Introduction
There are many websites that allow you to upload images and later view them after the upload is complete. I was working on a similar website and needed the same functionality. Unfortunately, I was not intrigued by the idea of viewing the images after the upload. I wanted to view the images as soon as I select them from my hard drive. This will give me a better idea of what I am about to upload. In this article I will demonstrate how to create a simple page that allows you to view the image as soon as you select it from your hard drive.
The Idea:
Let’s first discuss how we are going to accomplish this task. First we need a page which will allow the user to select a file. Once, the user has selected the file we upload the file to the server’s folder and return the user with the url of the image that corresponds to the server’s folder. Once, we get the url we will create child image controls and add to our container. We will use the <DIV> element as our container which will contain other <DIV> elements which in turn will contain the image elements.
Uploading the Image to the Server’s Folder:
The uploading of the image is performed by ASP.NET 2.0 Client Callbacks. If you are not familiar with client callbacks then I suggest that you take a look at my article Client Callbacks in ASP.NET 2.0. The callback is fired as soon as the file is selected by the user using the file field control.
Select a file:
<input id="File1" runat="server" onchange="PopulateList(this)" name="File1"
       type="File" />
The PopulateList function is fired on the onchange event of the file field control.
function PopulateList(obj)
{
filePath = obj.value;
CallServer(obj.value,'');
}
Another important point to note is that we are capturing the file path from the file field control into a public variable “filePath”. The CallServer function fires the server’s method which is responsible for uploading the file. Once, the CallServer function is fired it calls the RaiseCallbackEvent method.
public void RaiseCallbackEvent(string eventArgument)
    {
        if (!String.IsNullOrEmpty(eventArgument))
        {
            returnValue = eventArgument;
        }

    }
The returnValue is a global protected variable which stores the file path that the user has selected.
The GetCallbackResult method is responsible for uploading the file to the server’s folder. The “Images” folder is the server folder where we need to upload all the selected images.
public string GetCallbackResult()
    {
        string fileName = System.IO.Path.GetFileName(returnValue);
        string path = Server.MapPath("Images/");
        string fullPath = path + fileName;

        Stream s = File.OpenRead(returnValue);

        byte[] buffer = new byte[s.Length];
        s.Read(buffer, 0, (int) s.Length);

        int len = (int) s.Length;

        s.Dispose();
        s.Close();

        FileStream fs = new FileStream(fullPath, FileMode.Create);
        fs.Write(buffer, 0, len);

        Bitmap bmp = new Bitmap(fs);


        if (System.IO.Path.GetExtension(returnValue).Equals(".gif"))
        {
            bmp.Save(fs, ImageFormat.Gif);
        }
        else
        {
            bmp.Save(fs, ImageFormat.Jpeg);
        }

        bmp.Dispose();

        fs.Dispose();
        fs.Close();

        return "Images/"+ fileName;
    }
The GetCallbackResult is the heart of the application. This method is responsible for reading the file into the buffer using the file path as selected by the user. Once, the file is read it is written back to the server’s folder as a jpeg or gif image. The GetCallbackResult method returns the new path to the file name to the ReceiveServerData function defined in the HTML code.
function ReceiveServerData(rValue)
{
newPath = rValue;
CreateNestedElements();
}
The new path is stored in the global variable called “newPath”. Finally, the CreateNestedElements() function is fired which appends the new child elements to the parent DIV “FileList”.
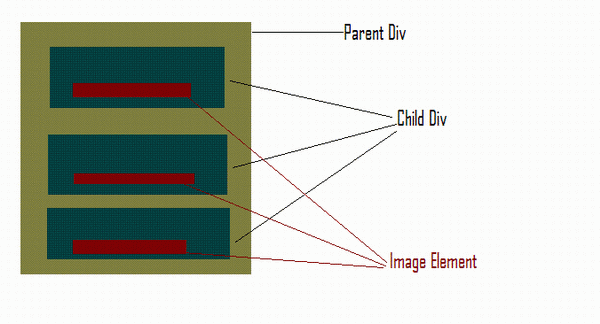
Creating Nested Elements:
Now, let’s see how we create nested elements. The idea is to have one parent div which is the “fileList”. The fileList (div) will contain several child div elements which will contain the delete button and the image element. The CreateNestedElements function is responsible for appending the new elements to the fileList div element.
function CreateNestedElements()
 {
    var obj = document.getElementById("fileList");

    var divElement = document.createElement('div');
    divElement.id = 'div' + counter;

    var deleteButton = document.createElement('button');
    deleteButton.value = 'Delete';
    deleteButton.innerHTML = 'Delete';
    deleteButton.onclick = DeleteItem;

    var imageObject = document.createElement('img');

    imageObject.src = newPath;

    var textNode = document.createTextNode(filePath);

    divElement.appendChild(textNode);
    divElement.appendChild(deleteButton);
    divElement.appendChild(imageObject);

    document.getElementById("fileList").appendChild(divElement);

    counter++;
 }
Each nested div element is given assigned an ID which uniquely identifies that element. Take a look at the image below:
Now, if you run the application you can select the image file from your hard drive and as soon as you select the image it will be displayed in the fileList element.

Aren’t the cats too cute?
Deleting the Selected Item:
Sometimes, you are not happy with your selection and want to delete an item from the list. Let’s see how to delete the selected item. When we created the delete button we also wired its onclick event.
var deleteButton = document.createElement('button');
    deleteButton.value = 'Delete';
    deleteButton.innerHTML = 'Delete';
    deleteButton.onclick = DeleteItem;
When the delete button is pressed the DeleteItem function is fired.
function DeleteItem(e)
{
var evt = e || window.event;
var evtTarget = evt.target || evt.srcElement;
if(evtTarget.parentElement) {
var childDiv = evtTarget.parentElement;
childDiv.parentElement.removeChild(childDiv);
}
else if(evtTarget.parentNode)
{
var childDiv = evtTarget.parentNode;
childDiv.parentNode.removeChild(childDiv);
}
}
The DeleteItem function takes the event as the parameter. First, we get the evtTarget which in our case will be the button control. Then we find its parent which will be a nested DIV. Finally, we remove the child DIV from the parent DIV. The DeleteItem function is browser compatible and will work for both IE and Mozilla.
Saving the Selected Files:
Here I am not talking about saving the selected images to the database but saving them so we can access them in the code behind. Once, we get the images in the code behind we can read them using their path and get a byte[] which can be saved in the database.
I am using a hidden field to hold all the selected paths.
<input type="hidden" id="list" runat="server" />
Also, note that the hidden field is marked with runat="server" attribute. This will make it possible to access the hidden field on the server side. The Save function is fired when we press the submit button.
function Save()
{
    document.getElementById("list").value = "";
    var path = '';

    var divObject = document.getElementById("fileList");

    var divChilds = divObject.childNodes;

    for(i=0; i<divChilds.length; i++)
    {

        var path = divChilds[i].innerHTML;
        var index = path.indexOf("<BUTTON>",0);

        document.getElementById("list").value += path.substring(0,index);
        document.getElementById("list").value += "|";
    }

}
Each image path is separated by a “|” symbol.
Accessing the Hidden Field on the Server Side:
The hidden field values are extracted in the Page_Load method.
string[] filePaths = null;

        HtmlInputHidden hiddenControl = (HtmlInputHidden)
                                               Page.FindControl("list");
        if (!String.IsNullOrEmpty(hiddenControl.Value))
        {
            filePaths = hiddenControl.Value.Split('|');

            SaveFilesToDB(filePaths);

        }
Once, we got all the filePaths we can send it to the SaveFilesToDB method to save the files in the database.
Conclusion
It is always good to provide the user with a preview of the image they are trying to upload. This also avoids confusion when uploading the images. You can also extend this article by adding validation and support for more image types.
I hope you liked the article, happy coding!
NOTE: The code to register the Client Callbacks is in the download.


 General
  News
News  Suggestion
  Question
  Bug
Bug  Answer
  Joke
Joke  Praise
  Rant
Rant  Admin
Admin 


