Introduction
We often need to create a Data Access Layer (DAL) which takes our business objects and performs CRUD (Create, Read, Update and Delete) in physical data store. If you have ever created the DAL, you will come to know how tedious it is to do it again and again. Also, it’s very time consuming to map our objects to the relational database. Here comes Object Relational Mapper (ORM).
Object Relational Mapping (ORM) is a technique by which we map our objects in Object Oriented Programming to get mapped to the underlying relational database. For example, if we have a student object with attributes Name, Age, Roll No, etc. and a database table name Student with columns Name, Age, Roll no, etc. In traditional approach, we will run an insert/update/delete/select query with scalar values to perform manipulations in database. But, what if we have the ability to directly save/remove/read/update the student object without thinking about the underlying database. The query itself is getting removed.
Why NHibernate?
NHibernate is an ORM framework which has the built in capability of concurrency checks, transactions, lazy loading (objects are not initialized until in use) and transparent persistence (allows to change the DAL without changing Domain Model). To download the latest version of NHibernate, visit NHibernate.
Let’s see the steps involved in configuring NHibernate to use in ASP .NET. Following are the common steps to be followed:
- Design your database
- Create your class files
- Create Mapping files to map class to database
- Create a Session Factory class
- Configure web.config file to use the datasource
- Create a
Service class for CRUD
Design Your Database
We start our example by creating a simple database name Students and creating a table name Student with following columns:

Note: The Id is auto generated.
Create the Class File (POCO Class)
Plain old CLR objects (POCO means that they do not need to inherit from or implement an interface) business entities are mapped into the table entity. We now create a class file with these columns as properties. The Id column will be read only as it is getting generated in the database as identity. Our class file would look like:
Public class Student
{
private string name;
private int id;
private DateTime dateofbirth;
private string address;
public int ID
{
get { return id; }
private set { id = value; }
}
public string Name
{
get { return name; }
set { name = value; }
}
public string Address
{
get { return address; }
set { address = value; }
}
public DateTime DateOfBirth
{
get { return dateofbirth; }
set { dateofbirth = value; }
}
}
Create Mapping Files
Once our class files and table design is complete, we need to create a mapping file which tells the framework what column to map with what properties in the class. It’s a simple XML file. The naming format of the file is Student.hbm.xml. Note the hbm in between student and xml.
="1.0″ encoding="
<hibernate-mapping
xmlns="urn:nhibernate-mapping-2.2″
namespace="NHibernate.Demo.Dal"
assembly="NHibernate.Demo.Dal">
<class name="Student" table="Student" lazy="false">
<id name="ID" column="id" unsaved-value="0″>
<generator />
</id>
<property name="Name">
<column name="Name" not-null="true" />
</property>
<property name="Address">
<column name="Address" not-null="true" />
</property>
<property name="DateOfBirth">
<column name="DateOfBirth" not-null="true" />
</property>
</class>
</hibernate-mapping>
From the above mapping, we can see that we first need to define the namespace and assembly where our class files are located and have the same namespace and assembly. Next the class tag attribute name takes class name and table attributes the database table name. Next the ID tag is the identification section to identify the identity column. It uses reflection to accomplish it so that only database is able to create those IDs. You see the ID tag is defined above differently. Inside this class tag, we define all the properties with property tag, where name is class property and column tag name is the table column name.
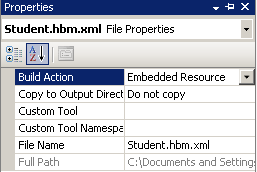
We need to change the build action to embedded resource so that it gets embedded in the assembly.

Define a Session Factory Class
This class will read all of the mapping files and configuration data and build a session that will enable you to talk to the database.
public class SessionFactory
{
private static NHibernate.ISessionFactory sFactory;
private static void Init()
{
NHibernate.Cfg.Configuration config = new NHibernate.Cfg.Configuration();
config.AddAssembly("NHibernate.Demo.Dal");
sFactory = config.BuildSessionFactory();
}
public static NHibernate.ISessionFactory GetSessionFactory()
{
if (sFactory == null)
{
Init();
}
return sFactory;
}
public static NHibernate.ISession GetNewSession()
{
return GetSessionFactory().OpenSession();
}
}
Configure web.config File to Use the datasource
We specify the database details with which we are making connection and the connection string in the web.config file. You also need to add reference to NHibernate.ByteCode.LinFu.dll and LinFu.DynamicProxy.dll which you can find in the NHibernate download.
<configSections>
<section name="hibernate-configuration"
    type="NHibernate.Cfg.ConfigurationSectionHandler, NHibernate"/>
</configSections>
<hibernate-configuration xmlns="urn:nhibernate-configuration-2.2″>
<session-factory>
<property name="connection.provider">
NHibernate.Connection.DriverConnectionProvider
</property>
<property name="dialect">
NHibernate.Dialect.MsSql2005Dialect
</property>
<property name="connection.driver_class">
NHibernate.Driver.SqlClientDriver
</property>
<property name="connection.connection_string">
Data Source=.\SQLEXPRESS;
AttachDbFilename=|DataDirectory|\QuickDemo.mdf;
Integrated Security=True;
User Instance=True
</property>
<property name="proxyfactory.factory_class">NHibernate.ByteCode.LinFu.ProxyFactoryFactory,
    NHibernate.ByteCode.LinFu</property>
</session-factory>
</hibernate-configuration>
Create a Service Class for CRUD
Finally, we need a service class which will talk to NHibernate and the datasource to perform operations. Operations like taking the list, inserting new record, etc.
public class StudentService
{
public static ICollection<Student> GetAllStudents()
{
using (NHibernate.ISession session = SessionFactory.GetNewSession())
{
return session.CreateCriteria(typeof(Student)).List<Student>();
}
}
public static void Add(Student student)
{
using (NHibernate.ISession session = SessionFactory.GetNewSession())
{
using (NHibernate.ITransaction transaction = session.BeginTransaction())
{
session.Save(student);
transaction.Commit();
}
}
}
}
As you can see, there is no single code written for query statements. This is because the NHibernate framework has taken care about the underlying process. NHibernate exposes two interfaces, IQuery and ICriteria, to perform query operations.
Download the complete project here.
