Introduction
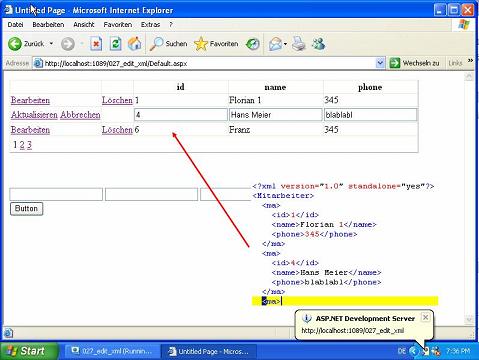
This short article shows how to edit XML files using a GridView control. Additionally, the user may create new records using some text fields and a button.
The XML document
Let's take a look at the structure of the XML file:
="1.0"="yes"
<Mitarbeiter>
<ma>
<id>1</id>
<name>Florian 1</name>
<phone>345</phone>
</ma>
...
</Mitarbeiter>
The document contains some records holding personal data. Each record has an ID, name, and a phone number.
The web form
First, we need some controls for the web form. We need a GridView to display, edit, and delete records from the XML file. The GridView will contain two command fields: ShowEditButton and SchowDeleteButton. To create new entries, I will use three TextBox fields for the columns of the record and a Button. Here is the code for the form:
<%@ Page Language="VB" AutoEventWireup="false"
  CodeFile="Default.aspx.vb" Inherits="_Default" %>
<!DOCTYPE html PUBLIC "-//W3C//DTD XHTML 1.0 Transitional//EN"
   "http://www.w3.org/TR/xhtml1/DTD/xhtml1-transitional.dtd">
<html xmlns="http://www.w3.org/1999/xhtml" >
<head runat="server">
    <title>Untitled Page</title>
</head>
<body>
    <form id="form1" runat="server">
    <div>
        <asp:GridView ID="GridView1" runat="server" AllowPaging="True" PageSize="3">
            <Columns>
                <asp:CommandField ShowEditButton="True" />
                <asp:CommandField ShowDeleteButton="True" />
            </Columns>
        </asp:GridView>
        <br />
        <br />
        <br />
        <asp:TextBox ID="txtId" runat="server"></asp:TextBox>
        <asp:TextBox ID="txtName" runat="server"></asp:TextBox>
        <asp:TextBox ID="txtTel" runat="server"></asp:TextBox><br />
        <asp:Button ID="Button1" runat="server" Text="Button" /></div>
    </form>
</body>
</html>
Page_Load and PageIndexChanging
In the PageLoad event, I have to bind the XML file to the GridView. To do this, I created a routine BindGrid() as I need to bind the GridView multiple times. In the BindGrid method, PhysicalApplicationPath is used to get the complete path to the XML file. Here is the code:
Protected Sub Page_Load(ByVal sender As Object, _
          ByVal e As System.EventArgs) Handles Me.Load
   If Page.IsPostBack = False Then
      BindGrid()
   End If
End Sub

Sub BindGrid()
   Dim oDs As New DataSet
   oDs.ReadXml(Request.PhysicalApplicationPath + "XMLFile.xml")
   GridView1.DataSource = oDs
   GridView1.DataBind()
End Sub
Next, I have to create an event handler to implement paging for the GridView. This is as easy as setting the PageIndex for the GridView to e.NewPageIndex.
Protected Sub GridView1_PageIndexChanging(ByVal sender As Object, _
         ByVal e As System.Web.UI.WebControls.GridViewPageEventArgs) _
         Handles GridView1.PageIndexChanging
   GridView1.PageIndex = e.NewPageIndex
   BindGrid()
End Sub
Deleting records
To delete records from the file is easy. I assign the DataSource from the GridView to a DataSet object. Then I delete the record the user has selected using the DeleteButton from the GridView. Lastly, I update the XML file and call BindGrid().
Protected Sub GridView1_RowDeleting(ByVal sender As Object, _
       ByVal e As System.Web.UI.WebControls.GridViewDeleteEventArgs) _
       Handles GridView1.RowDeleting
   BindGrid()
   Dim oDs As DataSet = GridView1.DataSource
   oDs.Tables(0).Rows(GridView1.Rows(e.RowIndex).DataItemIndex).Delete()
   oDs.WriteXml(Request.PhysicalApplicationPath + "XMLFile.xml")
   BindGrid()
End Sub
Updating records
Updating records is a little bit more work. First, I need to set the EditIndex for the GridView using e.NewEditIndex and call BindGrid again. This has to be done in the RowEditing event:
Protected Sub GridView1_RowEditing(ByVal sender As Object, _
        ByVal e As System.Web.UI.WebControls.GridViewEditEventArgs) _
        Handles GridView1.RowEditing
   GridView1.EditIndex = e.NewEditIndex
   BindGrid()
End Sub
Then, I implement the RowCancelingEvent. Very simple: I just have to set the EditIndex to -1 and bind the GridView.
Protected Sub GridView1_RowCancelingEdit(ByVal sender As Object, _
       ByVal e As System.Web.UI.WebControls.GridViewCancelEditEventArgs) _
       Handles GridView1.RowCancelingEdit
   GridView1.EditIndex = -1
   BindGrid()
End Sub
Now I need to create the code for the RowUpdating event. When this event fires, I have to get the changed values for the record from the GridView controls into temporary variables. This is done using a cast (CType) from cells to textboxes. Using the method .Text returns the current value of the control. Maybe, using FindControl is much better. Anyway, here is the code:
Protected Sub GridView1_RowUpdating(ByVal sender As Object, _
ByVal e As System.Web.UI.WebControls.GridViewUpdateEventArgs) _
Handles GridView1.RowUpdating
Dim i As Integer = GridView1.Rows(e.RowIndex).DataItemIndex
Dim strId As String = CType(GridView1.Rows(e.RowIndex).Cells(2).Controls(0), TextBox).Text
Dim strName As String = CType(GridView1.Rows(e.RowIndex).Cells(3).Controls(0), TextBox).Text
Dim strTel As String = CType(GridView1.Rows(e.RowIndex).Cells(4).Controls(0), TextBox).Text
GridView1.EditIndex = -1
BindGrid()
Dim oDs As DataSet = GridView1.DataSource
oDs.Tables(0).Rows(i).Item(0) = strId
oDs.Tables(0).Rows(i).Item(1) = strName
oDs.Tables(0).Rows(i).Item(2) = strTel
oDs.WriteXml(Request.PhysicalApplicationPath + "XMLFile.xml")
BindGrid()
End Sub
When I get the changed values, I reset the EditIndex to -1 and bind the GridView. Then, I assign the DataSource from the GridView to a DataSet and update the values in the DataSet. Lastly, the new DataSet is written to the XML file.
Creating new records
Lastly, I have to create new records. To do this, I use three TextBoxes and a Button. When the button is clicked, I create a DataSet from the DataSource of the GridView. Next, I call the method Tables(0).NewRow and assign the values to the created DataRow. In the end, I Add the new DataRow to the DataSet and write the XML file using oDs.WriteXml.
Protected Sub Button1_Click(ByVal sender As Object, _
           ByVal e As System.EventArgs) Handles Button1.Click
   BindGrid()
   Dim oDs As DataSet = GridView1.DataSource
   Dim oDr As DataRow = oDs.Tables(0).NewRow
   oDr("id") = txtId.Text
   oDr("name") = txtName.Text
   oDr("phone") = txtTel.Text
   oDs.Tables(0).Rows.Add(oDr)
   oDs.WriteXml(Request.PhysicalApplicationPath + "XMLFile.xml")
   BindGrid()
End Sub
Creating new records
That's it - storing data in XML files is very easy. It is also great for deployment as we can just copy the file to the desired location. But, a short warning about this solution: it does not support transactions. The last one who stores the file will win!!!
Maybe you are interested in a screen-cast about editing XML using a GridView: http://dotnet-visions.de.z.seekdotnet.com/blog/index.php?entry=entry061207-022305 (in German only).
