Introduction
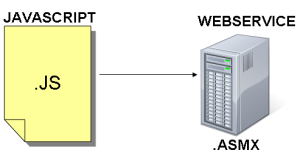
A proxy class is a script that is automatically generated by the server and downloaded to the browser at page-load time. The proxy class provides a client object that represents the exposed methods of a Web Service. The calls are made asynchronously, through the XMLHTTP object.
There are two approaches to making a Web Service request:
- Call Web Services by using the HTTP POST verb. A POST request has a body that contains the data that the browser sends to the server. It does not have a size limitation. Therefore, you can use a POST request when the size of the data exceeds the intrinsic size limitation for a GET request. The client serializes the request into JSON format and sends it as POST data to the server. The server deserializes the JSON data into the .NET Framework types and makes the actual Web Service call. During the response, the server serializes the return values and passes them back to the client, which deserializes them into JavaScript objects for processing.
- Call Web Services by using the HTTP GET verb. This resembles the functionality of a POST request, with the following differences:
- The client uses a query string to send the parameters to the server.
- A GET request can only call a Web Service method that is configured by using the
ScriptMethodAttribute attribute. - Data size is limited to the URL length allowed by the browser.
Background
Before trying out the tutorial, it is very important for you to understand the AJAX methodology and how the REST architecture works.
Using the code
I have used .NET Framework 4.0 to develop the example. You might have to change some code if you are using an earlier version. Before you start using the example, you must have the Microsoft AJAX Extension Toolkit pre-installed.
- Create an ASP.NET Web Application or an ASP.NET AJAX enabled application.
- Add a new Web Service Item to the project.
- You will see a default
HelloWorld () method implemented in the Web Service. But we will implement our own. - Copy this code into the class. Over here, the
[WebMethod] attribute signifies that the method will be available via a Web Service for calls. The [ScriptMethod] attribute signifies that the GET calls to this method will be available via JavaScript.
[WebMethod]
[ScriptMethod(UseHttpGet = true)]
public  string Add(int a, int b)
{
    return (a + b).ToString();
}
- Test your Web Service by running the program. The Web Service will need to be called if it is not selected with "Set as start page". Remember that you should create the application in IIS in order to avoid dynamic port related errors later.
- Now if everything works fine, then we will generate the client proxy JS file. It will automatically be created from the server. Therefore, type in the browser the URL http://localhost/webservicename.asmx/js. On calling this URL, the system will ask you to save the file. Which you can save in your scripts folder. Remember to store the file with a ".js" extension.
- Please put the following lines in your web.config.
<httpHandlers >
  <remove verb="*" path="*.asmx"/>
  <add verb="*" path="*.asmx"
  type="System.Web.Script.Services.ScriptHandlerFactory"
  validate="false"/>

  <add verb="GET,HEAD" path="ScriptResource.axd"
       type="System.Web.Handlers.ScriptResourceHandler, System.Web.Extensions,
             Version=4.0.0.0, Culture=neutral,PublicKeyToken=31BF3856AD364E35"
       validate="false"/>
</httpHandlers>
The type System.Web.Script.Services.ScriptHandlerFactory might need to be changed depending upon the framework you are using. If you run into a type error, then you can easily Google it up or message me.
- Put the following code in your code-behind (default.aspx.cs). Basically, we are calling the WebService from an ASP.NET page.
MyService obj = new MyService();
protected void Page_Load(object sender, EventArgs e)
{
ptag.InnerHtml = obj.Add(1, 2);
}
- Test the application to see if everything works well. If everything prints well, then it means that you have successfully implemented the Web Service and called it from the server side.
- Now we will call it from the client side, which means from JavaScript. This functionality is provided by the
ScriptManager control which is part of the AJAX Extension Toolkit. - Add a
ScriptManager to your page. There can be only one ScriptManager in a page. Input the following code within the ScriptManager control code:
<asp:ScriptManagerProxy ID="ScriptManagerProxy1" runat="server">
    <Scripts>
        <asp:ScriptReference Path="~/Scripts/ClientProxy.js"/>
    </Scripts>
    <Services>
        <asp:ServiceReference  Path="~/MyService.asmx"/>
    </Services>
</asp:ScriptManagerProxy>
The ScriptReference path should contain the path to the generated JS file [mentioned in point 6]. The ServiceReference should contain the path to the WebService.
- On the same page, you need to have a reference to the Microsoft AJAX library. Below that is the dynamic reference to the JavaScript which will be generated by the server. Remember to have the same order of inclusion for these files.
<script src="Scripts/MicrosoftAjax.js" type="text/javascript"></script>
<script src="MyService.asmx/js" type="text/javascript"></script>
- Implement the following code in your
head area:
<script language="javascript" type="text/javascript">
function Button1_onclick() {
ClientProxySample.MyService.Add(10, 20, OnsuccessComplete, null, null);
}
function OnsuccessComplete(result) {
alert(result);
}
</script>
<input id="Button1" type="button" value="Call Webservice via proxy"
onclick="return Button1_onclick()" />
Basically, we have created a function named Button1_onclick() which will be called by the onclick event of a button. The second line is the call to the Add method of the Web Service. ClientProxySample is the namespace. If you have referenced the code properly, then you will get the namespace and classes through intellisense. OnsuccessComplete(result) will get executed if the WebService is successfully called.
- Run the program and ta-da. You should get an alert with the result from the WebService that was called from the client side.
Points of interest
While testing the code in Fiddler, I was easily able to see the data being sent over the wire. This can be secured by implementing SSL. You can also use a proxy class generated by the WSDL tool.
