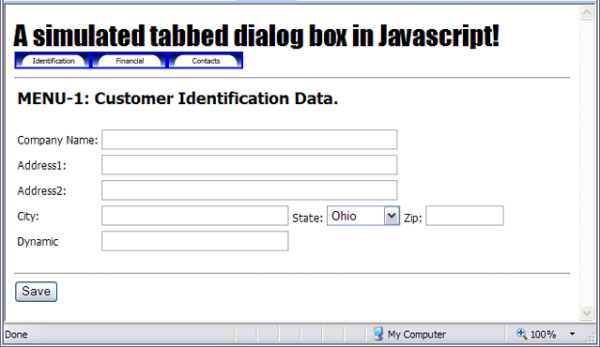
Introduction
There are a number of server-based technologies that make web programming simpler by providing a set of controls that implement the types of controls that have existed on client-based applications for a long time. One of those controls that helps organize a larger volume of data is the tabbed dialog control. But, what if you are using a technology that does not have a server-based tabbed dialog control? This article describes how to implement what appears to the user as a tabbed dialog box using only JavaScript, running completely on the client.

Background
The functionality of the tabbed dialog box control requires one or more tabs that the user clicks on to display the data for that tab. Typically, each tab represents a subset of the entire data to be operated on. For example, there may be too much data about a customer to display at one time. A tabbed dialog box could segment the customer data into demographic data (name, address, city, state, zip, etc.), contact data (primary contact, secondary contact, etc.), and other data (credit limit, account balance, payment history, etc.). Each of the segments (demographic, contact, and other) would have a tab. When the particular tab is clicked, only the data in that segment would display. All other data would be hidden.
Today, there is no HTML object that implements a tabbed dialog box. But we can simulate one with just a little JavaScript.
Using the code
The essence of a tabbed dialog box is that data items are grouped together and displayed only when the particular tab is clicked. Data in other groups is hidden from the user. To do this in JavaScript requires that we use an HTML tag that allows us to group data together. That tag is the <DIV> which allows us to group data items together that belong in a group. The other requirement is that we must be able to display and hide groups of data so that only one group is visible at one time.
To identify one <DIV> from another, we'll need to include the ID attribute. We can use any value for the ID that we want, but each div must have a unique ID value. The div tag would look something like this:
<DIV id="demoTabId"> ... </div>
Making data invisible
At first glance, we might be tempted to use the visibility style attribute, but that won't work for what we want. The visibility style attribute could make our data invisible, but it would still take up the same space on the page. We don't want that! We want whatever data is visible to display in the same location on the page. To make the data invisible and not take up any space on the page, we'll use the display style attribute. Setting the display style attribute to none will make it invisible, plus it won't take up any space on the page. Just what we want.
The tabs
Implementing the tabs is easy. If we don't care that they actually look like tabs, we can use normal HTML buttons. The buttons would be defined like this:
<INPUT Type="button" Value="Demographics" OnClick="javascript:displayTab('demoTab');">
If we want the tabs to actually look like tabs, we'll probably use a set of images that are created to look like tabs. The OnClick event of the <IMG> control would be the same as that of the button control above.
The JavaScript code
The JavaScript code that does the actual work is pretty simple. For the tab to show, the code will set [ctrlId].style.display='block', plus we'll set the other tabs to [ctrlId].style.display='none'. It looks like this:
function displayTab(tab)
{
demoTabId.style.display = "none";
contactTabId.style.display = "none";
otherTabId.style.display = "none";
var ctrl = document.getElementById(tab)
ctrl.style.display = "block";
}
Calling this JavaScript code passing the ID value of the div tag will display only the selected tab and hide all the others.
Summary
Simulating a tabbed dialog box using only JavaScript is an easy and effective way to display only the data your user wants to see and operate on.
