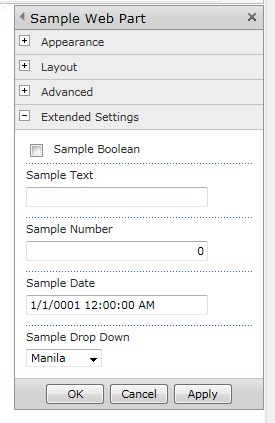
Before reading this article, I assume you already know how to create your own WebParts in SharePoint and is looking for some way to create a property for that WebPart that you can easily Set and Get from your application, like the one on the image below:

but if not, please read this post regarding Developing Web Parts first to avoid confusion. But if you already know what to do, then continue on.
First, on your WebPart class (yellow highlight), and not the User Control class (green highlight), define your properties:

For this example, I will show you how to define a text, boolean, integer, date/time, and enumeration property:
[ToolboxItemAttribute(false)]
public class Sample_Web_Part : WebPart
{
private const string _ascxPath =
@"~/_CONTROLTEMPLATES/Sample_Project/" +
@"Sample Web Part/Sample Web PartUserControl.ascx";
protected override void CreateChildControls()
{
Control control = Page.LoadControl(_ascxPath);
Controls.Add(control);
}
public static Boolean SampleBoolean;
[Category("Extended Settings"),
Personalizable(PersonalizationScope.Shared),
WebBrowsable(true),
WebDisplayName("Sample Boolean"),
WebDescription("Please Choose a Sample Boolean")]
public Boolean _SampleBoolean
{
get { return SampleBoolean; }
set { SampleBoolean = value; }
}
public static string SampleText;
[Category("Extended Settings"),
Personalizable(PersonalizationScope.Shared),
WebBrowsable(true),
WebDisplayName("Sample Text"),
WebDescription("Please Enter a Sample Text")]
public string _SampleText
{
get { return SampleText; }
set
{
Regex oRegEx = new Regex("[a-zA-Z]+");
if (!oRegEx.IsMatch(value))
throw new Microsoft.SharePoint.WebPartPages.
WebPartPageUserException(
"Please enter alphabeth characters only");
SampleText = value;
}
}
public static int SampleNumber;
[Category("Extended Settings"),
Personalizable(PersonalizationScope.Shared),
WebBrowsable(true),
WebDisplayName("Sample Number"),
WebDescription("Please Enter a Sample Number")]
public int _SampleNumber
{
get { return SampleNumber; }
set { SampleNumber = value; }
}
public static DateTime SampleDate;
[Category("Extended Settings"),
Personalizable(PersonalizationScope.Shared),
WebBrowsable(true),
WebDisplayName("Sample Date"),
WebDescription("Please Enter a Sample Date")]
public DateTime _SampleDate
{
get { return SampleDate; }
set { SampleDate = value; }
}
public enum CityEnum { Manila, Berlin, Auckland, Zurich };
public static CityEnum SampleDropDown;
[Category("Extended Settings"),
Personalizable(PersonalizationScope.Shared),
WebBrowsable(true),
WebDisplayName("Sample Drop Down"),
WebDescription("Please Choose a Sample DropDown")]
public CityEnum _SampleDropDown
{
get { return SampleDropDown; }
set { SampleDropDown = value; }
}
}
If you notice, each property you create has attributes:
Category – This will group your property according to category. If not declared, “Miscellaneous” will be used as the default. Personalizable – How the WebPart is configured, which can be per-user (PersonalizationScope.User), or for everyone (PersonalizationScope.Shared). For this example, we have chosen all users. WebBrowsable – This will hide or show the property on the tool pane. WebDisplayName – Label for the property. WebDescription – Description for the property.
You might also notice that we have validation on the codes. You can add your own like the one on the SampleText property where we implemented a Regular Expression, or even in SampleNumber. It is by default validated by its type so you cannot save once it has illegal values.

So the final step is consuming that property in your WebPart; you can do it easily like:.

