Introduction
Tree structures are part of today's interactive web development. These structures allow us to show hierarchical information on our web pages. To accomplish such structures, nothing is easier than using the tree view control shipped by Microsoft within ASP.NET 2.0. This tree control has the ability to consume hierarchical data sources like XML files and then display the information.
The client-side user can expand and collapse nodes and click on nodes to send requests to the server. Today's need for user interaction is much higher than that provided by the tree view control. This control would have more flexibility if the programmers were able to capture several other client-side events, thus providing the users more advanced features on the tree structure.
In this article, I am going to show:
- How to capture the right click event on the node of the tree
- How to produce a custom context menu on right click
Background
We know that all Microsoft server-side controls are rendered as HTML/DHTML with a combination of JavaScript on the browser. If we can combine JavaScript with the HTML rendered by the tree view control, we will be able to accomplish our task.
Tree View HTML Rendering
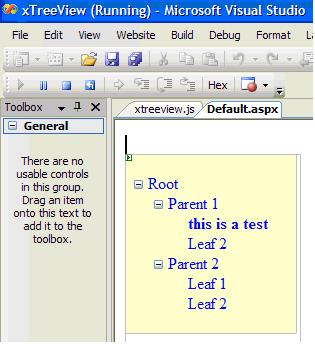
The programmer can decide to create a tree view with the help of the tools available in Visual Studio or can program the tree view in the source. This is the tree view that we are going to use in our example:

ASP Code
<asp:TreeView ID="TreeView1" runat="server" BackColor="#FFFFC0" Height="180px"
    Width="172px">
    <Nodes>
        <asp:TreeNode Text="Root" Value="sroot">
            <asp:TreeNode  Text="Parent 1" Value="sParent 1">
                <asp:TreeNode Text="this is a test" Value="sLeaf 1" >
                </asp:TreeNode>
                <asp:TreeNode Text="Leaf 2" Value="sLeaf2">
                </asp:TreeNode>
            </asp:TreeNode>
            <asp:TreeNode Text="Parent 2" Value="sParent2">
                <asp:TreeNode Text="Leaf 1" Value="sLeaf 1">
                </asp:TreeNode>
                <asp:TreeNode Text="Leaf 2" Value="sLeaf 2">
                </asp:TreeNode>
            </asp:TreeNode>
        </asp:TreeNode>
    </Nodes>
</asp:TreeView>
When viewed on the browser, the whole tree is rendered as a nested HTML TABLE and DIV with some JavaScript. A typical tree node...
<asp:TreeNode Text="this is a test" Value="sLeaf 1" ></asp:TreeNode>
...is rendered as:
<table cellpadding="0" cellspacing="0" style="border-width:0;">
<tr>
<td>
<div style="width:20px;height:1px"></div>
</td>
<td>
<div style="width:20px;height:1px"></div>
</td>
<td>
<img
src="http://www.mydomain.com/xTreeView/
WebResource.axd?d=EiQ7rX7B8TmWKbku-S5G9ciFFidk-r05cDK5-
8iUkl41&t=633045505810781250" alt="" />
</td>
<td style="white-space:nowrap;">
<a class="TreeView1_0"
href="javascript:__doPostBack('TreeView1',
'ssroot\\sParent 1\\sLeaf 1')"
onclick="TreeView_SelectNode(TreeView1_Data, this,
'TreeView1t2');" id="TreeView1t2"> this is a test
</a>
</td>
</tr>
</table>
The Trick
As we can see, the node text "this is a test" is rendered inside an anchor <a> tag. There is a number of text formatting tags that support JavaScript and that can be nested inside the anchor tag. For example, the bold tag <b>. The HTML would still be in correct format if we can embrace the node text inside tags that can be nested inside the <a></a> tag, so that the HTML rendering of the node looks like this:
<a class="TreeView1_0"
    href="javascript:__doPostBack('TreeView1','ssroot\\sParent
    1\\sLeaf 1')" onclick="TreeView_SelectNode(TreeView1_Data,
    this,'TreeView1t2');" id="TreeView1t2">
    <b> this is atest</b>
</a>
The bold tag also supports a number of browser events like click, double click, mouse over, etc. Any of the events can be used in the tag, but we are interested in the event oncontextmenu. This event fires up whenever the user right clicks on the browser to bring up the context menu. Therefore in our tag we can call any JavaScript function on this event. Thus, our tag now looks like this:
<b oncontextmenu="return showmenuie5(event)" > this is a test</b>
This kind of HTML rendering can easily be achieved by writing the complete HTML as the node text. Thus, in the tree code the node looks like this:
<asp:TreeNode Text="<b id='b1' oncontextmenu="return
showmenuie5(event)" > this is a test</b>"
Value="sLeaf 1" >
</asp:TreeNode>
Alternatively, in the text property of the node you can write the HTML:
<b oncontextmenu="return showmenuie5(event)" > this is a test</b>
Building the Menu
Once we are able to capture the contextmenu event, we want to produce our own menu instead of the default browser context menu. We can write any HTML combination within the DIV tags. This DIV division/section in the document can be moved around the document with the help of JavaScript.
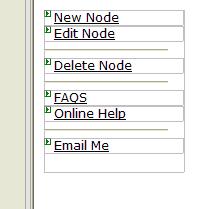
We can also use the ASP panel control. When this control is rendered, it is rendered as DIV division with the same ID and the panel control's ID. Therefore we can safely write our JavaScript function using the ID. Using the panel will allow more simplicity in building the menu and controlling the menu object through ASP.NET 2.0. features. The menu that we have used in this example is:

In the ASP code, we would like to add more functionality to make the menu more interactive:
<asp:Panel ID="Panel2"  runat="server" display:none BorderColor="Black"
    CssClass="skin0" onMouseover="highlightie5(event)"
    onMouseout="lowlightie5(event)" onClick="jumptoie5(event)"  >
<div class="menuitems"><asp:LinkButton ID="LinkButton1" runat="server"
    CssClass="menuitems" >New Node</asp:LinkButton></div>
<div class="menuitems"><asp:LinkButton ID="LinkButton2" runat="server"
    CssClass="menuitems">Edit Node</asp:LinkButton></div>
<hr />
<div class="menuitems"><asp:LinkButton ID="LinkButton3" runat="server"
    CssClass="menuitems">Delete Node</asp:LinkButton></div>
<hr />
<div class="menuitems"><asp:LinkButton ID="LinkButton4" runat="server"
    CssClass="menuitems">FAQS</asp:LinkButton></div>
<div class="menuitems"><asp:LinkButton ID="LinkButton5" runat="server"
    CssClass="menuitems">Online Help</asp:LinkButton></div>
<hr />
<div class="menuitems"><asp:LinkButton ID="LinkButton6" runat="server"
    CssClass="menuitems">Email Me</asp:LinkButton></div>
</asp:Panel>
JavaScript Overview
Before we begin with writing the JavaScript for our context menu function, I would like to give an overview of some JavaScript objects and their properties that will help us in bringing our right click menu.
Document: Document is the parent object of numerous other objects, such as "images", "forms" etc.
|
document.getElementById("ID")
| A cross-browser (IE5+/NS6+) DOM method for accessing any element on the page via its ID attribute.
|
document.body.clientWidth
document.body.clientHeight
| Specifies the width and height, in pixels, of the window's content area respectively. Read/Write. Does not include the toolbar, scrollbars, etc.
NS4 and NS6 equivalent are
window.innerWidth, window.innerHeight
|
document.body.scrollLeft
document.body.scrollTop
| Returns an integer representing the pixels the current document has been scrolled from the upper left corner of the window, horizontally and vertically, respectively. NS4 and NS6+ IE4+ equivalents are window.pageXOffset and window.pageYOffset
|
Event: The Event object (IE5+/NS6+) keeps tracks of various events that occur on the page, such as the user moving the mouse or clicking on the link, and allows the programmer to react to them.
|
event.clientX
event.clientY
| Returns the mouse coordinates at the time of the event relative to upper-left corner of the window
|
event.cancelBubble
| Set to true to prevent the event from bubbling.
NS equivalent stopPropagation()
|
| |
Object.offsetWidth
Object.offsetHeight
| Retrieves the width and height of the object relative to the layout or coordinate parent, as specified by the offsetParent property.
|
Style: The Style object of the DOM allows you to dynamically change the values of your CSS properties, whether defined inline or via an external style sheet. The changes are instantly reflected on the page
|
Event Bubbling
Internet Explorer 4.0x+ initially directs an event to its intended target. For example, if a button is clicked, the click event is directed to the button. The event invokes an event handler if one is defined for that object. If no event handler is defined to take care of the event, or if the event handler does not return false (to cancel the event), the event proceeds to the parent object for handling. The event bubbles up the object hierarchy until it is handled, or until it reaches the topmost level, the document object.
We are able the capture the oncontextmenu event and with the help of our JavaScript, we will also be able to produce a custom menu. However, at the same time, we need to stop the browser's default menu from coming up. The most important feature in Internet Explorer 4.0x+'s new event model is the event bubbling mechanism. In order to cancel bubbling for a specific event, we must set the cancelBubble property of the event object to true:
window.event.cancelBubble = true;
cancelBubble is a read-write property that takes a Boolean value. Its default value is false, specifying that the event should be bubbled up the hierarchy as usual. However, if explicitly set to true, the event isn't bubbled, preventing the next event handler in the hierarchy to receive the event.
Another way to stop an event from bubbling is to entirely cancel the event by returning false in its event handler script or event processing function. However, unlike canceling bubbling for an event, if you cancel the event itself the default action associated with the event does not take place.
The JavaScript showmenuie5(event) Function
var ie5=document.all&&document.getElementById
var ns6=document.getElementById&&!document.all
if (ie5||ns6)
var menuobj=document.getElementById("Panel2")
function showmenuie5(e){
var rightedge=ie5? document.body.clientWidth-event.clientX :
window.innerWidth-e.clientX
var bottomedge=ie5? document.body.clientHeight-event.clientY :
window.innerHeight-e.clientY
if (rightedge<menuobj.offsetWidth)
menuobj.style.left=ie5?
document.body.scrollLeft+event.clientX-menuobj.offsetWidth :
window.pageXOffset+e.clientX-menuobj.offsetWidth
else
menuobj.style.left=ie5? document.body.scrollLeft+event.clientX :
window.pageXOffset+e.clientX
if (bottomedge<menuobj.offsetHeight)
menuobj.style.top=ie5?
document.body.scrollTop+event.clientY-menuobj.offsetHeight :
window.pageYOffset+e.clientY-menuobj.offsetHeight
else
menuobj.style.top=ie5? document.body.scrollTop+event.clientY :
window.pageYOffset+e.clientY
if(ie5)
window.event.cancelBubble = true;
else if(ns6)
e.stopPropagation();
menuobj.style.visibility="visible"
return false
}
The Output

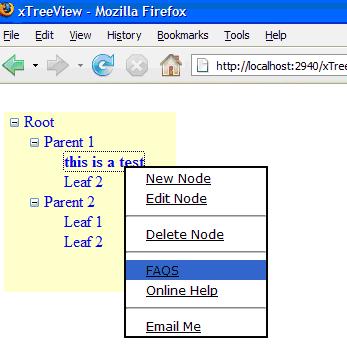
Although this article demonstrates the capture of right click events on the tree node and producing a menu, the concepts in this article can be applied for many other user-interactive effects on web pages, like mouse-over effects on links to show little information dialog, draggable dialogs on the web page, etc.
History
- 26 May, 2007 -- Original version posted
