Introduction
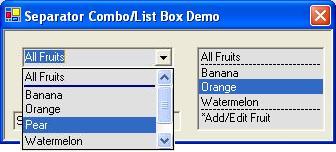
This article would be a late follow-up to my previous article, A Separator Combo Box, regarding a control class derived from MFC CCombobox. Since it was posted, several readers have asked for a similar separator combo box in C#. While touching C# programming, I found it easier to write such a custom combo box control as shown in above screen shot. The main point in implementing the separator in a combo box is that a separator should not be selected either from UI or in code logic. We have two choices: let a separator occupy an item space or let a separator reside between items without extra space. I like the latter; it simply draws a line between items, saving space for the whole combo box.
Since both combo box and list box are derived from Windows.Forms.ListControl, they have the same virtual OnDrawItem() and OnMeasureItem() functions available in my customization. Here, the implementation of adding a separator to the combo box can also be applied to the list box. So, I present both SeparatorComboBox and SeparatorListBox, giving the demo as you see it in the screen shot. For simplicity, I only discuss the combo box in the following sections.
Using SeparatorComboBox
Suppose that comboBox1 is a SeparatorComboBox object. Let's add the items as a string:
comboBox1.AddString("All Fruits");
comboBox1.AddString("Banana");
comboBox1.AddString("Orange");
comboBox1.AddString("Pear");
comboBox1.AddString("Watermelon");
comboBox1.AddString("*Add/Edit Fruit");
For your convenience, AddString() is simply a wrapper for Items.Add() in ComboBox. Next, set the separator positions like this:
comboBox1.SetSeparator(1);
comboBox1.SetSeparator(-1);
As shown in the image, SetSeparator(1) sets a separator before the item "Banana" at index 1. The second line sets at position -1, meaning a separator set at the last item. That is: before "*Add/Edit Fruit". This is the method to set a separator by position, a zero-based index. However, if you need to update a combo box by insertion, deletion, or sorting, then setting by position is not appropriate. I provide another method to set a separator by content. Thus, in this example, instead of using:
comboBox1.AddString("*Add/Edit Fruit");
comboBox1.SetSeparator(-1);
You can set a separator related to the text "*Add/Edit Fruit" like this:
comboBox1.AddStringWithSeparator("*Add/Edit Fruit");
Then a separator is always stuck on "*Add/Edit Fruit", regardless of its position. To summarize, SeparatorComboBox has three methods as follows:
AddString(string s): Appends a string item, equivalent to Items.Add(s).AddStringWithSeparator(string s): Adds a string item with a separator before the text s.SetSeparator(int pos): Adds a separator by a zero-based index position or by a negative from the bottom.
In addition, SeparatorComboBox provides five optional properties for visual effects:
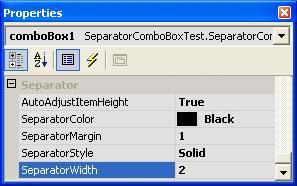
DashStyle SeparatorStyle: Sets the separator style defined in DashStyle, such as solid, dot, dash, etc. Default is DashStyle.Solid.Color SeparatorColor: Sets the separator color defined in Color. Default is Color.Black.int SeparatorWidth: Sets the separator width based on the default unit, e.g., in pixels. Default is 1.int SeparatorMargin: Sets the separator horizontal margin at both ends. Default is 1.bool AutoAdjustItemHeight: Indicates whether you allow automatic adjustment for the item height based on SeparatorWidth. Default is false.
For the demo combo box, I call:
comboBox1.SeparatorColor = Color.DarkBlue;
comboBox1.SeparatorWidth = 2;
comboBox1.AutoAdjustItemHeight = true;
I leave SeparatorStyle as solid and SeparatorMargin to 1. To make greater intervals between items, I set AutoAdjustItemHeight to true. As for the list box in the demo, I use default values for SeparatorColor (black), SeparatorWidth (1), AutoAdjustItemHeight (false) and call:
listBox1.SeparatorStyle = DashStyle.Dash;
listBox1.SeparatorMargin = 2;
Alternatively, you can set five properties in the form designer:

Implementations
The main job is to override OnDrawItem() and draw a line between items. Yet before drawing, we should have an information collection ready for all separators. This is the _separators ArrayList, a heterogeneous container storing positions or stings for all separators:
public void SetSeparator(int position)
{
    _separators.Add(position);
}

public void AddStringWithSeparator(string s)
{
    Items.Add(s);
    _separators.Add(s);
}
In OnDrawItem(), I search _separators to find a match for the current index passed from the DrawItemEventArgs parameter. This is done by comparing either a string or a position:
protected override void OnDrawItem(DrawItemEventArgs e)
{
if (-1 == e.Index) return;
bool sep = false;
object o;
for (int i=0; !sep && i<_separators.Count; i++)
{
o = _separators[i];
if (o is string)
{
if ((string)this.Items[e.Index] == o as string)
sep = true;
}
else
{
int pos = (int)o;
if (pos<0) pos += Items.Count;
if (e.Index == pos) sep = true;
}
}
e.DrawBackground();
Graphics g = e.Graphics;
int y = e.Bounds.Location.Y +_separatorWidth-1;
if (sep)
{
Pen pen = new Pen(_separatorColor, _separatorWidth);
pen.DashStyle = _separatorStyle;
g.DrawLine(pen, e.Bounds.Location.X+_separatorMargin, y,
e.Bounds.Location.X+e.Bounds.Width-_separatorMargin, y);
y++;
}
Brush br = DrawItemState.Selected == (DrawItemState.Selected & e.State)?
SystemBrushes.HighlightText: new SolidBrush(e.ForeColor);
g.DrawString((string)Items[e.Index], e.Font, br, e.Bounds.Left, y+1);
base.OnDrawItem(e);
}
Now, if an item has a separator, I draw a line along the top of its boundary with the properties of _separatorColor, _separatorWidth, _separatorStyle, and _separatorMargin. Finally, regardless of whether a separator is drawn or not, I have to draw the item text myself. To adjust item height automatically, I override OnMeasureItem() like this:
protected override void OnMeasureItem(MeasureItemEventArgs e)
{
    if (_autoAdjustItemHeight)
        e.ItemHeight += _separatorWidth;

    base.OnMeasureItem(e);
}
The caveat: Because OnMeasureItem() is getting called each time, immediately after an item is added or inserted, you must set SeparatorWidth and AutoAdjustItemHeight right before calling AddString() and AddStringWithSeparator(). Otherwise, you can't achieve expected results. Also, e.ItemHeight is the original item height that you may initialize manually in code or in the designer.
Points of interest
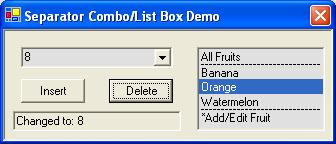
As a derived class, SeparatorComboBox inherits all public members from ComboBox. In the demo, I create a handler for the event SelectedIndexChanged and a handler for TextChanged, since I set the DropDown combo box style. Also, I add the Insert and Delete buttons to call ComboBox's methods.

Here, the code is nothing different from that using ComboBox directly. When trying insertion and deletion, you can verify two different separators: if set by position it always sticks on a specified index, and if set with content it always sticks on that specified text.
private void comboBox1_SelectedIndexChanged(object sender, System.EventArgs e)
{
    textBox1.Text = "Selected: " +comboBox1.SelectedItem;
}

private void comboBox1_TextChanged(object sender, System.EventArgs e)
{
    textBox1.Text = "Changed to: " +comboBox1.Text;
}

private void buttonInsert_Click(object sender, System.EventArgs e)
{
    comboBox1.Items.Insert(comboBox1.Items.Count, comboBox1.Text);
}

private void buttonDelete_Click(object sender, System.EventArgs e)
{
    try
    {
        int n = int.Parse(comboBox1.Text);
        if (n>comboBox1.Items.Count-1) throw new Exception();
        comboBox1.Items.RemoveAt(n);
    }
    catch (Exception)
    {
        MessageBox.Show("Please enter a valid index to delete an item.",
            "Error");
    }
}
These are just trivial samples. To fit your needs, you have to fine-tune your boxes. The only unsatisfactory aspect I noticed in the combo box is that if AutoAdjustItemHeight is set to true, the height of the dropdown list is not correctly calculated. This causes a vertical scroll bar always appearing, even with fewer items.
History
- 28 May, 2007 - Original version posted
