Introduction
In this article, I will cover creating a simple Outlook add-in as well as the setup project to get it installed.
Background
It has always driven me crazy to have that little number next to my Deleted Items telling me that I have unread mail. I finally got fed up and created this little Outlook add-in to make sure that anything I move to Deleted Items also gets marked as read.
That is why I created the add-in. I'm writing this article mostly to share the plug-in, but also to show what I learned about writing add-ins for Outlook, or more aptly installers for Outlook add-ins.
Using the Code
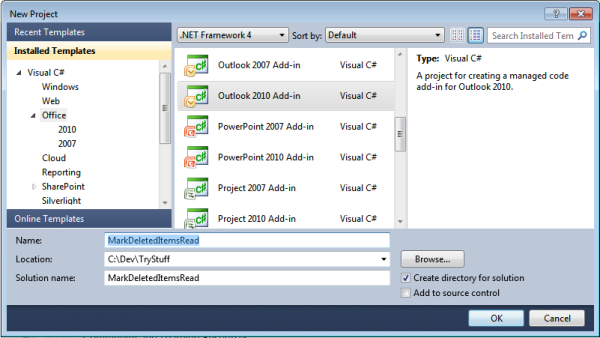
The code for marking items as deleted is actually very simple. First we need to create a new project and choose "Outlook 2010 Add-In" as the project type.

Then expand the "Outlook" group, and open ThisAddIn.cs. In the ThisAddIn_Startup method, we are going to add an event handler:
Outlook.MAPIFolder deletedFolder =
  this.Application.Session.GetDefaultFolder(
  Outlook.OlDefaultFolders.olFolderDeletedItems);
deletedFolder.Items.ItemAdd +=
  new Outlook.ItemsEvents_ItemAddEventHandler(DeletedItems_ItemAdd);
Then in the event handler, we just mark the item as read. I check for a number of other item types as well in the provided source, but they all look essentially like this:
if(Item is Outlook.MailItem)
{
    (Item as Outlook.MailItem).UnRead = false;
}
That's it. Close Outlook and click the Run button, and the debugger will open Outlook with the add-in running. You can test it out and verify that it is marking things as read when you send them to Deleted Items.
Installing the Add-In
First we need to create a new setup project.

Once you've created the setup project, switch to Release and rebuild the solution. If you click on the setup project in Solution Explorer, and you'll see a series of tools of buttons at the top of Solution Explorer. We'll be using the File System Editor and the Registry Editor.
File System Editor
In the file system editor, we are going to right click on the Application folder to add a few things:
- Project Output->Primary Output
- File->MarkDeletedItemsRead.dll.manifest (from the bin\release folder)
- File->MarkDeletedItemsRead.vsto (from the bin\release folder)
Registry Editor
In the Registry editor, we need to create the key HKEY_CURRENT_USER\Software\Microsoft\Office\Outlook\Addins\Mark Deleted Items Read.
The final key name isn't important, but you don't want it to match the add-in project name because VS will be overwriting that key when debugging.
We then need to create string values for Description, FriendlyName, and Manifest. You can put whatever you like for the first two values, but the Manifest's value should be "[TARGETDIR]MarkDeletedItemsRead.vsto|vstolocal".
Rebuild the setup project and you should be able to install from Setup.exe in the bin\release folder.
History
- 05/10/11 - Initial release.
