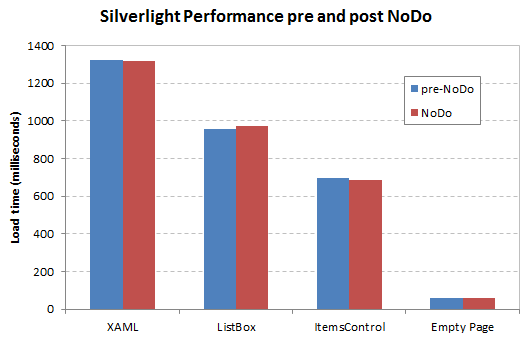
A few months ago, I blogged about the relative performance of the Windows Phone 7 emulator versus the same code being run on real hardware. There were a couple of take-home messages from this blog post, firstly the performance on real hardware is typically much slower than the emulator, and secondly an ItemsControl can render the same content as a ListBox in less time, making it a better choice for rendering lists of items for navigation.
The recent NoDo updates included some performance improvements, most of which focus on load performance. I re-ran the tests from my previous blog post pre-NoDo and after installing NoDo on the phone (Samsung Omnia), saw no difference in performance between my measurements, which is pretty much what I expected:

Load time is still a significant issue for Windows Phone 7 Silverlight applications, and anything that can be done to reduce this will make your application more slick and useable.
I still see examples on the internet of people using the ListBox for navigation within Windows Phone 7 application, despite the poor performance when compared with an ItemsControl. This is probably because ListBox has a slightly simpler API. In order to combat this, I have come up with a NavigationList control, which is based on an ItemsControl. This control wraps up all the ItemsControl configuration and click / manipulation handling to give a fast and easy-to-use control which simply raises a Navigation event in response to user interactions.
NavigationList Control
The NavigationList control is a lightweight control that can be used to render a list of items (base on an ItemTemplate). The following XAML snippet shows how to use this control:
<l:NavigationList ItemsSource="{Binding}"
              Navigation="NavigationList_Navigation">
  <l:NavigationList.ItemTemplate>
    <DataTemplate>
      <TextBlock Text="{Binding}" FontSize="25"/>
    </DataTemplate>
  </l:NavigationList.ItemTemplate>
</l:NavigationList>
The NavigationList has an ItemsSource property which is used to supply your list of items, and an optional ItemTemplate template where you specify how they are rendered.
The control fires a Navigation event whenever the user clicks on an item. This event has an Item argument which contains the item (from the ItemsSource) that was selected. This is typically used to navigate to a new page, as in the example below:
private void NavigationList_Navigation(object sender, NavigationEventArgs e)
{
FrameworkElement root = Application.Current.RootVisual as FrameworkElement;
root.DataContext = e.Item;
NavigationService.Navigate(new Uri("/DetailsPage.xaml",
UriKind.RelativeOrAbsolute));
}
So, how does the NavigationList compare to a ListBox? In terms or performance, it is a clear winner. The example project for this blog post has a test which renders exactly the same content with a ListBox and a NavigationList. Here’s how the load time of the page compares:

A page which uses a NavigationList renders twice as fast as an equivalent page that uses a ListBox!
Another problem with using ListBox is that selection state is ‘persisted’ in the back stack, therefore when you navigate back to the page, you must clear the SelectedItem. Interestingly, I just spotted a blog post by a WP7 developer whose application was rejected during the marketplace submission process for forgetting to do just this!
protected override void OnNavigatedTo(System.Windows.Navigation.NavigationEventArgs e)
{
base.OnNavigatedTo(e);
navigationListBox.SelectedItem = null;
}
private void ListBox_SelectionChanged(object sender, SelectionChangedEventArgs e)
{
if (navigationListBox.SelectedItem == null)
return;
FrameworkElement root = Application.Current.RootVisual as FrameworkElement;
root.DataContext = navigationListBox.SelectedItem;
NavigationService.Navigate(new Uri("/DetailsPage.xaml",
UriKind.RelativeOrAbsolute));
}
NavigationList Implementation
The control itself is quite simple; the template includes an ItemsControl which binds to the NavigationList ItemsSource and ItemTemplate dependency properties. The ItemsControl uses a VirtualizingStackPanel for the ItemsPanel to give a faster load time (as does the ListBox):
<Style TargetType="l:NavigationList">
  <Setter Property="ItemTemplate">
    <Setter.Value>
      <DataTemplate>
        <TextBlock Text="{Binding}"/>
      </DataTemplate>
    </Setter.Value>
  </Setter>
  <Setter Property="Template">
    <Setter.Value>
      <ControlTemplate>
        <l:ItemsControlEx x:Name="itemsControl"
              ItemsSource="{Binding Path=ItemsSource,
                 RelativeSource={RelativeSource TemplatedParent}}"
              ItemTemplate="{Binding Path=ItemTemplate,
                 RelativeSource={RelativeSource TemplatedParent}}">
          <l:ItemsControlEx.ItemsPanel>
            <ItemsPanelTemplate>
              <VirtualizingStackPanel Orientation="Vertical"/>
            </ItemsPanelTemplate>
          </l:ItemsControlEx.ItemsPanel>
          <l:ItemsControlEx.Template>
            <ControlTemplate>
              <ScrollViewer>
                <ItemsPresenter/>
              </ScrollViewer>
            </ControlTemplate>
          </l:ItemsControlEx.Template>
        </l:ItemsControlEx>
      </ControlTemplate>
    </Setter.Value>
  </Setter>
</Style>
ItemsControlEx is a simple subclass of ItemsControl which raises an event each time an item is added to the panel:
public class ItemsControlEx : ItemsControl
{
protected override void PrepareContainerForItemOverride(
DependencyObject element, object item)
{
base.PrepareContainerForItemOverride(element, item);
OnPrepareContainerForItem(new
PrepareContainerForItemEventArgs(element, item));
}
public event EventHandler<PrepareContainerForItemEventArgs>
PrepareContainerForItem;
protected void OnPrepareContainerForItem(PrepareContainerForItemEventArgs args)
{
if (PrepareContainerForItem != null)
{
PrepareContainerForItem(this, args);
}
}
}
public class PrepareContainerForItemEventArgs : EventArgs
{
public PrepareContainerForItemEventArgs(DependencyObject element, object item)
{
Element = element;
Item = item;
}
public DependencyObject Element { get; private set; }
public object Item { get; private set; }
}
The NavigationControl locates the ItemsControlEx instance from its template to handle this event. Each time an element is added, handlers are added to various events:
public override void OnApplyTemplate()
{
base.OnApplyTemplate();
var itemsControl = GetTemplateChild("itemsControl") as ItemsControlEx;
itemsControl.PrepareContainerForItem += ItemsControl_PrepareContainerForItem;
}
private void ItemsControl_PrepareContainerForItem(object sender,
PrepareContainerForItemEventArgs e)
{
var element = e.Element as UIElement;
element.MouseLeftButtonUp += Element_MouseLeftButtonUp;
element.ManipulationStarted += Element_ManipulationStarted;
element.ManipulationDelta += Element_ManipulationDelta;
}
The above could have been achieved without the use of ItemsControlEx by providing a container for each item that is added, much the same as the ListBox containing items within a ListBoxItem instance. However, the aim here is to make the control as lightweight as possible, which means minimizing the number of visual elements created.
The Element_MouseLeftButtonUp event handler raises the Navigation event, but what are the manipulation event handlers for? This is because if the NavigationList is used within a control that performs some action due to manipulation, the Pivot control which reacts to swipe for example, a mouse up event is still fired when the manipulation ends. This results in a navigation firing incorrectly, see Tore Lervik’s blog for more details.
private bool _manipulationDeltaStarted;
private void Element_ManipulationDelta(object sender,
ManipulationDeltaEventArgs e)
{
_manipulationDeltaStarted = true;
}
private void Element_ManipulationStarted(object sender,
ManipulationStartedEventArgs e)
{
_manipulationDeltaStarted = false;
}
private void Element_MouseLeftButtonUp(object sender,
MouseButtonEventArgs e)
{
if (_manipulationDeltaStarted)
return;
var element = sender as FrameworkElement;
OnNavigation(new NavigationEventArgs(element.DataContext));
}
So there you have it, the NavigationList, simple and fast.
Now people … please stop using ListBox for navigation, it is slow and its API is cumbersome!
You can download the source code here: NavigationListControl.zip.
