While working with ASP.NET web applications, you must be familiar with one of most important state management techniques “Session”. If you want to do a quick refresh or want to know something more, please go ahead and read one of my articles “Exploring Session in ASP.NET” published on CodeProject. In this post, I am going to share some important tips that might be useful.
ASP.NET Session State is on by default, hence you are paying for memory even if you don’t use it. There are several ways to optimize it.
Tip #1: Not using Session State at all? Then turn it off completely in web.config.

Tip #2: Session is only required for few pages, not all over the application.
Then first turn it off for all pages, for that you need to do the following entry in web.config.

Then enable it for a specific page where you required the session.

Tip #3: If you are using Session for Reading Purpose, use Session State as “ReadOnly”
If you are a beginner, you must be wondering what is EnableSessionState=”Readonly”. Well, if you look at your web application, not all the pages using Session or some of the pages are using session data for reading purposes. If there is no write operation happening on session, then it’s always better to use session State is “ReadOnly”

The session requests pass through different httpModules within HTTPPipeline. To know more details on how session state ReadOnly works, please read the article Read Only Session State in ASP.NET. A quick summary from the referred article:
The session state module implements a readers – writers locking mechanism and queues the access to session state values. A page that has session-state write access will hold a writer lock on the session until the request finishes. A page gains write access to the session state by setting the EnableSessionState attribute on the @Page directive to True. A page that has session-state read access — for example, when the EnableSessionState attribute is set to ReadOnly — will hold a reader lock on the session until the request finishes.
You can also set ReadOnly SessionState in web.config as well:

Tip #4: Programmatically Change Session State Behavior when required (ASP.NET 4.0)
We can enable or disable session state either in web.config or using @Page directive’s EnableSessionState attributes. But there was no provision to change the session state at runtime till date in ASP.NET. But using ASP.NET 4.0, we can change the session state programmatically. The .NET 4.0 Framework adds a new method SetSessionStateBehavior to the HttpContext class for ASP.NET. This method required SessionStatebehavior value to set the current session mode. To call SetSessionStateBehavior, simply create a new HttpModule by implementing IHttModule and hook the BeginRequest event. Most important, you can only use the SetSessionStateBehavior until the AcquireRequestState event is fired, because AcquireRequestState occurs when ASP.NET acquires the current state that is associated with the current request.
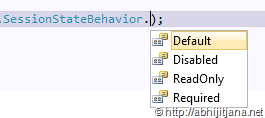
While calling SetSessionStatebehavior, you can pass the following values as SessionStatebehavior:
Default: This is the default setting which means everything works as before. Disabled: Turned of Session Sate for Current Request. ReadOnly: Read only access to Session State. Required: Enabled session state for both Read and Write Access.

Here is one of my complete articles, where I have discussed about the details of SetSessionStatebehavior which talks about the details implementation, use with real example.
Tip #5: Compress Session Data while using OutProc Session mode based on Requirements (ASP.NET 4.0)
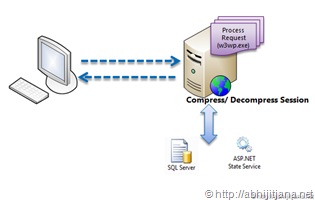
ASP.NET 4.0 comes with a new option for compressing the Session data with Out Process Session mode. To enable this functionality, we need to add “compressionEnabled=”true” attribute with the SessionMode in web.config.

When Compression mode is enabled in web.config, ASP.NET compresses the serialized session data and passes it to session storage and during retrieval same deserialization and decompression happens in the server side. ASP.NET 4.0 used System.IO.Compression.GZStream class to compress the session mode.

This process has several advantages and disadvantages, please read my detailed article on Compression Enabled Session State and how its works, where I have explained how to use it for SQL Server and State Server Session Mode, how to calculate the size of Session Data and compare the amount of compressed data.
Tip #6: Use HttpContext.Current.Items for very short term storage instead of Session
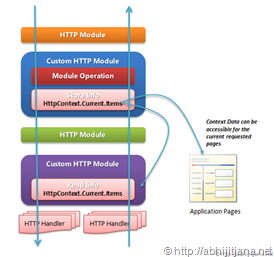
You can use HttpContext.Current.Items for very short term storage. Short term storage means, this data is valid for a single HTTP Request. There is a lot of confusion regarding storing data in HttpContext.Current.Items and storing data in Session variable. Items collections of HttpContext is an IDictionary key-value collections and that are shared across a single HTTPRequest. Yes, HttpContext.Current.Items is valid for a single HTTPRequest.

Here is one of my complete blog posts, When we can use HttpContext.Current.Items to stores data in ASP.NET?, which describes the fundamentals of using HttpContext.Current.Items for storing short terms items instead of using session.
Hope the above tips will help you.
Cheers!
AJ
Filed under:
.NET 4.0,
ASP.NET 4.0,
Tips and Tricks,
Visual Studio,
Visual Studio 2010 


