Introduction
This articles explains how OpenGL is rendered as a Firefox plugin. I don't know whether it's useful. I did it for fun!
Background
I was trying to render an X3D file with OpenGL as a Firefox plugin. I know there are many such X3D file viewers, but mine intends to handle the haptic field... well, this sample is just a by-product.
Tinkering with the Code
You will first need to download Gecko plugin API and Firefox source code. Download Gecko SDK and extract to \yourroot\gecko-sdk\.
Download Firefox source code from here, extract to \yourroot\mozilla.
Then we start from a basic plugin sample. Go to the folder: yourroot\mozilla\modules\plugin\tools\sdk\samples\basic\windows.
Here's a little trick, we need to run unix2dos on npbasic.dsp and npbasic.dsw under this folder. Then we open and cover the project by Visual C++ Express, we will be successful now. From project properties, change the Additional include directories to yourroot\gecko-sdk\include; yourroot\mozilla\modules\plugin\tools\sdk\samples\include. Try to build now, if successful, we continue...
Open plugin.cpp, then
#include "plugin.h"
add:
#include <gl/gl.h>
Then, after the line:
static WNDPROC lpOldProc = NULL;
add two functions EnableOpenGL and DisableOpenGL:
void EnableOpenGL(HWND hWnd, HDC * hDC, HGLRC * hRC);
void DisableOpenGL(HWND hWnd, HDC hDC, HGLRC hRC);
Add EnableOpenGL and SetTimer as shown below:
NPBool nsPluginInstance::init(NPWindow* aWindow)
{
.................
EnableOpenGL( mhWnd, &hDC, &hRC );
SetTimer(mhWnd, 0, 1, (TIMERPROC) NULL); ............
}
Then, add DisableOpenGL as shown below:
void nsPluginInstance::shut()
{
DisableOpenGL( mhWnd, hDC, hRC );
.... }
After that, in PluginWinProc, we need to handle WM_TIMER message like the following:
case WM_TIMER:
    theta += 1.0f;
    PostMessage( hWnd, WM_PAINT, NULL, NULL );
    break;
At last we do OpenGL rendering in the case of WM_PAINT, remove the original code under this case, and replace it with our code as follows:
glClearColor( 0.0f, 0.0f, 0.0f, 0.0f );
glClear( GL_COLOR_BUFFER_BIT );
glPushMatrix();
glRotatef( theta, 0.0f, 0.0f, 1.0f );
glBegin( GL_TRIANGLES );
   glColor3f( 1.0f, 0.0f, 0.0f );
   glVertex2f( 0.0f, 1.0f );
   glColor3f( 0.0f, 1.0f, 0.0f );
   glVertex2f( 0.87f, -0.5f );
   glColor3f( 0.0f, 0.0f, 1.0f );
   glVertex2f( -0.87f, -0.5f );
glEnd();
glPopMatrix();
SwapBuffers( hDC );
It's almost done, but don't forget to define EnableOpenGL and DisableOpenGL:
void EnableOpenGL(HWND hWnd, HDC * hDC, HGLRC * hRC)
{
PIXELFORMATDESCRIPTOR pfd;
int format;
*hDC = GetDC( hWnd ); ZeroMemory( &pfd, sizeof( pfd ) );
pfd.nSize = sizeof( pfd );
pfd.nVersion = 1;
pfd.dwFlags = PFD_DRAW_TO_WINDOW | PFD_SUPPORT_OPENGL |
PFD_DOUBLEBUFFER;
pfd.iPixelType = PFD_TYPE_RGBA;
pfd.cColorBits = 24;
pfd.cDepthBits = 16;
pfd.iLayerType = PFD_MAIN_PLANE;
format = ChoosePixelFormat( *hDC, &pfd );
SetPixelFormat( *hDC, format, &pfd );
*hRC = wglCreateContext( *hDC );
wglMakeCurrent( *hDC, *hRC );
}
void DisableOpenGL(HWND hWnd, HDC hDC, HGLRC hRC)
{
wglMakeCurrent( NULL, NULL );
wglDeleteContext( hRC );
ReleaseDC( hWnd, hDC );
}
It's done!
Build the Project
Nothing to say, just 
Test the plugin
Copy npbasic.dll to C:\Program Files\Mozilla Firefox\plugins\ or yourfolder\Mozilla Firefox\plugins\.
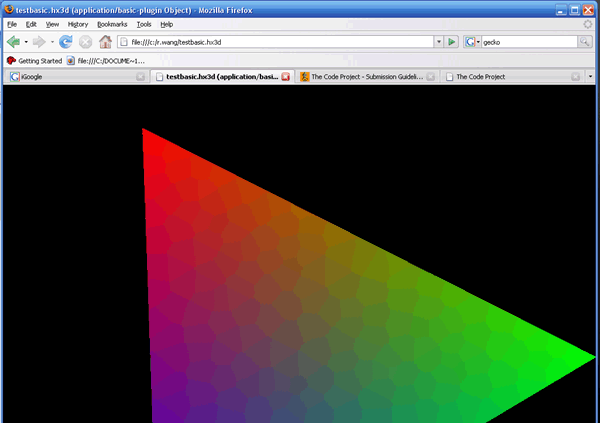
From the folder yourroot\mozilla\modules\plugin\tools\sdk\samples\basic\, you will find test.html, double click and you would see a rotating triangle, colorful...
Another way to test the plugin
If we open a file of the type that a plugin is registered, then the plugin will be triggered. Open basic.rc with a text editor, find the string "FileExtents" and change the value to whatever you want. I changed it to hx3d. Next, create an empty file with the extension .hx3d, I created testbasic.hx3d under my folder. In the Firefox URL box, type c:\r.wang\testbasic.hx3d, you would also see the plugin triangle.
Now... enjoy!
