Introduction
In a typical data driven application, you can expect to spend at least 40-50% of your time writing the "CRUD" code (Create, Read, Update, and Delete). In order to loosely couple your application code with the database, you will probably want to create a DAL (Data Access Layer). Unfortunately, writing a DAL can be very time consuming. Especially if you are working on a project where the data model is constantly evolving.
Well, lucky for us, there is SubSonic. SubSonic is an Open Source tool built for .NET that will automatically build your DAL with a few simple steps.
Building the DAL
- The first task is to download and install SubSonic from www.subsonicproject.com.
- Open up Visual Studio 2005 and create a new project. Choose Visual C# --> Windows --> Windows Control Library.
- Once the project is created, you need to add three references. The first is to SubSonic.dll. If you did a default install, then this should be located at C:\Program Files\SubSonic\SubSonic 2.0.3\SubSonic.dll. You will also need a reference to
System.Web (unfortunately, this is a requirement) and System.Configuration. - Now, you need to add an application configuration file. In the config file, you will need to add a connection string, a config section, and a provider section. Here is sample "SubSonic" configuration file:
="1.0"="utf-8"
<configuration>
<configSections>
<section name="SubSonicService"
type="SubSonic.SubSonicSection, SubSonic" requirePermission="false"/>
</configSections>
<connectionStrings>
<add name="AdventureWorks"
connectionString="Data Source=.;Database=AdventureWorks;
Integrated Security=true;"/>
</connectionStrings>
<SubSonicService defaultProvider="AdventureWorks">
<providers>
<clear/>
<add name="AdventureWorks" type="SubSonic.SqlDataProvider, SubSonic"
connectionStringName="AdventureWorks"
generatedNamespace="AdventureWorksDAL"/>
</providers>
</SubSonicService>
</configuration>
Note: You can change the default namespace by modifying the generatedNamespace attribute.
- Add a new folder to the solution with the name "Generated". This is where all of the generated code will get created. Although it is not required to add this folder, it is definitely recommended. The folder is nice to have because once you are happy with the data model and the resulting code, you can move it into a separate folder that will be your "production ready" code. Since SubSonic is a code generation tool, you may choose to generate the files a few times and keep overwriting the source files in the "Generated" folder without affecting the "production ready" files. When the files are generated, they do not get automatically included into the library, so having this extra folder filled with files will not bloat your DLL. This is because Visual Studio will ignore files that are not included in the project, and therefore those files will not get compiled into the assembly.
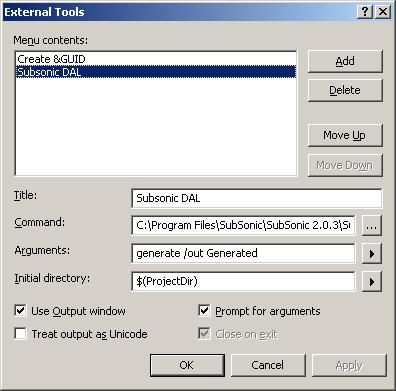
- Now, it is time to run sonic.exe. If you did a default install, sonic.exe will be located at C:\Program Files\SubSonic\SubSonic 2.0.3\SubCommander\sonic.exe. The easiest way to run sonic.exe is to add it as an external tool to your VS2005 environment. This can be done by going to Tools-->External Tools and clicking on the "Add" button. In the Title field, I entered "SubSonic DAL", but you can name it whatever you like. In the command field, enter in the path to the sonic.exe. In the Arguments field, enter in "generate /out Generated". This means that all generated code will get created in the folder named Generated that we created in the previous step. Finally, set the Initial Directory to "$(ProjectDir)". Also check the "Use Output Window" and the "Prompt for Arguments" checkboxes. Click the "OK" button to close out the dialog.

- Now, for the moment of truth. Execute sonic.exe by clicking on the "SubSonic DAL" menu item under the "Tools" menu. Keep an eye on the output window so you can see the execution status. If you setup something wrong, the output window will usually give you a clue of how to fix the error.
- If everything went well, you should see a bunch of new files in the Generated folder. If you do not see any files, then you may need to click on the Show all files button located at the top of Solution Explorer. Select all of the files, and right click and choose "Include In Project". Now compile, and voila! You have just created your first SubSonic DAL!

Using the DAL
You have officially created your first SubSonic DAL. Now, you are probably wondering... how do I use this thing? Well, here are some sample code snippets.
Sample No. 1 - Fetching all of the products that have a ListPrice greater than $50.00, a Class value of L, and is the Color Yellow.
Query qry = Product.CreateQuery().WHERE("ListPrice > 50.00")
            .AND("Class = L").AND("Color = Yellow");
IDataReader rdr = qry.ExecuteReader();

while (rdr.Read()) {
   Console.WriteLine(rdr[Product.Columns.Name].ToString());
}
Notice how I chained the where conditions!
Sample No. 2 - Adding a new product.
Currency c = new Currency();
c.CurrencyCode = "CPD";
c.Name = "Code Project Dollar";
c.Save("Some_UserName");
Tips & Thoughts
If you need to extend the functionality of a class, then use partial classes. This way, when you re-generate the files, you won't have to worry about having your custom code overwritten.
This product states that it works with other database systems. This library could be very useful if you are creating an application that runs against multiple database systems. In theory, with a little work and some basic know-how, you should be able to move your application from SQL Server to Oracle without changing your code. You would simply just recompile your DAL against the new RDBMS (Remote Database Management System). Remember, I said in theory! Don't send me hate emails if this does not work.
Finally, SubSonic is not only a big time saver, but it is free, it is Open Source, and it is very easy to use. What more could you ask for?
