Introduction
This article discusses how to post XML data VB application to an ASP.NET application.
- Create Sender Application in VB 6.0
- Create Receiver Application in ASP.NET 2.0
- Post XML from Sender Application
- Verify Response XML is received or not
- Verify Request XML is generated in Receivers application
1. Create Sender Application in VB 6.0
Create a VB Standard EXE project and create form as shown below:
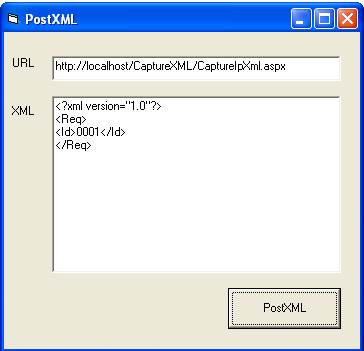
The source code is as follows:
Private Sub Command1_Click()
Dim url As String
url = Text1.Text
Dim myHTTP As MSXML2.XMLHTTP
Set myHTTP = CreateObject("msxml2.xmlhttp")
Dim myDom As MSXML2.DOMDocument
Set myDom = CreateObject("MSXML2.DOMDocument")
myDom.async = False
Dim myxml As String
myxml = Text2.Text
myDom.loadXML (myxml)
myHTTP.open "post", url, False
myHTTP.setRequestHeader "Content-Type", "text/xml;charset=utf-8"
myHTTP.setRequestHeader "Connection", "keep-alive"
myHTTP.setRequestHeader "Accept", "text/xml, multipart/related,
text/html, image/gif, image/jpeg, *; q=.2, */*; q=.2"
myDom.async = False
myDom.loadXML myxml
myHTTP.send myDom.xml
MsgBox myHTTP.responseText
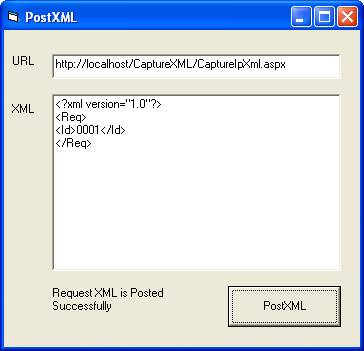
Label3.Caption = "Request XML is Posted Successfully"
Set myHTTP = Nothing
End Sub
Private Sub Form_Load()
Text1.Text = "http://10.32.111.20/CaptureXML/CaptureIpXml.aspx"
Text2.Text = "<?xml version=""1.0""?>" & _
"<Req>" & _
"<Id>1024634</Id>" & _
"<Status>0</Status>" & _
"</Req>"
End Sub
Your sender application is ready now. Next, let us create a Receiver application.
2. Create Receiver Application in ASP.NET
In CaptureXML.aspx page, remove all the default HTML content except page directive.
Page directive of CaptureXML.aspx page should contain as below:
<%@ Page Language="C#" ResponseEncoding="UTF-8" ContentType="text/XML"
CodeFile="CaptureXml.aspx.cs" Inherits="CaptureXml" %>
Source code of CaptureXML.aspx.cs is as follows:
using System;
using System.Data;
using System.Configuration;
using System.Collections;
using System.Web;
using System.Web.Security;
using System.Web.UI;
using System.Web.UI.WebControls;
using System.Web.UI.WebControls.WebParts;
using System.Web.UI.HtmlControls;
using System.IO;
using System.Xml;
using System.Collections.Specialized;
using System.Text;
public partial class CaptureXml : System.Web.UI.Page
{
protected void Page_Load(object sender, EventArgs e)
{
Int32 len = (Int32)this.Request.InputStream.Length;
byte[] myData = new byte[len];
this.Request.InputStream.Position = 0;
this.Request.InputStream.Read(myData, 0, len);
DateTime t=DateTime.Now;
string timeStamp = t.Year.ToString() + "_" + t.Month.ToString() + "_" +
t.Day.ToString() + "_" + t.Hour.ToString() + "_" + t.Second.ToString() +
"_" + t.Millisecond.ToString();
string filepath = @"E:\CaptureXML\" + GetTimeStampString() + "_1.xml";
FileStream fs = new FileStream(filepath, FileMode.Create, FileAccess.Write);
fs.Write(myData, 0, (int)len);
fs.Flush();
fs.Close();
string respfilepath = @"E:\CaptureXML\Response.xml";
string strResonse = Utility.ReadResponseFromFile(respfilepath);
byte[] opStream1 = System.Text.Encoding.ASCII.GetBytes(strResonse.ToCharArray());
this.Response.OutputStream.Write(opStream1, 0, opStream1.Length);
}
public static string GetTimeStampString()
{
DateTime strReqTimeStamp = DateTime.Now;
string strRetTimeStamp = strReqTimeStamp.Year.ToString() +
" " + strReqTimeStamp.Month.ToString() + " " +
strReqTimeStamp.Day.ToString() + " " +strReqTimeStamp.Hour.ToString() + " " +
strReqTimeStamp.Minute.ToString() + " " + strReqTimeStamp.Second.ToString() +
" " + strReqTimeStamp.Millisecond.ToString();
return strRetTimeStamp;
}
}
Deploy the CaptureXML application in IIS. Try to access the complete URL from the browser including IP address. For example, http://10.32.111.20/CaptureXML/CaptureIpXml.aspx.
Also create a default Response XML and name it as Response.xml. This is the default response XML will show to the sender application when requested.
="1.0"="UTF-8"<Response> Recieved </Response>
3. Post XML from Sender Application
- Send XML: Create EXE for sender application, then
- Enter the URL in the URL text box
- Enter the XML which you need to post in XML multitext box.
- Click on Post XML button
4. Verify Response XML is Received or Not
You will be able to see response XML in the message box as below:
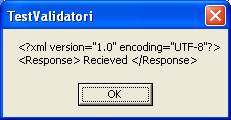
Also you can able see the From Label, message is successfully posted.
5. Verify Request XML is Generated in Receiver's Application
Browser to the CaptureXML folder and check the request XML created by date.
Request XML created in this name: 2011 6 10 17 22 15 626_1.xml.
Content of Request XML posted to receiver application is as follows:
="1.0"
<Req>
<Id>0001</Id>
</Req>
Troubleshooting
If receiver application is unable to receive XML, verify: XML encoding type “text / XML”
History
- 27th June, 2011: Initial post
This member has not yet provided a Biography. Assume it's interesting and varied, and probably something to do with programming.


 General
  News
News  Suggestion
  Question
  Bug
Bug  Answer
  Joke
Joke  Praise
  Rant
Rant  Admin
Admin 


