Introduction
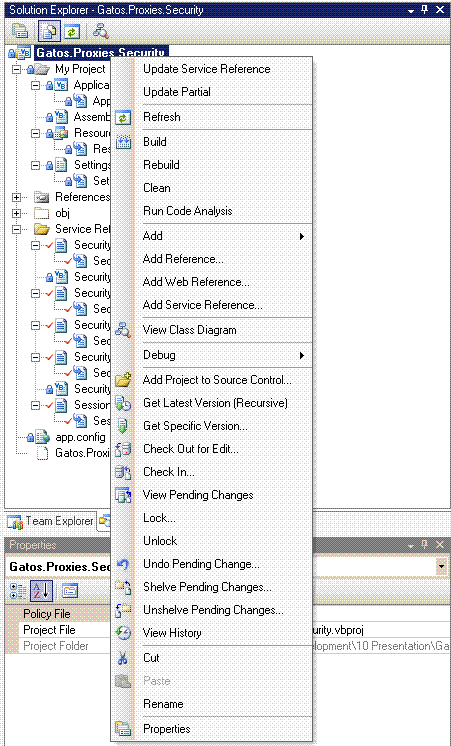
In Visual Studio, the command Update Service Reference, which creates a proxy for a Web-Service, is available only on file level (.map files). With this add-in, this command becomes available on folder and project level as well. Also, the proxy code does not set the DateTimeMode in date columns of datasets. For example, the date 2010-10-10 00:00 on the server will become 2010-10-09 23:00 on the client when the client's timezone is 1 hour back of the timezone of the server. This is not desirable for dates where time information is not relevant. This add-in creates partial classes for the datasets on the server, as well as on the client, that set the DataTimeMode to unspecified.
Background
In WCF, to create a proxy for a given Web Service, an XML file with a .map extension is created that specifies the Web Service to access. For example, Service1.map may look as follows:
<ServiceReference>
    <ProxyGenerationParameters

        ServiceReferenceUri="http://ServiceHost/Service1/Service1.svc?wsdl"

        Name="Service1"

        NotifyPropertyChange="False"

        UseObservableCollection="False">
    </ProxyGenerationParameters>
    <EndPoints>
        <EndPoint

            Address="http://ServiceHost/Service1/Service1.svc"

            BindingConfiguration="WSHttpBinding_IService1"

            Contract="Service1.IService1">
        </EndPoint>
    </EndPoints>
</ServiceReference>
In Visual Studio, when right-clicking on a .map file, the "Update Service Reference" command becomes available. When running this command, Visual Studio generates the code to be used to call the Web-Service, that means the proxy.
Using the Code
There are two projects in this package:
Unisystems.Utilities.XSDParserUnisystems.Utilities.AddIns
Unisystems.Utilities.XSDParser
This project provides methods to parse .map and .xsd files to create proxies and to create partial classes. It is used by the add-in, but it may also be run separately from the command line, or from its user interface. First, compile this project. To run it from within Visual Studio, set Project properties/Debug/Command line arguments to /ui and press F5. The following form appears:

Set in the Input folder field, the folder which contains the .xsd or .map files. Set in the IDE folder field, the folder that contains the Visual Studio executable. This folder is used to find the svcutil.exe program (that creates proxies) and the tf.exe program (to check-out files in Team Foundation Server). When pressing the Get files button, all .xsd and .map in all subfolders are retrieved. Multiple files may be selected. When pressing the Create proxy button, proxies are generated for the selected .map files. When pressing the Create partial button, partial classes are created for the selected files. When pressing the Parse button, the structure of the XSD documents (which were either retrieved from the Web Service or from the XSD files) is written to the standard output.
To run the project from the command-line, run Unisystems.Utilities.XSDParser /? and this will give you the available options. For example:
Unisystems.Utilities.XSDParser /svcutil /partial /checkout c:\temp\Service1
will create the proxies and partial classes for all .map and .xsd files in the folder c:\temp\Service1. The corresponding files will be checked-out.
Unisystems.Utilities.AddIns
This project was created with the Visual Studio Add-in template (New project/Other project types/Extensibility/Visual Studio Add-in). In the Connect.OnConnection method, two new commands are created:
UpdatePartial: creates partial classes for .xsd and .map files. It is available on file, folder, and project level.UpdateServiceReference: creates proxies for .map files. It is available on folder and project level. Visual Studio already provides this command on file level.
In the Connect.Exec method is the code that is called by these commands. Depending on the command name, a method to be executed is returned by the GetProcessProjectItem function. This method is executed for the selected item. This method is passed to the ProcessItem method, which traverses the tree underlying the selected item and calls the given method for each item in the tree.
To use the Add-In, compile the project. This will place in C:\Documents and Settings\All Users\Application Data\Microsoft\MSEnvShared\AddIns\ the DLLs and the Unisystems.Utilities.AddIns.AddIn file. Upon restart of Visual Studio, Visual Studio looks in this directory for files with extension .AddIn and loads the DLLs specified in this file. Open a project that contains .xsd or .map files, and the two commands should be available when right-clicking on a folder or project in Solution Explorer. Running the command will execute the respective function on the items in the tree underlying the selected item. The files are checked-out, but unfortunately, the Visual Studio UI is not updated. If the project is reloaded, the files will be shown with the checked-out icon.
Points of Interest
A console application can have windows. With:
Application.Run(New Form1)
a form can be displayed.
History
- 28th June, 2011: Initial version
