Introduction
I've been writing small WMI applications off and on for the past few years and have always found that writing such an application in .NET has always seemed somewhat cumbersome. I couldn't help but think there was a better way to write a WMI application in .NET. So I started out to search the Internet for anything I could find that might help speed up the development process. Everywhere I turned I found article after article showing people how to use the System.Management namespace within .NET to accomplish their goals. Some of these writings were very good, and some could probably use a little more work. But one thing they always had in common, were the strings of comments after the article asking “How do I do ‘this’…” or “Is it possible to do ‘this’…”. Which led me to think, did this article really answer the questions people are having? The answer I found to my own question was, yes, and no.
One of the problems with writing a WMI application in .NET is that there isn't a direct way to work with the properties and methods of the built-in classes. Every solution ends with developers referencing properties via a string index within a ManagementObject object.
ManagementObject oMngObject = MyObejctCollection[0];
lblDemo.Text = oMngObject["Manufacturer"];
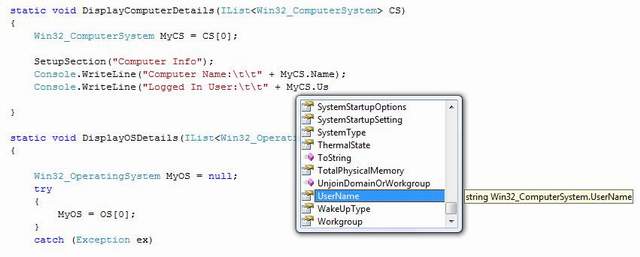
This being a completely valid method for working with WMI properties, it doesn't do much good if you don't know the name of the property you're trying to access. This is where EasyWMI comes in.
Breakdown of EasyWMI
I developed the EasyWMI class library to help speed up the development process of developing WMI driven applications. It includes a large percentage of all of the Win32 classes within the root/cimv2 namespace. The library consists of two main parts: controllers and models. The models are the Win32 classes pulled directly from WMI within Windows and contain all the properties and methods for each. The controllers are what create and populate all of the models for each class. For every model there is a corresponding controller that accompanies it. The naming scheme for the controllers is the same naming scheme as the models without the preceding Win32_ prefix. For example, the Win32_Process class has a corresponding controller named Process. One thing to note when using the source of EasyWMI, is that I did not physically write all of the models and controllers. I actually threw together a code generator using CodeDOM specifically for this purpose. So when working with the actual source, be warned, indentations may be a little off, making it a little awkward to read, but not difficult.
Using the Code
To use EasyWMI is very simple. Create a new instance of the class controller you wish to use and run the SelectAll() method. Each controller contains 5 overloaded constructors; the default constructor assumes “localhost”.
ComputerSystem CS = new ComputerSystem();
IList<win32_computersystem /> CSCollection = CS.SelectAll();
Win32_ComputerSystem MyCS = CSCollection[0];
SelectAll() returns a generic IList<t /> collection of type Win32_CLASSNAME. Some classes will only return one item within the collection, such as ComputerSystem and OperatingSystem, for example. You now have access to all of the methods and properties for that particular object of the Win32_ComputerSystem type. For classes that return more than one object, you can simply use a foreach loop to iterate through the collection.
static void DisplayLogicalDisks(IList<win32_logicaldisk /> Drives)
{
      SetupSection("Logical Disks");
      try
      {
            foreach (Win32_LogicalDisk LogicalDisk in Drives)
            {
                  Console.WriteLine("Drive " + LogicalDisk.DeviceID);
                  Console.WriteLine("    Volume:\t\t" + LogicalDisk.VolumeName);
                  Console.WriteLine("    Size:\t\t" + ConvertToMB(LogicalDisk.Size));
                  Console.WriteLine("    Free Space:\t\t" + ConvertToMB
                            (LogicalDisk.FreeSpace));
                  Console.WriteLine("    File System:\t" + LogicalDisk.FileSystem);
                  Console.WriteLine("    Caption:\t\t" + LogicalDisk.Caption);
                  Console.WriteLine("    Serial:\t\t" + LogicalDisk.VolumeSerialNumber);
                  Console.WriteLine();
            }
      }
      catch (Exception ex)
      {
            Console.WriteLine("Error retrieving information.");
            Console.WriteLine("Message: " + ex.Message);
      }
      Console.WriteLine();
}
Now you have an idea of how simple it is to access properties for each of the Win32 classes, but what about using their methods? Simple, use them the way you would use any method.
string Domain;
string User;
Process SysProcess = new Process();
IList<win32_process /> Processes = SysProcess.SelectAll();

foreach (Win32_Process Process in Processes)
{
      if (Process.Name == "iexplore.exe")
      {
            Process.GetOwner(out Domain, out Username);
              Process.Terminate(0);
      }
}
You can also specify a different query to use instead of the default select * from.
CS = new ComputerSystem(ComputerName);
CS.EasyWMICfgUsername = @"yourdomain\username";
CS.EasyWMICfgPassword = "password";
CS.EasyWMICfgQuery = "select Manufacturer from";
CS.SetScope();
CSCollection = CS.SelectAll();
You may notice I call the SetScope() method after I set some configuration options. You'll need to run the SetScope() method anytime you change any of the configuration options before you run the SelectAll() method.
Conclusion
Although this may not be the most complete and yet still not the best way to interface with WMI using .NET, I hope this helps simplify working with WMI and speed up your development process.
History
No updates as of yet.
