Table of Contents
Introduction
If we work on multiple releases simultaneously, the need to manually change IIS virtual directory settings to physically point to different folders everytime becomes cumbersome. This also becomes error-prone when there are multiple virtual directories under a website, so we may not switch the physical location correctly due to typos. This article shows how to switch IIS 6.0 websites' metadata and switch automatically using the iiscnfg.vbs script.
The Problem
Let's say company TheProductCompany's website is http:\\theproductcompany.com. Typically, TheProductCompany launches new products via its website every quarter.
For simplicity of coding, and so that development work for various releases corresponding to each quarter can continue in parallel, the physical location of the website is logically mapped as: d:\theproductcompany_Q1, d:\theproductcompany_Q2, etc. indicating code for various 'quarters'. For supporting code check-in to multiple releases, TheProductCompany uses multiple branches in their source control.
Now, a developer John is working on all of these websites. He finds it very tedious to go to IIS everytime and change the physical locations associated with the websites manually, viz. d:\theproductcompany_Q1, d:\theproductcompany_Q2, ...Q3, etc. everytime he has to work on various requirements on these various releases.
In a professional setting, there could be many virtual directories under your main website and each following a similar folder structure. This really becomes cumbersome and error-prone many-a-times.
The Solution
First of all, we need to set the virtual directory's physical path as usual. We need to export this configuration. The next time, after we have switched to d:\theproductcompany_Q2 and want to switch back to d:\theproductcompany_Q1, we need to import the already exported settings. This can be done by exporting/importing the IIS metadata as below.
Export Settings
First of all, we need to export our current IIS metadata/settings.
This can be done in two ways:
Exporting manually through IIS
- Open IIS
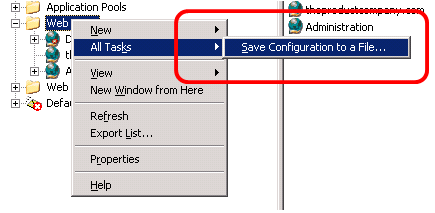
- On your websites, right click and select All Tasks. Click Save Configuration to file (see figure 1):

- Type in a file name (for our example - figure 2-: I typed in d:\myproduct.xml)

Exporting using the iisconfig.vbs file
The syntax is:
iiscnfg /export/f [Path\]FileName.xml/sp SourcePath [/d EncryptingPassword]
[/inherited] [/children] [/s Computer [/u [Domain\]User [/p Password]]]
Import Settings
Now whenever we need to switch, just import:
iiscnfg /import /f [Path\]FileName.xml /sp SourcePath /dp DestiniationPath
[ /d EncryptingPassword] [ /inherited ] [ /children ] [ /merge ][ /s Computer
[ /u [Domain\]User [ /p Password]]]
So John can now import:
iiscnfg /import /sp /lm/w3svc /dp /lm/w3svc /children /f d:\myproduct.xml;
References
