Introduction
Part 2, sequel and the last part of the article Accessing data using Language Integrated Query(LINQ) in ASP.NET WebPages - Part 1 explains how to create entity classes to represent SQL Server database and tables using Object Relational Designer and display data in a web page using LinqDataSource control.
LinqDataSource Control
Using declarative markup, you can create a LinqDataSource control that connects to data from a SQL database table, and configure it to handle updating, inserting, and deleting data without having to write the SQL commands to perform these tasks. The LinqDataSource class also provides an event model that enables you to handle customized scenarios. To use LinqDataSource control to query a database, entity objects must be created to represent the database and its tables. You can use the Object Relational Designer or the SqlMetal.exe utility to generate these objects.
The ContextTypeName property must be set to the object that represents the database and the TableName property to the object that represents the database table.
Object Relational Designer
The Object Relational Designer (O/R Designer) provides a visual design surface for creating LINQ to SQL entity classes and associations (relationships) based on objects in a database. In other words, the O/R Designer is used to create an object model in an application that maps to objects in a database. The O/R Designer also provides functionality to map stored procedures and functions to DataContext methods for returning data and hydrating entity classes. The O/R Designer also provides the ability to design inheritance relationships between entity classes. The O/R Designer currently supports only SQL Server 2000 and later, and SQL Server Express databases.
The O/R Designer has two distinct areas on its design surface: the entities pane on the left, and the methods pane on the right. The entities pane is the main design surface that displays the entity classes defined in the file. The methods pane is the design surface that displays the DataContext methods that are mapped to stored procedures and functions. You can hide the methods pane. Using methods pane is out of the scope of this article.
Code Generation tool (SqlMetal.Exe)
The SqlMetal command-line tool is used to generate code and mapping for the LINQ to SQL component of the .NET Framework. By applying options as listed below, you can instruct SqlMetal to perform a number of different actions, including the following:
From a database, generate source code and mapping attributes or a mapping file.
From a database, generate an intermediate DBML file for customization.
From a DBML file, generate code and mapping attributes or a mapping file.
The file is located by default at [drive:]\program files\microsoft sdks\windows\v6.0A\bin.
>sqlmetal [options] [<input file>]
Example 1: To generate a .dbml file with extracted SQL metadata, issue the following command in the Visual Studio Command Prompt window.
>sqlmetal /server:myserver /database:northwind /dbml:mymeta.dbml
Example 2: To generate a .dbml file with extracted SQL metadata from a .mdf file with SQL Server Express, issue the following command:
>sqlmetal /dbml:mymeta.dbml mydbfile.mdf
Walkthrough 2
Connecting Sql Server Express Database using O/R Designer and LinqDataSource and perform queries on a table to display data in a ASP.NET webpage
Add a new Webpage (Default2.aspx) to the existing WebSite project you have just created to test the sample Walkthrough 1.
In the WebSite Menu, select “Add New Item” command to choose the “Linq to SQL Classes” from the available list of templates in the dialog. It creates a new entity class’s file called DataClasses.dbml in the website’s App_Code folder.
After you add the new LINQ to SQL file to the project, the empty design surface represents a DataContext ready to be configured. The DataContext name corresponds to the name that you provided for the .dbml file. For this walkthrough, because you named the LINQ to SQL file DataClasses.dbml, the DataContext is named DataClassesDataContext. You can verify this by clicking an empty area on the designer and inspecting the Properties window.
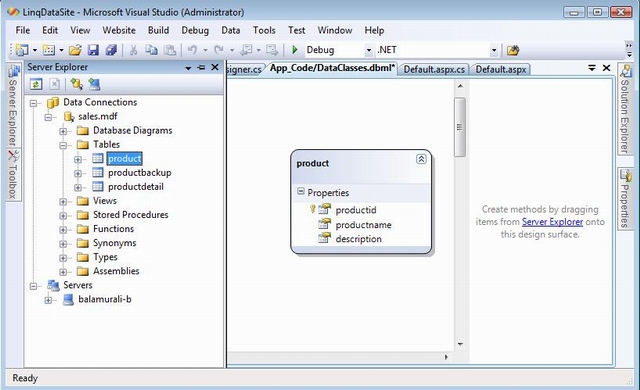
The next step is to create LINQ to SQL classes that are mapped to database tables by dragging tables from Server Explorer/Database Explorer onto the O/R Designer. The result is a LINQ to SQL entity class that maps to the table in the database.

In Server Explorer/Database Explorer, locate the tables in the SQL Server version of the sales.dbf sample database used in this article.
Drag the Product node from Server Explorer/Database Explorer onto the O/R Designer surface.
An entity class named Product is created to represent a single product from the Product table. It has properties that correspond to the columns in the Product table.
Drag a LinqDataSource control (ID=LinqDataSource1) into Default2.aspx page from the data tab in the toolbox and configure it to access the data sources and queries you have just created in the project as below in the Configure Data Source Wizard.
- Choose “
DataClassDataContext” as a Context object.

- Choose “
products” as Table in the Data Selection and check all the fields that appear in the Select list. - Click the “Finish” button to complete the configuration of
LinqDataSource control.
Drag a GridView control (ID=GridView1) into the page from the data tab in the tool box and set Data Source property to LinqDataSource1.
That’s it. Now run the webpage and see the output as displayed below.

Conclusion
This two-part article explained basically how to use LinqDataSource control available with the new version of ASP.NET in Visual Studio 2008 to connect to two different data sources namely Object data collection and SQL Server Express Database table. It also detailed how to define object and entity classes and execute queries to display data. In the coming articles, I would explore more about using LINQ with other data sources as well.
