Introduction
This follows on from my first article, so if you want to follow along, download and configure that code for your Azure AD instance as a starting point.
Background
Having created an Angular site that requires users to log in with Azure AD, now we want to protect our back end APIs so that they will ignore calls that don't contain a token generated by Azure AD. Until we do this, our site is not really secure, anyone can hit our end points and access sensitive data.
Setting Up in Azure AD
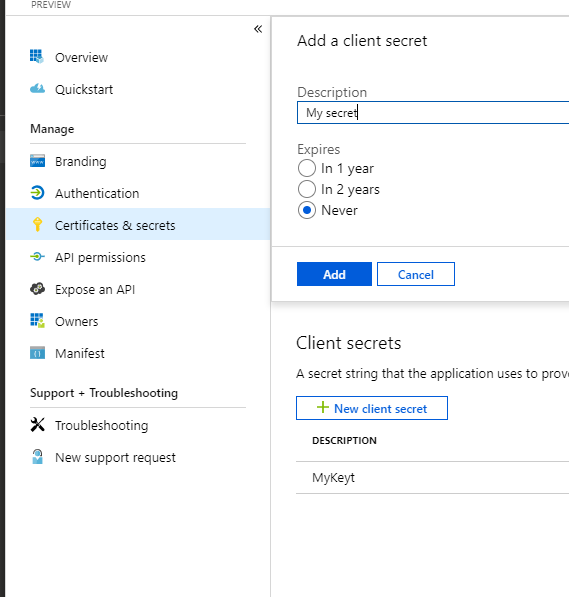
In order to write the code we need, we need to first get a secret from Azure AD. Go to your Application in Azure AD and click on 'Certificates and Secrets' (for now, we're clicking on the 'Preview' item which will eventually replace the main one today).

If you click on 'New client secret', you'll be prompted to give it a name and decide on how long it lasts. You can make it automatically expire in 1 or 2 years, or make it last until you choose to remove it. When you click 'Add', you will see your secret as follows:

BE CAREFUL!!! If you refresh this screen, there is NO WAY to ever see this secret again. Click on the icon to the right to copy your secret to your clipboard and then store it in a safe place.
Start Coding
The first thing we need to do is configure the settings. Go to your appsettings.json and add this object:
"AzureAd": {
"Instance": "https://login.microsoftonline.com/",
"Domain": "<yourdomain>",
"TenantId": "<yourtenantid>",
"ClientId": "<yourclientid>",
"CallbackPath": "/signin-oidc",
"ClientSecret": "<yourclientsecret>"
},

The easiest way I found to find your domain is to click 'expose an API' and the scope added by default has your domain URL in it. Just remove the GUID at the end and copy this in.
It's worth mentioning that, at this point, you're configuring your Azure instance twice, once for .NET Core and once for Angular. If you don't configure them both the same, it's not going to work.
Now, if you're following along, you will need to download the sample code for this article and create a folder and add two class files as follows:

This is not code I wrote, it's code I found online, on the Microsoft site. I imagine it will become part of a library at some point.
Once this is done, you can add AzureAD auth to your ConfigureServices in the Startup file as follows:
services.AddAuthentication(sharedOptions =>
           {
               sharedOptions.DefaultScheme = JwtBearerDefaults.AuthenticationScheme;
           })
         .AddAzureAdBearer(options => Configuration.Bind("AzureAd", options));
Intellisense will help you add the namespace you need and you'll be good to go.
I have initially forgotten this more than once, but you also need to turn on Authentication in the Configure method:
app.UseAuthentication();

There's still stuff to do in Azure. If you want to validate with tokens, you need to check "ID tokens" here and save.

Later, when we use groups for roles, we'll need to give the app some permissions on the Graph API. For now, 'Grant admin consent', this will mean that you have consented on behalf of your users.
Protect an API
At this point, we have auth configured but we're not using it. The sample app that Visual Studio generates has one controller. Add an [Authorize] attribute at the top level.
The site won't work anymore. You can get the token from the console and use it with Postman to confirm that authorisation is working, but let's make it work in the code.
First, we'll extend the FetchDataComponent to use an auth token. First, add a property to store the token:
public static token: string;
Now, change the get method to use it:
const headerDict = {
  'Authorization': 'bearer ' + FetchDataComponent.token
}

const requestOptions = {
  headers: new HttpHeaders(headerDict),
};

http.get<WeatherForecast[]>(baseUrl +
     'api/SampleData/WeatherForecasts', requestOptions).subscribe(result => {
  this.forecasts = result;
}, error => console.error(error));
This is a little rough but it's the basic idea of what you'd want to do in production, store the token somewhere and use it in all your calls.
Now we need to store the token, so return to our app.component.ts.
import {FetchDataComponent} from './fetch-data/fetch-data.component'
and:
constructor(private adalSvc: MsAdalAngular6Service) {
  console.log(this.adalSvc.userInfo);
  this.adalSvc.acquireToken('https://graph.microsoft.com').subscribe((token: string) => {
    FetchDataComponent.token = token;
    console.log(token);
  });
}
That's it!!! Your Angular code knows how to store your token and use it as an auth header in your requests. The page will now work again, showing a collection of weather forecasts. We have everything we need to build an Angular application and protect all our APIs and access to our front end page, using Azure AD.
Points of Interest
The main things to remember here are, make sure you're registering the front and back end to the same Azure AD application, and that you're calling app.UseAuthorization as well as the service calls.
History
