Introduction
There is an important concern in designing any new application - building a reliable and high performance logging engine. After much investigation and research, we found that recommended framework is Enterprise Library 5.0 with MSMQ distributor service.
In this article, we are going to see two approaches; common logging through Logging Application Block and then logging through MSMQ Distributor Service.
1. Setup
Before going further, we need to install few things on our PC:
- Enterprise Library v5.0
- Message Queue
Enterprise Library: Enterprise Library consists of a collection of application blocks and core infrastructure. All of these are reusable software components designed to assist developers with common enterprise development challenges. Enterprise Library also provides many highly configurable features that make it much easier to manage repetitive tasks which occur in many places in our applications. These include tasks such as logging, validation, caching, exception management, and more. Here we are only concerned about the Logging Application Block.
Download and install the Enterprise Library v5.0. Realize that we are getting and installing a lot more than a logging library here. Be patient.
Message Queue: Message Queuing (also known as MSMQ) is a messaging infrastructure and environment for running distributed, loosely coupled, messaging applications. Message Queuing applications running on source computers send messages to queues, where they are temporarily stored, and applications running on target computers retrieve messages from queues. Such applications can communicate across heterogeneous networks and with computers that may be offline temporarily.
Message Queuing is not installed by default during Windows Setup. Here are the steps to install MSMQ.
2. Concept
The Logging Application Block
The Enterprise Library Logging Application Block simplifies the implementation of common logging functions. We can use the Logging Application Block to write information to a variety of locations:
- The event log
- An e-mail message
- A database
- A message queue
- A text file
- A Windows® Management Instrumentation (WMI) event
- Custom locations using application block extension points
Although the process of creating and writing log entries is relatively simple, the number of options available (such as the many logging targets and the ability to filter entries) means that the underlying structure of the block and the options available for using it can seem complex. The following schematic shows how the main types of objects in the block work together to provide flexibility when creating and writing log entries.
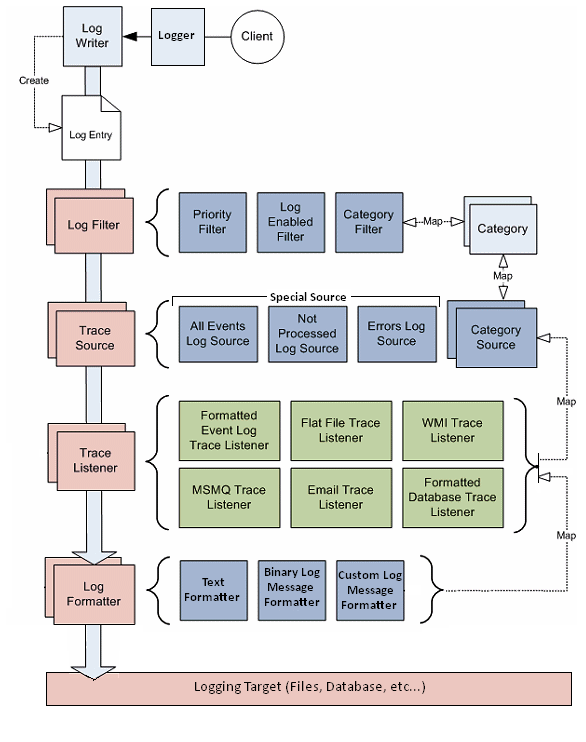
The seven main types of objects are:
- Logger:
Logger is a static class which provides typical APIs for writing logs. There are many overloaded APIs according to which logs can be routed to the respective logging target. - Log Entry: Log Entry represents a log message. It contains the common properties that are required for all log messages like Priority, Severity, and Category etc…
- Log Writer: The log writer is the main entry point for creating log entries and writing them to our chosen logging targets. It creates an instance of a log entry containing the information to be logged, and interacts with the other objects that filter the log entry, assign it to one or more categories, format it, and dispatch it to the appropriate targets.
- Log Filters: Log filters can block or allow a log entry based on a number of features. Each log entry is assigned to one or more categories (the default is the General category), and the category log filter can use these categories to pass or block a log entry. In addition, two special log filters can block all logging, or block log entries with a priority lower than a specified value. We define the categories, priorities, and the settings for the log filters in the configuration for the block.
- Trace Sources: Trace sources are effectively a set of buckets into which the block places all log entries that have not been blocked by a log filter. We use these buckets to define where log entries will be dispatched to—we can think of them as being the source of the log entries that will actually be dispatched to the target destinations.
There are two basic types of trace sources:
- Category Sources: There is a trace source for each category we define in the configuration of the block.
- Special Sources: There are three built-in trace sources: one that receives all log entries, one that receives log entries when an error occurs during processing or dispatching of the log entry, and one that receives all log entries that do not match any configured category.
- Trace Listeners: Trace listeners represent the targets for our log entries, and we configure one for each type of target (such as the Windows® Event Log, a disk file, and an e-mail message) to which we want to send the log entries. Trace listeners listen for log entries arriving in the trace source buckets, format each log entry as required, and dispatch it to the target configured for that trace source. Our configuration maps each trace source (each category source we define plus the three special sources) to one or more trace listeners. The important point to note here is that this allows us to dispatch each log entry to zero, one, or more targets (such as sending it as e-mail as well as writing it to the Windows Event Log).
- Log Formatters: Each trace listener we add to our configuration can use a log formatter to convert the data in the log entry from a series of properties into format suitable for sending to the log target. The block contains a text formatter that we can configure with trace listeners that dispatch log entries to targets such as disk files, e-mail, or Windows Event Log; and a binary formatter that serializes the log entry data into a format suitable for transmission to targets such as Windows Message Queuing (MSMQ). The text formatter is configurable so that we can modify the format and content of the text message, including using placeholders for the values of the properties of the log entry.
The Logging Process Sequence
Although the logging process should be clear to us now from the description of the objects used, the following describes the process step by step to help us understand how it relates to the set of objects it uses.
- Our application submits information that the Logging Application Block should log either by using the
static class Logger or LogWriter class to automatically create a log entry or by directly creating an instance of the LogEntry class and populating it with the information to log. The log entry can define a set of categories that map to the categories defined in the configuration. This mapping controls the processes that the block applies to the log entry (the filters and sources that it uses). - The log writer passes the log entry through the log filters that we define in the configuration. These filters can block the log entry based on its priority, category name, or when logging is not enabled.
- If the log filters do not block the log entry, the log writer retrieves the appropriate trace sources. The trace sources we can use consist of a set of category sources that we create and configure, and three special sources that we can use to ensure that the block will record all log entries (for example, if there is an error within the logging system or if the log entry does not match any configured category).
- We can configure one or more trace listeners for each of the trace sources. In other words, we can configure a specific set of trace listeners for each category that the message might contain, and for each of the three special sources that might handle the message. The log writer will pass the log entry to the matching trace listeners we specify.
- The trace listener then uses a log formatter to transform the information in the log entry into an appropriate format, such as formatted text or binary, and writes the result to the output specific to the type of trace listener. Depending on the trace listener type, the output can go to a file, a database, WMI, Message Queuing (also known as MSMQ), or as an e-mail message.
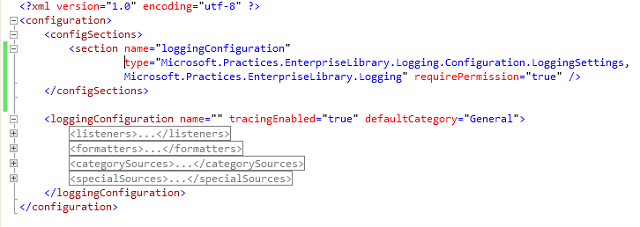
Source Schema for the Logging Application Block
3. Practical Steps
Let’s focus on the practical part of Logging Application Block.
Once MSMQ is installed; create a non-transactional private queue where all logging messages will be sent. Transactional queue will work but not necessary since MSMQ Distributor does not use distributed transaction.
Creating a New Message Queue
- In the Control Panel, double-click Administrative Tools, and then double-click Computer Management.
- Expand Services and Applications, and then expand Message Queuing (available only if MSMQ installed successfully).
Note: A queue may be either public or private, depending on the requirements of the notification application. Our sample application demonstrates a private queue.
- Right-click Private Queues, and then click New.
- Enter a name for the private queue, and then click OK.

After queue is created, go to properties and, set permissions as needed as who has what access to the queue.
Creating a New Visual Studio Project
- Open Visual Studio.
- Select New | Project | Visual C# | Windows Forms Application.
- Name the project something appropriate like
EntLibLoggingExampleOne.
Adding a Reference to the Enterprise Library Logging Assembly
- In Solution Explorer, right click the project node and select Add Reference.
- Browse and select the Microsoft.Practices.EnterpriseLibrary.Logging.dll.
- Click Ok.
Configure Logging for the Application
Although we can configure the Application Logging Block through code, it’s better to do it through XML config file. Any change does not require us to recompile the code. Additionally we can easily create the configurations through Enterprise Library Configuration Tool - EntLib Config .NET 4. Now add an application configuration file to the project and then add configuration information to it.
- In Solution Explorer, right click the project node and select Add | New Item.
- Select Visual C# Items | General | Application Configuration File
- Leave the filename App.config as shown:
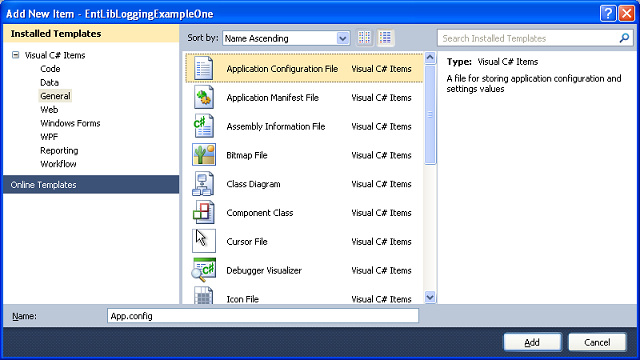
- Click Add
- Open app.config in the XML editor (double click it in Solution Explorer) and note that it is empty. We should see something like this:

- Close app.config.
- Right click app.config in Solution Explorer and select Edit Enterprise Library V5 Configuration as shown:
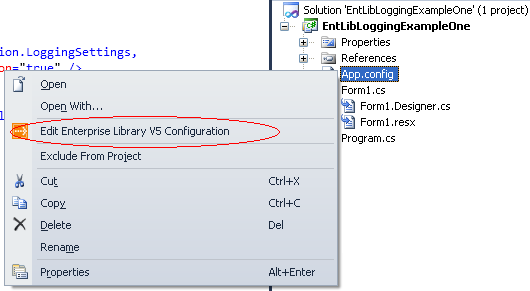
- The Enterprise Library Configuration V5 Editor opens.
- Click on Blocks | Add Logging Settings as shown (if Logging Settings is not already there):
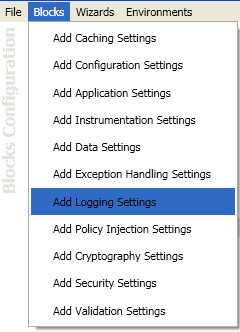
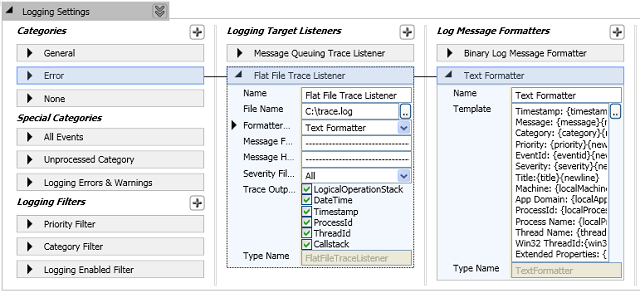
- A new Logging Application Block node is added to the configuration editor. Click on symbol to add new categories, filters, trace listeners and message formatters. The layout of the block will be similar to this:
- Close the app.config visual editor window.
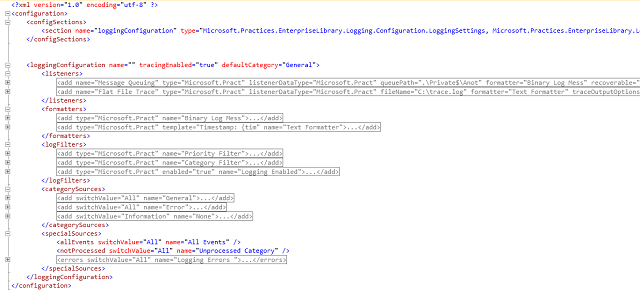
- Double click app.config in Solution Explorer to open it in the XML editor. We can see the configuration XML added for the logging block.
Adding Logging Code to the Application
The application is all configured up to work with logging and the dependencies are linked in.
private void myButtonWriteToLog_Click(object sender, EventArgs e)
{
LogEntry logEntry = new LogEntry();
logEntry.Message = "Starting up the application";
Logger.Write(logEntry);

Logger.Write("Hello Error", "Error");
Logger.Write("Hello Message", "None", 1, 01, TraceEventType.Information);
Logger.Write("Hello Crash", "General", 1, 02, TraceEventType.Error);
Logger.Write("Hello Crash", "Error", 1, 01, TraceEventType.Error, "Ravi");
}
Running the Application and Validating the Logging
- Press CTRL+F5.
- Click the button to run the click handler.
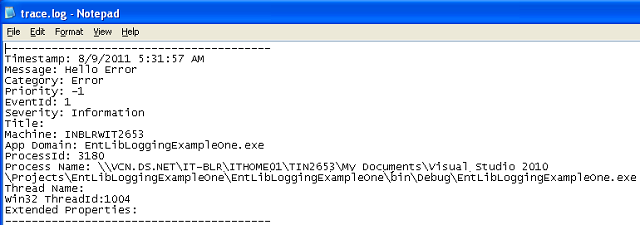
- Open the configured flat file – “C:\trace.log”.
- Following should be the content of log file:
4. MSMQ Distributor Service
Applications must often send log entries from multiple sources to a common destination. The Logging Application Block takes advantage of Message Queuing (also known as MSMQ) to allow us to do this. By configuring multiple applications to use the same message queue, we can process log entries at a central location.
To distribute log entries to a central destination, configure our application to write log entries to the message queuing trace listener. When the application sends a log entry to the Logging Application Block, it places the log entry on a Message Queuing queue. The distributor service runs as a Windows service on either the same computer as the application or on a remote computer. It polls the queue to see if there are any log entries on it. The polling interval is determined by configuration. If there are log entries on the queue, the distributor service uses an instance of the Logging Application Block to forward the messages to the trace listener(s). The trace listener(s) write the log entries to the destinations, such as an event log or a flat file.
The distributor service requires that all log entries be formatted using the BinaryLogFormatter class. If the service cannot interpret the entry, it will log an error to the Application Event Log and shut down.
The following schematic illustrates how multiple applications use the distributor service to send log entries to a central location.
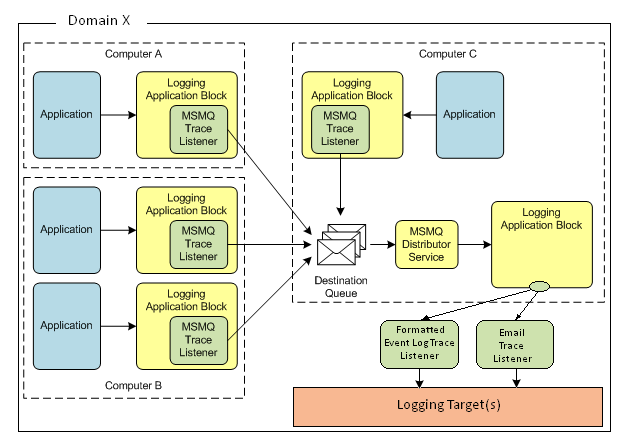
Each instance of the Logging Application Block uses an instance of the message queuing trace listener (the MsmqTraceListener class) to send the log entries to a single destination queue. The distributor service polls the queue and uses another instance of the Logging Application Block to direct the log entries to the proper trace listeners.
The main flow is given below. All computers should be in the same domain to realize this.
- Application on machine A calls Enterprise Library logging API to write a log entry.
- Enterprise Library serializes the entry using binary formatter and drops the serialized log entry into local MSMQ outgoing queue.
- MSMQ sends the entry as a message to destination queue on computer C.
- MSMQ distributor service polls the destination queue.
- MSMQ distributor service reads the message and deserializes it back to log entry.
- MSMQ distributor service calls Enterprise Library API to log the entry.
- MSMQ distributor service removes entry from queue.
MSMQ Distributor Service is readily available in Enterprise Library framework; we just need to configure, install and run it. It requires two files which will be installed along with the Enterprise Library package in “..\Microsoft Enterprise Library 5.0\bin” folder - MsmqDistributor.exe and MsmqDistributor.exe.config.
Configuration
MSMQ distributor service configuration is almost similar to the configuration of Logging Application Block. Additionally, the service has to read the message queue in order to read the logs.
- Open the MSMQDistributor.exe.config in Enterprise Library Configuration V5 Editor.
- Click on Blocks | Add Logging Settings as shown (if Logging Settings not already there):

- A new Logging Application Block node is added to the configuration editor. Click on + <shape id="_x0000_i1038" style="WIDTH: 18pt; HEIGHT: 16.5pt" type="#_x0000_t75">symbol to add new categories, filters, trace listeners and message formatters. The layout of the block will be similar to this:
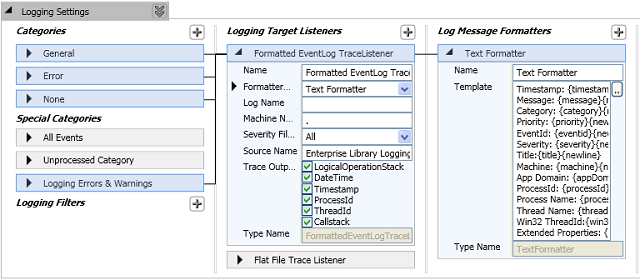
- Close the MSMQDistributor.exe.config visual editor window.
- Double click MSMQDistributor.exe.config to open it in the XML editor. We can see the configuration XML added for the logging block.

- Here we have an additional settings node as “
msmqDistributorSettings”. We have to manually edit these details as we cannot use the configuration console to do this. - Change the
msmqPath attribute to match the name of specified queue. The default name is ".\Private$\entlib". - “
queueTimeInterval” is the time interval (in milliseconds) to check for log entries in the message queue. - The MsmqDistributor.exe.config file contains a “
serviceName” attribute. Do not change this name after installing the distributor service. If we do, we will not be able to uninstall the service because the system will try to uninstall a service with the new serviceName value. - We will also be unable to restart the service after changing the
serviceName attribute. When Windows restarts a service, it first initiates a service stop and then it initiates a service start. If we change the serviceName attribute, Windows will be unable to initiate the service stop because it will look for a service with the new name. - We should use the
serviceName attribute to run multiple instances of the distributor service on the same computer. The following procedure shows how to do this. - Copy the Msmqdistributor.exe file and the MsmqDistributor.exe.config file to multiple directories.
- Update the MsmqDistributor.exe.config file in each directory to have a unique service name.
- Run the Installutil tool for each copy. This will give each copy of the distributor service the same service name as the one in the corresponding configuration file.
The distributor service uses the service name as the trace source when it logs messages to the event log. This log is always the Application Event Log.
Installation
Once the configuration is over, we can install the service in the system; the steps are given below:
- Open Visual Studio command prompt. From the command line, type installutil -i msmqdistributor.exe. (The installer tool, Installutil.exe, is located in the Framework directory. An example is C:\WINDOWS\Microsoft.NET\Framework\v2.0.50727.)
- When we run the installer tool, we will be prompted to enter a user name and a password for the account that the Message Queuing service runs under.
- To uninstall the distributor service, at the command line, type installutil /u msmqdistributor.exe.
- It should prompt respective message for both installation and uninstallation.
Starting the Distributor Service
The following procedure starts the distributor service.
- On the taskbar, click Start, click Control Panel, double-click Administrative Tools, and then double-click Services.
- Right-click the distributor service, and then click Start.
Validating the Logging
- Run the earlier discussed application which writes log in message queue and flat file.
- Click the button to run the click handler.
- Open the Windows Event Viewer.
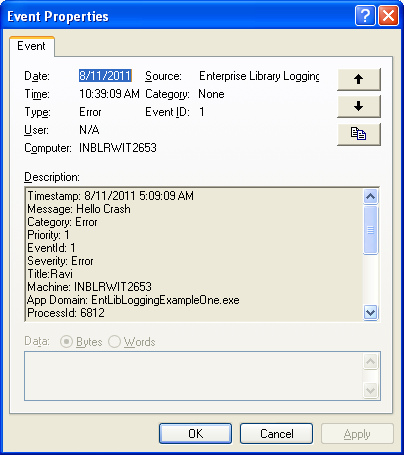
- Open the application event log and verify recent events; it should be similar to the following:
5. Points to Remember during Configuration
These are few important settings in the Logging Application Block configuration:
- Recoverable - This is to instruct if message should be persisted on disk. If this is set to
false, then messages in queue will not survive shutdown. - TimeToReachQueue - How long message should remain in outgoing queue if destination queue is unreachable. After that time elapsed, the message will either be in system Dead-letter Queue if
useDeadLetterQueue is set to true, or discarded. The message will be in Dead-letter queue on the source computer. Default is about 250 years. Dead-letter queues are system-generated queues used for storing messages that could not be delivered. - TimeToBeReceived - How long message should remain in the destination queue. The message can remain there for a long time if MSMQ Distributor service is not running. The message will be in Dead-letter queue on the destination computer.
- UseAuthentication - This is to enable message authentication and should match queue's authentication setting. Also both sender and receiver need to have updated certificates.
6. References
7. History
- 12/08/2011 - Initial post
