It's been a long time I have written any article on ASP.NET. Just few weeks back, I got a very interesting requirement where I had to customize my GridView by Grouping the Columns and also merging the Rows by using Colspan properties. So while in View mode of GridView, the data should be displayed in Rows and Columns format, but when I click on Edit it will display in List Format where we can place the controls in any format we want. You can refer to the figure below for the final target that I am going to show in this article.

In the figure above, you can see the Employee Details and Address Details are grouped together. Also in Edit Mode, the same data is displayed in List Format where we are free to put the controls in any format. I have used different colours for different groups so that groups of similar items can be easily identifiable in any format.
To keep it simple, I am using SqlDataSource control for databinding and Employee table of Northwind database. Assuming that you must be aware of the basics of databinding and ASP.NET, I am going directly to the topic. This topic covers mostly the control properties of ASP.NET so you may connect to any datasource or databinding controls as per your requirement.
Before I start, I have done the following steps:
- Created a empty ASP.NET web application.
- In default.asp page, added a
GridView control and a SqlDataSource. - Configured the
SqlDataSource to connect to SqlServer Northwind Database. - Selected
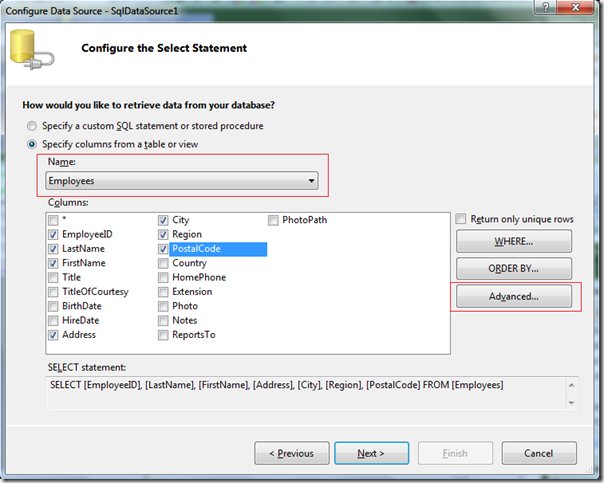
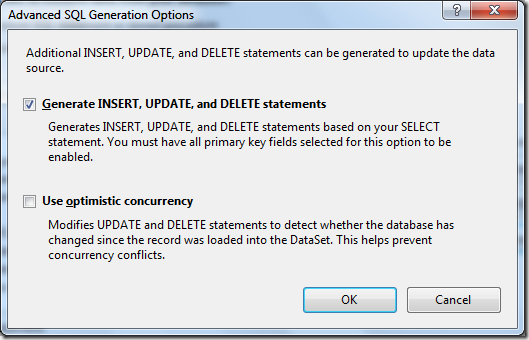
Employee table from the Database, and from the Advanced property of the Configuration screen of SqlDataSource, I have selected to Generate Insert, Update and Delete statements.
Refer to the figure below for the specific configuration of SqlDataSource mentioned above.


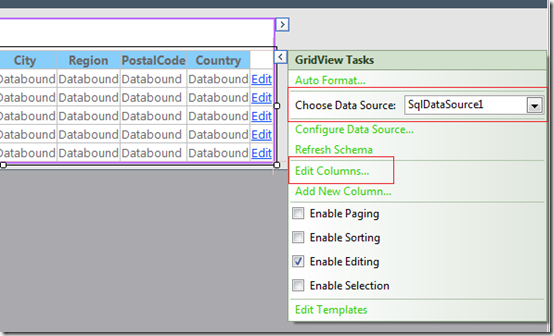
Once you save these changes, you can select to Bind the GridView with the SqlDataSource. Now configure the GridColumns by Selecting the EditColumns as given in the screen below:

This will open the popup where you can customize the individual columns, to customize the columns as per our requirement convert all the fields into TemplateFields which you can do from the same popup screen.

Once these changes are done, our configuration part is done and now we are ready to move to the coding part where each and every step will define the look and feel of our required screen.
First of all, I am going to show my default.aspx page, while doing the steps above my VS2010 tools have generated lots of code. I am going to clean up the codes which I don't want at this moment and which is out of scope of this article. If you look at the code below, I have cleared the InsertParameter, DeleteParameter, InsertCommand and DeleteCommand codes from SqlDataSource. The only part right now I am interested in is SelectCommand, UpdateCommand and UpdateParameters. And leaving rest of the codes untouched.
 1: <asp:SqlDataSource ID="SqlDataSource1" runat="server"
  ConnectionString="<%$ ConnectionStrings:NorthwindConnectionString %>"
 2:     SelectCommand="SELECT * FROM [Employees]"
 3:     UpdateCommand="UPDATE [Employees] SET [LastName] = @LastName,
      [FirstName] = @FirstName, [Address] = @Address,
      [City] = @City, [Region] = @Region, [PostalCode] = @PostalCode,
      [Country] = @Country WHERE [EmployeeID] = @EmployeeID">
 4:     <UpdateParameters>
 5:         <asp:Parameter Name="LastName" Type="String" />
 6:         <asp:Parameter Name="FirstName" Type="String" />
 7:         <asp:Parameter Name="Address" Type="String" />
 8:         <asp:Parameter Name="City" Type="String" />
 9:         <asp:Parameter Name="Region" Type="String" />
10:         <asp:Parameter Name="PostalCode" Type="String" />
11:         <asp:Parameter Name="Country" Type="String" />
12:         <asp:Parameter Name="EmployeeID" Type="Int32" />
13:     </UpdateParameters>
14: </asp:SqlDataSource>
Now let me run my program, this gives me the following output. This is just the default layout which my ASP.NET page gave me.

So let me start with the customization. First, I am going to merge the Columns. To get this, I have to write just simple few lines of code on RowCreated event of my Employee GridView.
protected void EmployeeGrid_RowCreated(object sender, GridViewRowEventArgs e)
{
if (e.Row.RowType == DataControlRowType.Header)
{
GridView objGridView = (GridView)sender;
GridViewRow objgridviewrow = new GridViewRow
(1, 0, DataControlRowType.Header, DataControlRowState.Insert);
TableCell objtablecell = new TableCell();
#region Merge cells
AddMergedCells(objgridviewrow, objtablecell, 3,
"Employee Detail", System.Drawing.Color.LightGreen.Name);
Country) under the column name "Address Details"
AddMergedCells(objgridviewrow, objtablecell, 5,
"Address Details", System.Drawing.Color.LightSkyBlue.Name);
objGridView.Controls[0].Controls.AddAt(0, objgridviewrow);
#endregion
}
}
This code is referring to the method AddMergedCells with GridView, TableCell, number of Columns to merge, Title of the Merged Cells with the background color as an argument. In the code above, first I took the instance of the Current GridView with GridView row object and TableCell object. And with these empty cells, we finally created the Merged cells and added to the top of the current instance of the GridView.
protected void AddMergedCells(GridViewRow objgridviewrow,
    TableCell objtablecell, int colspan, string celltext, string backcolor)
{
    objtablecell = new TableCell();
    objtablecell.Text = celltext;
    objtablecell.ColumnSpan = colspan;
    objtablecell.Style.Add("background-color", backcolor);
    objtablecell.HorizontalAlign = HorizontalAlign.Center;
    objgridviewrow.Cells.Add(objtablecell);
}
In AddMergedCells, we have just few lines of code which basically set the different properties of the TableCells and using the ColSpan it creates the Merged cells and adds to the GridView. Now once you run the code, ideally we should get the following output:

As you can see above, the same grid is little decorated now, with merged columns. This takes us one step closer to our requirement. Now our next target is to Create the Merged cells. To get this, first I have created a simple table with all the columns in the custom format which I wish to display, alternatively you can use any other layout too, thecode of which is given below:
<table style="float: left" width="100%">
    <tr align="left" style="background-color: LightGreen">
        <td>
            EmployeeID :
        </td>
        <td>
            <asp:Label ID="lblEmployeeID" runat="server"
            Text='<%# Bind("EmployeeID") %>'></asp:Label>
        </td>
        <td>
            Last Name
        </td>
        <td>
            <asp:TextBox ID="txtLastName" runat="server"
            Text='<%# Bind("LastName") %>'></asp:TextBox>
        </td>
        <td>
            First Name
        </td>
        <td>
            <asp:TextBox ID="txtFirstName" runat="server"
            Text='<%# Bind("FirstName") %>' />
            <asp:RequiredFieldValidator ID="RequiredFieldValidator5"
            runat="server" ErrorMessage="First Name is Required."
                ControlToValidate="txtFirstName"
                CssClass="Error"></asp:RequiredFieldValidator>
        </td>
    </tr>
    <tr align="left" style="background-color: LightSkyBlue">
        <td>
            Address
        </td>
        <td>
            <asp:TextBox ID="txtAddress" runat="server"
            Text='<%# Bind("Address") %>' />
        </td>
        <td>
            City
        </td>
        <td>
            <asp:TextBox ID="txtCity" runat="server"
            Text='<%# Bind("City") %>' />
        </td>
        <td>
            Region
        </td>
        <td>
            <asp:TextBox ID="txtRegion" runat="server"
            Text='<%# Bind("Region") %>' />
        </td>
    </tr>
    <tr align="left" style="background-color: LightSkyBlue">
        <td>
            Postal Code
        </td>
        <td>
            <asp:TextBox ID="txtPostalCode" runat="server"
            Text='<%# Bind("PostalCode") %>' />
        </td>
        </td>
        <td>
            Country
        </td>
        <td colspan="4" align="left">
            <asp:TextBox ID="txtCountry" runat="server"
            Text='<%# Bind("Country") %>' />
        </td>
    </tr>
</table>
Now coming to the rest of the code, you have to remove all the EditItemTemplate codes from all the columns except the first Column EmployeeID, because this column is now going to span over rest of the Columns. Next paste the above table layout format into the EditItemTemplate of the EmployeeID, which will give you the code as below. This is also our complete code of the ASPX page.
<asp:Content ID="BodyContent" runat="server"
ContentPlaceHolderID="MainContent">
    <asp:SqlDataSource ID="SqlDataSource1" runat="server"
    ConnectionString="<%$ ConnectionStrings:NorthwindConnectionString %>"
        SelectCommand="SELECT * FROM [Employees]"
        UpdateCommand="UPDATE [Employees] SET [LastName] = @LastName,
        [FirstName] = @FirstName, [Address] = @Address, [City] = @City,
        [Region] = @Region, [PostalCode] = @PostalCode, [Country] = @Country
        WHERE [EmployeeID] = @EmployeeID">
        <UpdateParameters>
            <asp:Parameter Name="LastName" Type="String" />
            <asp:Parameter Name="FirstName" Type="String" />
            <asp:Parameter Name="Address" Type="String" />
            <asp:Parameter Name="City" Type="String" />
            <asp:Parameter Name="Region" Type="String" />
            <asp:Parameter Name="PostalCode" Type="String" />
            <asp:Parameter Name="Country" Type="String" />
            <asp:Parameter Name="EmployeeID" Type="Int32" />
        </UpdateParameters>
    </asp:SqlDataSource>
    <asp:GridView ID="EmployeeGrid" runat="server"
    AutoGenerateColumns="False"
    OnRowDataBound="EmployeeGrid_RowDataBound" DataKeyNames="
    EmployeeID" DataSourceID="SqlDataSource1"
    OnRowCreated="EmployeeGrid_RowCreated"
    OnRowUpdating="EmployeeGrid_RowUpdating">
        <Columns>
            <asp:TemplateField HeaderText="EmployeeID"
            InsertVisible="False" HeaderStyle-BackColor="LightGreen"
                SortExpression="EmployeeID">
                <EditItemTemplate>
                    <table style="float: left" width="100%">
                        <tr align="left" style="background-color: LightGreen">
                            <td>
                                EmployeeID :
                            </td>
                            <td>
                                <asp:Label ID="lblEmployeeID"
                                runat="server" Text='<%# Bind
                                ("EmployeeID") %>'></asp:Label>
                            </td>
                            <td>
                                Last Name
                            </td>
                            <td>
                                <asp:TextBox ID="txtLastName"
                                runat="server" Text='<%#
                                Bind("LastName") %>'></asp:TextBox>
                            </td>
                            <td>
                                First Name
                            </td>
                            <td>
                                <asp:TextBox ID="txtFirstName"
                                runat="server" Text='<%#
                                Bind("FirstName") %>' />
                                <asp:RequiredFieldValidator ID="RequiredFieldValidator5"
                                runat="server" ErrorMessage="First Name is Required."
                                    ControlToValidate="txtFirstName"
                                    CssClass="Error"></asp:RequiredFieldValidator>
                            </td>
                        </tr>
                        <tr align="left" style="background-color: LightSkyBlue">
                            <td>
                                Address
                            </td>
                            <td>
                                <asp:TextBox ID="txtAddress"
                                runat="server" Text='<%# Bind("Address") %>' />
                            </td>
                            <td>
                                City
                            </td>
                            <td>
                                <asp:TextBox ID="txtCity"
                                runat="server" Text='<%# Bind("City") %>' />
                            </td>
                            <td>
                                Region
                            </td>
                            <td>
                                <asp:TextBox ID="txtRegion"
                                runat="server" Text='<%# Bind("Region") %>' />
                            </td>
                        </tr>
                        <tr align="left" style="background-color: LightSkyBlue">
                            <td>
                                Postal Code
                            </td>
                            <td>
                                <asp:TextBox ID="txtPostalCode"
                                runat="server" Text='<%# Bind("PostalCode") %>' />
                            </td>
                            </td>
                            <td>
                                Country
                            </td>
                            <td colspan="4" align="left">
                                <asp:TextBox ID="txtCountry"
                                runat="server" Text='<%# Bind("Country") %>' />
                            </td>
                        </tr>
                    </table>
                </EditItemTemplate>
                <ItemTemplate>
                    <asp:Label ID="Label8" runat="server"
                    Text='<%# Bind("EmployeeID") %>'></asp:Label>
                </ItemTemplate>
            </asp:TemplateField>
            <asp:TemplateField HeaderText="LastName"
            SortExpression="LastName" HeaderStyle-BackColor="LightGreen">
                <ItemTemplate>
                    <asp:Label ID="Label1" runat="server"
                    Text='<%# Bind("LastName") %>'></asp:Label>
                </ItemTemplate>
            </asp:TemplateField>
            <asp:TemplateField HeaderText="FirstName"
            SortExpression="FirstName" HeaderStyle-BackColor="LightGreen">
                <ItemTemplate>
                    <asp:Label ID="Label2" runat="server"
                    Text='<%# Bind("FirstName") %>'></asp:Label>
                </ItemTemplate>
            </asp:TemplateField>
            <asp:TemplateField HeaderText="Address"
            SortExpression="Address" HeaderStyle-BackColor="LightSkyBlue">
                <ItemTemplate>
                    <asp:Label ID="Label3" runat="server"
                    Text='<%# Bind("Address") %>'></asp:Label>
                </ItemTemplate>
            </asp:TemplateField>
            <asp:TemplateField HeaderText="City"
            SortExpression="City" HeaderStyle-BackColor="LightSkyBlue">
                <ItemTemplate>
                    <asp:Label ID="Label4" runat="server"
                    Text='<%# Bind("City") %>'></asp:Label>
                </ItemTemplate>
            </asp:TemplateField>
            <asp:TemplateField HeaderText="Region"
            SortExpression="Region" HeaderStyle-BackColor="LightSkyBlue">
                <ItemTemplate>
                    <asp:Label ID="Label5" runat="server"
                    Text='<%# Bind("Region") %>'></asp:Label>
                </ItemTemplate>
            </asp:TemplateField>
            <asp:TemplateField HeaderText="PostalCode"
            SortExpression="PostalCode" HeaderStyle-BackColor="LightSkyBlue">
                <ItemTemplate>
                    <asp:Label ID="Label6" runat="server"
                    Text='<%# Bind("PostalCode") %>'></asp:Label>
                </ItemTemplate>
            </asp:TemplateField>
            <asp:TemplateField HeaderText="Country"
            SortExpression="Country" HeaderStyle-BackColor="LightSkyBlue">
                <ItemTemplate>
                    <asp:Label ID="Label7" runat="server"
                    Text='<%# Bind("Country") %>'></asp:Label>
                </ItemTemplate>
            </asp:TemplateField>
            <asp:CommandField ShowEditButton="True" />
        </Columns>
    </asp:GridView>
</asp:Content>
Now since the first columns are spanning into the rest of the Columns, we have to write few lines of code to hide the rest of the columns. So here in the RowDataBound of EmployeeGrid, I have hidden rest of the columns except the Last column where we have kept our Command Buttons and the first Column where basically our code sits which spans in the other columns.
protected void EmployeeGrid_RowDataBound(object sender, GridViewRowEventArgs e)
{
    if (e.Row.RowState.ToString().Contains("Edit"))
    {
        GridView editGrid = sender as GridView;
        int colSpan = editGrid.Columns.Count;
        for (int i = 1; i < colSpan - 1; i++)
        {
            e.Row.Cells[i].Visible = false;
            e.Row.Cells[i].Controls.Clear();
        }

        e.Row.Cells[0].Attributes["ColSpan"] = (colSpan - 1).ToString();
    }
}
Now let's run the example code, so we are almost done now, as you can see in the screen below this is exactly what we were expecting. But just wait a moment, this is just the visual layout. What about saving the modified data?

Ok, now the first thing we have to do is to rename all the controls properly so that we can refer the controls in the FindControl methods in code behind. And now I have to capture the Updating event of the SqlDataSource, where basically I will get the reference of the input controls with the modified data if any and set the DefaultValue of the UpdateParameters of SqlDataSource control.
protected void EmployeeGrid_RowUpdating(object sender, GridViewUpdateEventArgs e)
{
GridViewRow row = EmployeeGrid.Rows[e.RowIndex];
SqlDataSource1.UpdateParameters["LastName"].DefaultValue =
((TextBox)(row.Cells[4].FindControl("txtLastName"))).Text;
SqlDataSource1.UpdateParameters["FirstName"].DefaultValue =
((TextBox)(row.Cells[4].FindControl("txtFirstName"))).Text;
SqlDataSource1.UpdateParameters["Address"].DefaultValue =
((TextBox)(row.Cells[0].FindControl("txtAddress"))).Text;
SqlDataSource1.UpdateParameters["EmployeeID"].DefaultValue =
((Label)(row.Cells[1].FindControl("lblEmployeeID"))).Text; ;
SqlDataSource1.UpdateParameters["City"].DefaultValue =
((TextBox)(row.Cells[2].FindControl("txtCity"))).Text;
SqlDataSource1.UpdateParameters["Region"].DefaultValue =
((TextBox)(row.Cells[3].FindControl("txtRegion"))).Text;
SqlDataSource1.UpdateParameters["PostalCode"].DefaultValue =
((TextBox)(row.Cells[4].FindControl("txtPostalCode"))).Text;
SqlDataSource1.UpdateParameters["Country"].DefaultValue =
((TextBox)(row.Cells[0].FindControl("txtCountry"))).Text;
}
So with this, I have completed my end to end databinding, column merging, row merging, updating our grid view control using SqlDataSource. In this example, I have used Northwind database which you can get online. And this example is compatible with ASP.NET 2.0 and above.
On top of this, you can customize this according to your requirements, like changing the layout in some other format, add images, other controls, adding validation controls, Inserting new record, deletion, etc.
You can download the complete application VS2010 source code from here.
