Introduction
This article introduces a small utility program that can help in visualizing the existing directory structure in terms of graphs. This utility is being developed to create a tree like structure based on the directory structure provided as input.
Background
If you've ever designed a build setup for any existing project, you've encountered the daunting task of visualizing the project structure. Sometimes, you may have created a sketch to represent the same. During my experience with build terminologies, I researched for a simple tool to generate a visual representation of the existing project layout. Luckily, I found some utilities, but most of them were commercial utilities. Or I can say, I was not able to find such a free utility. This was the inception of this small utility. I had an idea of recursively processing the directory tree, but the problem was the rendering in a graphical manner. After toilsome efforts, I found a free toolkit called GraphWiz. This toolkit was composed of many utilities to render many kinds of graphs. Here, I was only interested in a directed graph creation utility. GraphWiz has such a utility, namely Dot. Dot requires a simple input file that is written using a Dot specific syntax (described later), and renders the output in various formats including GIF, JPG, and PNG.
The Dot Syntax
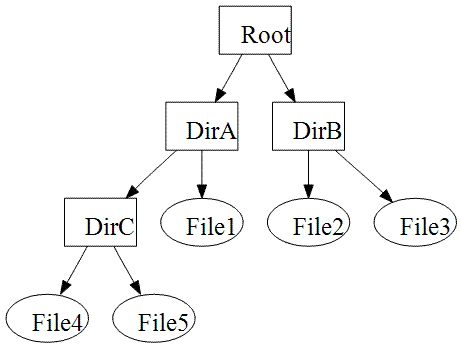
Dot uses a very simple syntax to create graph like structures. The basic tokens of the syntax are Node and Connector Edges. I would like to provide a very simple example for the Dot syntax. Suppose we want to display the following directory structure in a graph:

The Dot syntax for the above structure is as shown here:
digraph G {
    Root [shape=box];

    DirA [shape=box];
    DirB [shape=box];
    DirC [shape=box];

    Root -> DirA;
    Root -> DirB;

    DirA-> DirC;
    DirA-> File1;

    DirB-> File2;
    DirB-> File3;

    DirC-> File4;
    DirC-> File5;
}
Using the following command, the output can be rendered in GIF format:
dot -Tgif tree.dt -o tree.gif
The algorithm for generating graphs
The basic algorithm I used here for generating the graphs for the specified tree structure is:
- Start from the root directory provided by the input.
- For every directory, create a node of inverted triangle shapes.
- For every directory being traversed, process each side by creating the node for every file and linking those nodes to their respective parents (the file nodes are of elliptical shape).
- For every directory being traversed, start the traversal of the subdirectory by specifying it as the root and making a recursive call to itself.
- When every file and directory has been traversed, finish the writing of the Dot syntax and call the Dot utility to generate the output file.
The implementation of the above algorithm (in C#):
void ProcessDirectory(DirectoryInfo dInfo,string ParentNode)
{
foreach (DirectoryInfo tempDir in dInfo.GetDirectories())
{
nodeCtr++;
dotWriter.WriteLine("node{0} [shape=box,label=\"{1}\"]; ",
nodeCtr,tempDir.Name);
dotWriter.WriteLine("{0} -> node{1};", ParentNode, nodeCtr);
depth++;
ProcessDirectory(tempDir,"node" + nodeCtr.ToString());
}
foreach(FileInfo fInfo in dInfo.GetFiles())
{
nodeCtr++;
dotWriter.WriteLine("node{0} [shape=oval,label=\"{1}\"];",
nodeCtr, fInfo.Name);
dotWriter.WriteLine("{0} -> node{1};", ParentNode, nodeCtr);
}
depth--;
if (depth == 0)
{
}
}
I hope the implementation and basic concepts have been explained in enough details. Now, I would like to do a walkthrough of the utility.
How to use the utility
After downloading and extracting the utility, you will find an executable TreeStructure.exe. Start the utility, and the initial screen will be as shown:

Select the root for the directory structure for which the tree structure needs to be created.


Now, click Generate button. The utility will perform the traversal and create a Dot syntax file.

When the traversal is complete, it will show a file save dialog box for specifying the output file and format. Specify the output file name and the format, e.g., GIF or PNG, and click Save to generate the tree structure.

Once the tree structure is generated, the utility will get a prompt to preview the generated file.

After successful completion (hope so), you will get an image file containing the graphical representation of the directory structure, starting from the directory you specified. A sample is shown here:

Note: Please do not use it for very huge directory structures because it will create a very huge graphic that might not be visible clearly at 16x zoom; trust me I have tried this.
Where to find GraphWiz
The Graphviz software is freely available under an Open Source license. It is available at www.graphviz.org and at www.research.att.com. In addition to software, the latter site also provides documentation, sample layouts, and links to various sites describing libraries or packages incorporating the uses of Graphviz.
History
- Initial revision: 04 June 2008.
