Introduction
Lately, I have had to add some external logic to one of my BizTalk applications. I searched all over the web and didn't find a step by step guide to consume a custom .NET component from BizTalk 2006. So, I'm going to enumerate the steps to make a custom .NET component to be implemented from an Expression Shape of BizTalk 2006.
Making the component
- Open a new Visual Studio 2005 project. It must be a Class Library.
- Input a project name and rename the class name as desired.
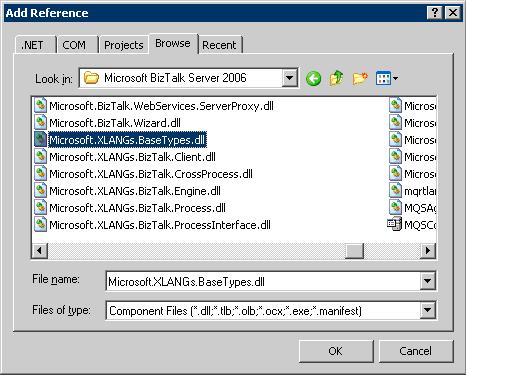
- Now, it's necessary to add some BizTalk 2006 references in order for both applications to communicate. So, right click in References-->Add Reference, and search in the default installation folder of BizTalk (by default, C:\Program Files\Microsoft BizTalk Server 2006). Add the “Microsoft.XLANGs.BaseTypes.dll” assembly.

- Add the following lines on the top of the code of the class:
using Microsoft.XLANGs.BaseTypes;
using System.Xml;
- Define the class as
[Serializable]. - Add two methods, one to receive a string, and the other to receive the whole XML message. Both of the methods are going to write the received values to a text file. These methods aren't useful in real world, but are good examples.
using System;
using System.Collections.Generic;
using System.Text;
using Microsoft.XLANGs.BaseTypes;
using System.Xml;
using System.IO;


namespace BizLog
    {
    [Serializable]
    public class Trace
    {
        public void WriteValue(string value)
        {
            File.AppendAllText("C:\\Log.txt", value);
            System.Diagnostics.EventLog.WriteEntry("BizLog", value);
        }

        public void WriteMessage(XLANGMessage msg)
        {
            XmlDocument doc = (XmlDocument)msg[0].RetrieveAs(typeof(XmlDocument));

            string mystring = doc.InnerXml;
            File.WriteAllText("C:\\content.txt", mystring);
        }
    }
}
- Sign the assembly. First of all, it's necessary to make a file with keys: In the VS2005 Command Prompt, input “Sn –k keyfile.snk”. A new file with keys will be generated. Now, it's necessary to inculcate the project with the new key file. Go to project's Properties-->Signing-->Sign the assembly-->Browse-->keyfile.snk.
- In the Solutions Configuration, select “Release” and build the assembly.
- Add the component to the GAC (Global Assembly Cache) Start-->Settings-->Control Panel-->Administrative Tools-->Microsoft .NET Framework 2.0 Configuration-->Manage the Assembly Cache-->Add an assembly to the GAC-->Select the assembly.
Calling the component from a BizTalk 2006 orchestration
Let's assume that you have defined a schema project, a message, send port, receive port and all the necessary stuff.

- From the orchestration project, it's necessary to add a reference to the assembly that contains the serializable class we have defined previously.
- It's time to create an instance of the new class. Go to “Orchestration View”. Click on Variables. Input the name of the instance and select the type and class, and select the referenced assembly.

- Add an Expression Shape to your orchestration and edit the code inside (double click over it). Tip: You can use Ctrl+j or Ctrl+Space to display all the elements you can use as messages, variables, and components.
Add the following code to your Expression Shape:

- Now, compile the assembly and deploy it. Don't forget to stop the BizTalk application before deploying the assembly, and it's recommended to stop and start the BizTalk Service from Control Panel-->Administrative Tools-->Services.
- Start the BizTalk application and send a message to your Receive location. Soon, you will see that two new files have appeared in your hard disk.
