Introduction
This tutorial doesn’t cover the theoretical basics of the new features
and controls, instead it concentrates on the practical example of using
the new features. This tutorial covers the following features:
- LINQ (Language Integrated Query) for the data manipulations
- ListView control for presenting the data
- LinqDataSource for binding data
- DataPager for pagination
- ASP.NET AJAX for getting rid of the unncecesassary page reloads
Requirements
- Visual Studio 2008
- SQL Server
Project
Our project is quite simply, it's just a guestbook, but it's good for
demonstrating the cool features of ASP.NET 3.5 and .NET 3.5 in action.
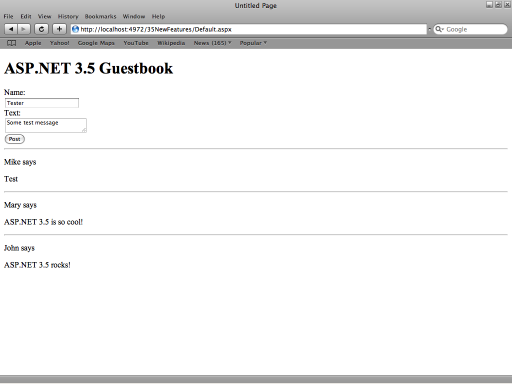
So, just open Visual Studio and create a new C# website.
Database design
We need to create a database when
the comments will be stored. We’ll just create a database with a single
table that will keep the comments posted by the authors. We can create
it in Server Explorer without leaving Visual Studio.

Don’t forget to set the Id field as an identity.
Let’s populate the database as well, so that we’ll have some data to display, just execute these queries:
INSERT INTO Comments
(Author, Text)
VALUES('John', 'ASP.NET 3.5 rocks!');

INSERT INTO Comments
(Author, Text)
VALUES('Mary', 'ASP.NET 3.5 is so cool!');
LINQ
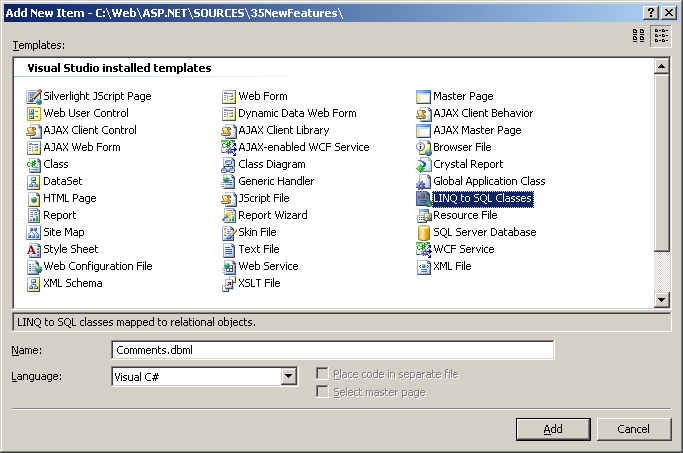
Then, we need to create a LINQ To SQL class that will be using for
the data manipulations (retrieving and inserting). We open
Website->Add New Item and choose LINQ To SQL Classes
Then we open Server Explorer and drag and drop our table on the workspace.
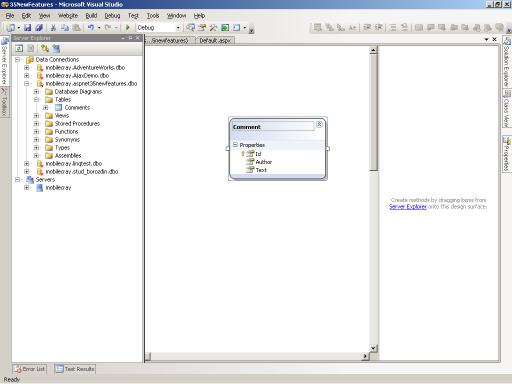
Now we just save this file and go futher, we can view the generated
code though located in
App_Code\Comments.dbml\Comments.designer.cs
LinqDataSource
Ok, it’s a time for create your webform that will hold all the
content. Actually, it is already created by Visual Studio, we just have
to add some content there.
We are going to start with a data source, open Toolbox, expand the data section and find LinqDataSource there.

Drag it to the webform. You will get the following code:
<asp:LinqDataSource ID="LinqDataSource1" runat="server">
</asp:LinqDataSource>
Give it a more appopriate name, something like dsComments. Now switch
to the Design view, click on the LinqDataSource we’ve just added and
select Configure Data Source.
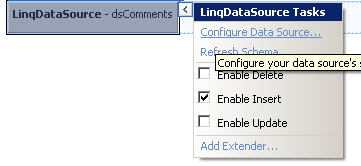
Choose the only avaliable data context object and click Next.
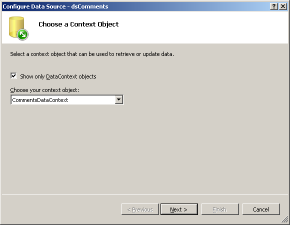
Then leave everything by default by click on the Order By button. And choose Id and the Descending order

Click Ok and finish, switch to the Source view and look at the code we get:
<asp:LinqDataSource ID="dsComments" runat="server"
    ContextTypeName="CommentsDataContext" EnableInsert="True" OrderBy="Id desc"
    TableName="Comments">
</asp:LinqDataSource>
Pretty simple, I would say.
ListView
It’s time to add the ListView control. It’s a new data bound control
that enables you to have a full control of the rendered HTML code. It’s
also located in the Data section of Toolbox. Drag it and rename it to
lvComments, also don’t forget to assign a data source to it. You must
get the following code:
<asp:ListView ID="lvComments" runat="server" DataSourceID="dsComments">
</asp:ListView>
Then, we have to add the <LayoutTemplate> that will be the root template
<asp:ListView ID="lvComments" runat="server" DataSourceID="dsComments">
    <LayoutTemplate>
        <h1>ASP.NET Guestbook</h1>
        <div id="itemPlaceholder" runat="server"></div>
    </LayoutTemplate>
</asp:ListView>
Please, note the we have the div tag with id="itemPlaceholder"
runat="server". They denote that ListView content will be placed in the
place of that div, itemPlaceholder is the default ID of the content
placeholder.
To display out data we should add the <ItemTemplate> element and place some content there
<ItemTemplate>
    <div>
        <b><%# Eval("Author") %></b> says<br />
        <%# Eval("Text") %>
    </div>
</ItemTemplate>
It’s simply and has nothing new if you worked with other data bound
controls. Let’s add the separator element to separate the posts:
<ItemSeparatorTemplate>
    <hr />
</ItemSeparatorTemplate>
Compile the website, you should you see a very simply webpage with
just two comments by Mary and John that we added in the very beginning.
It’s cool, but what about enabling users to post comments? It also can
be done by using LinqDataSource and ListView.
First, add EnableInsert=”True” attribute to the LinqDataSource. Second, we need to add the insert item template to the ListView.
<InsertItemTemplate>
    Name:<br />
    <asp:TextBox ID="txtBox" runat="server" Text='<%# Bind("Author") %>' /><br />
    Text:<br />
    <asp:TextBox ID="txtText" runat="server" Text='<%# Bind("Text") %>'
        TextMode="MultiLine" /><br />
    <asp:Button runat="server" CommandName="Insert" Text="Post" /><br />
</InsertItemTemplate>
Pay attetion at two things – data binding in the input controls and the
CommandName attribute in the button. If you compile the website right
now, you won’t see see the post form because you should define its
position first, to do that add InsertItemPosition="FirstItem" to the
ListView attributes, you can set it to LastItem however.
Now compile the project and try posting some comments. It’s working that is good.
DataPager
It’s time to add a pagination and see another new control in action. It
is called DataPager. Add the following code to the LayoutTemlate of the
ListView:
<asp:DataPager runat="server" PagedControlID="lvComments" PageSize="5">
    <Fields>
        <asp:NumericPagerField />
    </Fields>
</asp:DataPager>
I
suppose it’s pretty self-explanatory, PagedControlID defined the
control we want to page, PageSize sets the number of entries per page.
<asp:NumericPagerField /> says that we want to have the list of
the page numbers. Compile it and try it in the browser.
I guess you noticed that it has an ugly postback in its URL. You can easily get rid of it by adding the QueryStringField attribute to the DataPager and of course by setting its value ;-).
<asp:DataPager runat="server" PagedControlID="lvComments" PageSize="5"
                    QueryStringField="page">
It looks much better now and you can send the link to the 10th page of your guestbook to a friend.
ASP.NET AJAX
At the final stage, let’s add some AJAX, so that the page doesn’t reload each time you post a comment.
Visual Studio 2008 has a built-in ASP.NET AJAX library which is extremely easy in use.
Open Toolbox, expand AJAX Extensions and drop ScriptManager to the page. ScriptManager is a control that loads all the necessary JavaScript libraries needed for ASP.NET AJAX. If you forget to add ScriptManager, you’ll get an error.
So, we don’t want the whole page to be updated when posting a comment, we just want to update our ListView, so we are surrounding the ListView with UpdatePanel.
<asp:UpdatePanel runat="server">
    <ContentTemplate>
        <% List View code %>
    </ContentTemplate>
</asp:UpdatePanel>
Points of Interest
There are a lot of cool features in ASP.NET that help you make your
applications much faster than in ASP.NET 2.0. We have build a guestbook
without writing a line of C# code. Of course this tutorial wasn't mean
to cover all the features of ASP.NET 3.5, it doesn't cover the basics
things, however you can find them on MSDN and on ww.asp.net.
