Introduction
I am getting what feels like an infinite number of emails and calls from all over world about the same query: How to install Windows XP Embedded. So I thought, "why not to make an article."
Lots of people get a problem during the installation of XP-Embedded, like when making an image for the first time. The reason is that there is no documented help for certain issues. So I thought I'd summarize all these in a tutorial.
Installing XP Embedded
Well, installing Embedded XP is not a one-button-click process. Most people get in trouble when there is an error while installing. However, it is not at all that tough — you just have to apply your mind a little.
What you Get When you Download EXP
When you download Embedded XP you will get the following cab files .
- disk1.cab
- disk2.cab
- msde.cab
- tools.cab
- {484C9D34-846E-40E2-A2E6-FF2771A303D5}.CAB
- {022716D8-0CF0-4779-B94C-8E52EB36709C}.CAB
- {347677C8-8935-4D30-8DDA-FB6D701ACF47}.CAB
First, unzip these files by using WinRar from (here)
Assumptions: You UN-Rar all files at D:\XPE
When you go to the DISK1 folder and click SETUP.EXE (D:\testXPE\disk1\DISK1\SETUP.EXE) it prompts an error. Now go to STARTCD.INI (D:\testXPE\disk1\STARTCD.INI)
And make following changes:
You will find CD keys in D:\testXPE\disk1\DISK1\productkey.txt
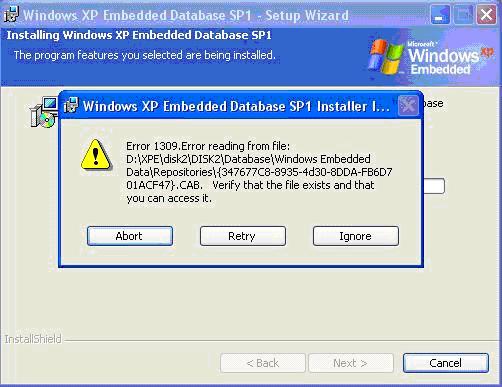
When you would be installing database setup you will find this error


To remove this error go to D:\xpe\disk2\DISK2\DATABASE here make a folder name “Windows Embedded Data” inside that make a folder name “Repositories”
Inside this folder i.e. “D:\xpe\disk2\DISK2\DATABASE\Windows Embedded Data\Repositories”
Add
- {484C9D34-846E-40E2-A2E6-FF2771A303D5}.CAB
- {022716D8-0CF0-4779-B94C-8E52EB36709C}.CAB
- {347677C8-8935-4D30-8DDA-FB6D701ACF47}.CAB
Now click on Retry.
Finally, install remote boot setup.
Congrats your Embedded XP development environment is successfully installed!
17 Easy Steps to Create your New Embedded XP Image
- In “C:\programm files\Windows Embedded\utilities”, double click “tap’, then it will create “devices.pmq” automatically.
- Select “All programs->Microsoft Windows Embedded Studio->Component Designer”.
- Open “File”, choose “Import…”, import “devices.pmq”, and input log file name, click “start”.
- Save “devices”.
- Select “All programs->Microsoft Windows Embedded Studio->Component Database Manager”, import devices file that created, and then click “Import”, then “close”.
- Select “All programs->Microsoft Windows Embedded Studio->Target Designer”. Open “file”, choose “New”, click “OK”, then search components that you want.(device manager/ display control panel/Acpi multiprocer, power management/ Date/Time control panel/ keyboard &Mouse control panel/system control panel/ task manager/ users control panel/ user interface core/ sound recorder/TCP/IP utility / Directshow DVD/MPEG2/ audio control panel/DirectX 9.0C/ add hardware controlpanel/ add/remove program control /FAT/FATFormat)
- Open “Configuration”, choose “Check Dependencies”.
- After “Check Dependencies” finished, there are 4 errors. Double click task name, select “NT l loader”, “English Language Support”, “FAT Format”, “Explorer Shell” apart.
- Open “Configuration”, choose “Check Dependencies” again.
- Open “Configuration”, choose “Build Target Image”, and click “Build”.
- After “Build” finished, copy BOOTPREP file in “C:\Programs files\Windows Embedded\ Utilities” to “C:\Windows Embedded Image”
- Copy all files in “Windows Embedded Image” to another disk that must be FAT32.
- Boot from floppy to DOS, then active the partition which has system files.
- Reboot to DOS, execute BOOTPREP file.
- Boot from HDD. The Embedded Windows XP is completed.
- Input use name” administrator”, then press “Enter” key after enter OS.
- Copy folder “Windows Embedded Data” to another disk for installing the driver.
