The purpose of this article is to explain how to build a centralized function for logging and how to display log entries in real time using a Console window which can be opened throughout the run time of the application, regardless of its type (Win32, MFC, etc.).
The Building Blocks
A proper logging function should have the flexibility to accept any number of arguments of various types such as date, numeric and strings. First, I will introduce the types of information that can be included in each log entry.
The Calling Function
It is possible to always know the name of the function that invoked each log entry. To do so, we add a parameter to our WriteLogFile() function and call it via a MACRO that automatically added as the first parameter the following preprocessor directive: __FUNCTION__ (see this article).
General Information
We would normally wish the log entries to include general information such as:
- Current date and time
- Date and time when the application has started
- (Optional) Date and time when the application was created
Counting Our Cycles
This is something not every application needs, but some do. If your application has a main event loop, you would usually start with some initializations, and then start this loop until the application is terminated. You may want to count how many times this loop occurred.
Setting the Text and Background Color
The following function can be used to set both text and background colors of the text. The function should be called by a wrapper based on criteria set to make it easier to view the log during runtime. For example, distinguishing between information log entries and errors / warnings, and also setting different colors for different types of urgency.
inline void setcolor(int textcol, int backcol)
{
    if ((textcol % 16) == (backcol % 16))textcol++;
    textcol %= 16; backcol %= 16;
    unsigned short wAttributes = ((unsigned)backcol << 4) | (unsigned)textcol;
    HANDLE hStdOut = GetStdHandle(STD_OUTPUT_HANDLE);
    SetConsoleTextAttribute(hStdOut, wAttributes);
}
Defining Logging Levels
With the following code, we define different levels for logging allowing later to display log entries based on the selected "Logging Level".
typedef enum
{
minimal = 1,
normal = 2,
verbose = 3
} LoggingLevel;
We can then use MACROS to select the desired Logging Level as a parameter to WriteLogFile().
#define LOG_VERBOSE utils::LoggingLevel::verbose
#define LOG_NORMAL utils::LoggingLevel::normal
#define LOG_MINIMAL utils::LoggingLevel::minimal
However, we need to define two different set of Logging Levels:
Log Message Level: Let's say a function has a call to WriteLogFile which we think should not be displayed in most cases. We then want to define this specific message as "Verbose".
Application Level: Now, we would want to define dynamically are we now in "Verbose", "Debug" or "Minimal" mode. We do that with these MACROS.
#define LOGGINGTYPE_NONE 0
#define LOGGINGTYPE_SIMPLE 1
#define LOGGINGTYPE_DEBUG 2
If we are in "SIMPLE" mode, we will only display log entries that are classified as "Minimal". If we are in "DEBUG" mode, we will also include entries that are classified as "Verbose", and so on...
Displaying the Creation Date of Our Program
We will fetch the creation date of our program, but first, we define a "friendly" formal for displaying it:
#define FRIENDLY_DATEFORMAT L"%d-%m-%Y, %H:%M:%S"
That means: Day-Month-Year Hour:Minute:Seconds. For example:
04-04-2019 10:00:00
We fetch the creation date of our program using the following code:
CTime GetFileDateTime(LPCWSTR FileName)
{
FILETIME ftCreate, ftAccess, ftWrite;
HANDLE hFile;
CTime result = NULL;
CTime FileTime;
hFile = CreateFile(FileName, GENERIC_READ,
FILE_SHARE_READ, NULL, OPEN_EXISTING, 0, NULL);
if (hFile == INVALID_HANDLE_VALUE)
{
return result;
}
if (!GetFileTime(hFile, &ftCreate, &ftAccess, &ftWrite))
return result;
FileTime = ftWrite;
CloseHandle(hFile);
result = (CTime)FileTime;
return result;
}
CTime GetSelfDateTime(void)
{
WCHAR szExeFileName[MAX_PATH];
GetModuleFileName(NULL, szExeFileName, MAX_PATH);
return GetFileDateTime(szExeFileName);
}
As you can see, GetFileDateTime() has 2 variations. When it is called with no parameters, the full path of the currently running program is found out and then used to call the other variation passing it to the function. The return value is a CTime.
Displaying the Processor Type
We might also want to display the processor type, most likely either 32 bit (x86) or 64 bit (x64). We do that using the following function:
bool Isx64OS()
{
    SYSTEM_INFO systemInfo;
    GetNativeSystemInfo(&systemInfo);
    return (systemInfo.wProcessorArchitecture == PROCESSOR_ARCHITECTURE_AMD64);
}.
Using the Code
Now it’s time to see the entire function and how we call it.
We use the WriteLogFile() as shown in the code snippet below.
Note: We use logging when the _LOG preprocessor directive is set, otherwise we don't, and the way this code is organized ensures that the version where _LOG isn't turned on, won't contain all log messages in the binary executable, since sometimes we don't want these messages to be published but only be used internally.
int myIntVar = 999;
wchar_t *myStringVar = L"Test";
#if _LOG
     WriteLogFile(__FUNCTION__, LOG_COLOR_WHITE, LOG_VERBOSE,
     L"myStringVar = %s myIntVar = %d", myStringVar, myIntVar);
#endif
The Result
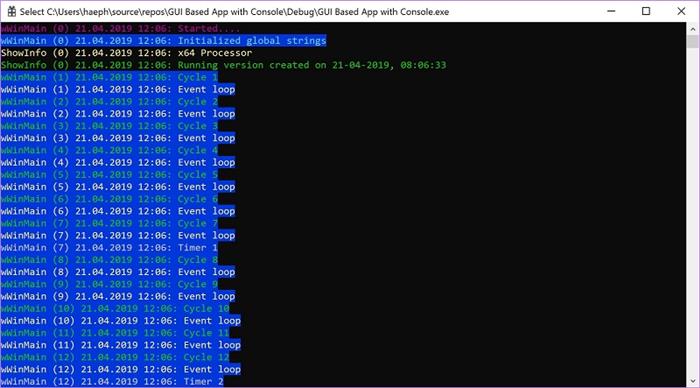
As you can see, when running the code, you should see the Console window shown as in the screenshot below:

History
- 21st April, 2019: Initial version
