In last week’s tutorial, we used the canvas control to make a character’s eyes follow the mouse. This week Nelly the elephant is back again. This time, we will add some animations and use a texture atlas. If you are reading this on Code Project, you can see the code in action at the original blog entry.
Texture Atlas
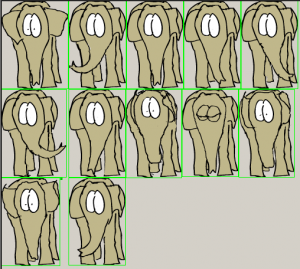
Combining all the graphics in one texture atlas gives a performance boost and makes things more manageable. (A texture atlas is a similar idea to a sprite sheet, except the images are better packed to use less space.) I used our in-house tool to create the atlas from the original artwork and this is the result:

Each image is packed into one big image. The tool also creates an XML file which tells us where in the atlas each image is located:
<texture file="images0.tga">
  <image name="base" x="212"
  y="0" width="97" height="150"
  xOffset="39" yOffset="1"/>
  <image name="blink02" x="306"
  y="150" width="96" height="149"
  xOffset="39" yOffset="1"/>
 ....
</texture>
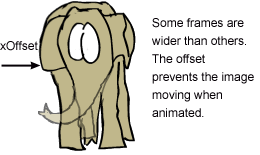
Each location and size of each image is stored as well as an "offset". The offset is used to "pad out" each frame, without wasting any space.

The atlas XML file is parsed using XMLHttpRequest:
var client = new XMLHttpRequest();
client.onreadystatechange = xmlHandler;
client.open("GET", "http://astronautz.com/wordpress/atlas.xml");
client.send();
...
function xmlHandler()
{
  if (this.readyState == 4)
  {
    if (this.status == 200 || this.status == 0)
    {
      if (this.responseXML != null)
      {
        var x = this.responseXML.getElementsByTagName("image");
        if (x == null ) return;
        for (var n = 0; n < x.length; n++)
        {
          var atlasImage = new AtlasImage();
          atlasImage.load(x[n]);
          atlasMap[x[n].getAttribute("name")] = atlasImage;
        }
        init2();
      }
      else
        alert("this.responseXML == null");
    }
    else
    {
      alert("this.status = " + this.status);
    }
  }
}
We create an AtlasImage object for each image and store it in an map, with the image name as a key.
function AtlasImage()
{
this.m_x;
this.m_y;
this.m_width;
this.m_height;
this.m_xOffset;
this.m_yOffset;
this.load = function(elem)
{
this.m_x = parseInt(elem.getAttribute("x"));
this.m_y = parseInt(elem.getAttribute("y"));
this.m_width = parseInt(elem.getAttribute("width"));
this.m_height = parseInt(elem.getAttribute("height"));
if (elem.getAttribute("xOffset"))
this.m_xOffset = parseInt(elem.getAttribute("xOffset"));
else
this.m_xOffset = 0;
if (elem.getAttribute("yOffset"))
this.m_yOffset = parseInt(elem.getAttribute("yOffset"));
else
this.m_yOffset = 0;
}
this.render = function(x, y)
{
context.drawImage(atlas, this.m_x, this.m_y,
this.m_width, this.m_height,
this.m_xOffset+x, this.m_yOffset+y,
this.m_width, this.m_height);
}
};
There are 4 animations: ear flap, trunk swing, blink and standing still. The Animation class controls the individual animations:
function Animation()
{
this.m_currFrame;
this.m_age;
this.m_listFrame = [];
this.m_moveEyes = true;
this.isFinished = function()
{
return this.m_age >= this.m_listFrame.length*1000/12;
}
this.start = function()
{
this.m_age = 0;
this.m_currFrame = 0;
}
this.init = function(listIndex)
{
this.start();
var image;
for (var n = 0; n < listIndex.length; n++)
{
image = atlasMap[listIndex[n]];
if (image)
this.m_listFrame.push(image);
else alert("missing image:"+listIndex[n]);
}
}
this.update = function(timeElapsed)
{
this.m_age += timeElapsed;
this.m_currFrame = Math.floor(this.m_age/1000*12);
if (this.m_currFrame >= this.m_listFrame.length)
this.m_currFrame = this.m_listFrame.length-1;
}
this.render = function()
{
this.m_listFrame[this.m_currFrame].render(0, 0);
}
};
You need to pass it a list of images that compose the animation sequence:
var earFlap = new Animation();
  earFlap.init(["base", "earflap02", "earflap04", "earflap06",
    "earflap08", "earflap06", "earflap04", "earflap02", "base"]);
  earFlap.m_moveEyes = false;
  listAnim.push(earFlap);
Note: Sometimes, we use the same images several times in the same animation to save space.
For some animations, we don’t want the eyes to move, because the head moves in the animation. For these cases, we set m_moveEyes = false.
The current animation is stored in a global variable currAnim. In the main game loop, once an animation stops, we randomly select a new one, by setting currAnim to a new animation:
function render()
{
var timeElapsed = new Date().getTime() - lastRender;
lastRender = new Date().getTime();
if (currAnim.isFinished())
{
var randNum = Math.floor(Math.random()*100);
if (randNum < listAnim.length)
{
currAnim = listAnim[randNum];
}
else
{
currAnim = standStill;
}
currAnim.start();
}
context.clearRect(0, 0, canvasWidth, canvasHeight);
currAnim.update(timeElapsed);
currAnim.render();
if (currAnim.m_moveEyes == true)
{
eyeRight.update();
eyeLeft.update();
eyeRight.render();
eyeLeft.render();
}
requestAnimFrame(render);
}
That’s all! The full source code can be found here.
