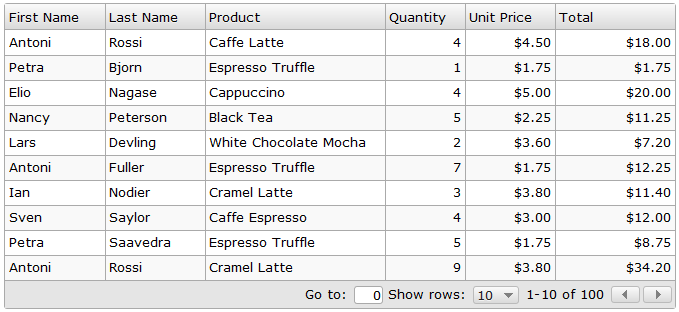
In this post, we will explore how to set up a Grid and add powerful features such as sorting and paging.
We will first add the following references:
<link rel="stylesheet" href="../../jqwidgets/styles/jqx.base.css" type="text/css" />
<link rel="stylesheet" href="../../jqwidgets/styles/jqx.classic.css" type="text/css" />
<script type="text/javascript" src="../../scripts/jquery-1.7.1.min.js"></script>
<script type="text/javascript" src="../../jqwidgets/jqxcore.js"></script>
<script type="text/javascript" src="../../jqwidgets/jqxbuttons.js"></script>
<script type="text/javascript" src="../../jqwidgets/jqxscrollbar.js"></script>
<script type="text/javascript" src="../../jqwidgets/jqxlistbox.js"></script>
<script type="text/javascript" src="../../jqwidgets/jqxdropdownlist.js"></script>
<script type="text/javascript" src="../../jqwidgets/jqxmenu.js"></script>
<script type="text/javascript" src="../../jqwidgets/jqxgrid.js"></script>
Add a div tag to the document’s body to use it as a Grid. The div will be initialized as a Grid widget using JavaScript.
<div id="Grid"></div>
Add the data source initialization code. In this sample, we will bind the Grid to a data array with ‘firstname’, ‘lastname’, ‘productname’, ‘quantity’, ‘price’ and ‘total’ members.
<script type="text/javascript">
$(document).ready(function () {
var data = new Array();
var firstNames =
[
"Andrew", "Nancy", "Shelley", "Regina",
"Yoshi", "Antoni", "Mayumi", "Ian",
"Peter", "Lars", "Petra", "Martin",
"Sven", "Elio", "Beate",
"Cheryl", "Michael", "Guylene"
];
var lastNames =
[
"Fuller", "Davolio", "Burke", "Murphy",
"Nagase", "Saavedra", "Ohno", "Devling",
"Wilson", "Peterson", "Winkler", "Bein",
"Petersen", "Rossi", "Vileid",
"Saylor", "Bjorn", "Nodier"
];
var productNames =
[
"Black Tea", "Green Tea", "Caffe Espresso",
"Doubleshot Espresso", "Caffe Latte",
"White Chocolate Mocha", "Cramel Latte",
"Caffe Americano", "Cappuccino", "Espresso Truffle",
"Espresso con Panna", "Peppermint Mocha Twist"
];
var priceValues =
[
"2.25", "1.5", "3.0", "3.3", "4.5",
"3.6", "3.8", "2.5", "5.0",
"1.75", "3.25", "4.0"
];
for (var i = 0; i < 100; i++) {
var row = {};
var productindex = Math.floor(Math.random() * productNames.length);
var price = parseFloat(priceValues[productindex]);
var quantity = 1 + Math.round(Math.random() * 10);
row["firstname"] = firstNames[Math.floor(Math.random() * firstNames.length)];
row["lastname"] = lastNames[Math.floor(Math.random() * lastNames.length)];
row["productname"] = productNames[productindex];
row["price"] = price;
row["quantity"] = quantity;
row["total"] = price * quantity;
data[i] = row;
}
}
);
</script>
To initialize the Grid, we create a source object with ‘data’ and ‘datatype’ members. We set the ‘data’ member to the data array and the ‘datatype’ member to ‘array’. Then, we pass the source object to the Grid and also initialize its columns. Each column should have at least two members – ‘text’ and ‘datafield’. The ‘text’ member specifies the text displayed in the column’s header and the ‘datafield’ member associates the grid column (e.g.: ‘First Name’) to the data column (e.g.: ‘firstname’). Additional column properties that we use are ‘width’, ‘cellsalign’, and ‘cellsformat’. The ‘width’ property sets the column header’s width. The ‘cellsalign’ and ‘cellsformat’ specify how the grid cells are aligned and formatted. To enable the Grid paging and sorting features, we set the ‘pageable’ and ‘sortable’ properties to true.
var source =
{
    data: data,
    datatype: "array"
};

$("#Grid").jqxGrid(
{
    source: source,
    theme: 'classic',
    pageable: true,
    sortable: true,
    autoheight: true,
    columns: [
        { text: 'First Name', datafield: 'firstname', width: 100 },
        { text: 'Last Name', datafield: 'lastname', width: 100 },
        { text: 'Product', datafield: 'productname', width: 180 },
        { text: 'Quantity', datafield: 'quantity',
        width: 80, cellsalign: 'right' },
        { text: 'Unit Price', datafield: 'price',
        width: 90, cellsalign: 'right', cellsformat: 'c2' },
        { text: 'Total', datafield: 'total',
        cellsalign: 'right', cellsformat: 'c2' }
    ]
});
Here’s how looks the Grid after we start the application:

The Grid looks like this after clicking the ‘First Name’ column:

