Introduction
The article provides a brief idea about how to use the ASP.NET charting controls and create beautiful graphs. I want to share my experience with some of you who are interested in working on Microsoft technologies.

Background
We may use various graphs or graphical controls developed by various organizations. We can even develop our own graphs by using System.Drawing namespace provided by the .NET Framework. Some people may use Google charts which we can get by simple httprequests. The Microsoft community has developed graphs which are pretty much interesting and have a good and rich look.
Prerequisites
Following are the prerequisites for using the ASP.NET charting controls:
Install .NET Framework 3.5 (SP1 if possible).
Install Visual Studio 2008 (SP1 if possible).
Download the charts and Visual Studio add-in from the below links.
You can also download the samples and documentation from the below links:
You can install the charts by double clicking on MSChart.exe and add-in by double clicking on MSChart_VisualStudioAddOn.exe.
After installation, create a web project/ Website in Visual Studio 2008.
Drag the charting control which is available under the data section of Toolbox.
Using the Chart Control
We have to create an <asp:chart /> tag to place the control. It has various properties links, height, width, shading, backcolor, and bordercolor.
<asp:chart id="Chart1" runat="server" Height="296px" Width="412px"
      BorderDashStyle="Solid" BackSecondaryColor="White"
      BackGradientStyle="TopBottom" BorderWidth="2px" backcolor="211, 223, 240"
      BorderColor="#1A3B69" >
<titles .> tag is used to place the titles on the graph. We can create a title using <asp:Title /> tag. The title created here will be placed above the chart.
<Titles>
      <asp:Title Text="Title of the Graph comes here" />
</Titles>
Series is a tag used to add the columns or to plot the points on the graphs. We can add series by using <Asp:series />. We can add the name of the series that is plotted and also the points by using <points />. We can add the data points using <asp:DataPoint />.
In the <asp:datapoint> tag, axislabel is used to add the name to the label and xvalue and Yvalue to plot the point on the graph.
<series>
          <asp:Series Name="Students" BorderColor="180, 26, 59, 105">
           <Points>
               <asp:DataPoint AxisLabel="jon" XValue="5" YValues="4" />
               <asp:DataPoint AxisLabel="kon" XValue="15" YValues="44" />
               <asp:DataPoint AxisLabel="pol" XValue="85" YValues="90" />
           </Points>
          </asp:Series>
          <asp:Series   Name="Teachers" BorderColor="180, 26, 59, 105">
           <Points>
               <asp:DataPoint AxisLabel="hjim" XValue="50" YValues="40" />
               <asp:DataPoint AxisLabel="azdai" XValue="75" YValues="4" />
               <asp:DataPoint AxisLabel="kriasm" XValue="35" YValues="29" />
           </Points>
          </asp:Series>
     </series>
Finally, we need to create a chart area where the actual graph is displayed. We can create gridlines on Xaxis and Yaxis if required and can add styles to the chart area as below:
  <chartareas>
        <asp:ChartArea Name="ChartArea1" BorderColor="64, 64, 64, 64"
 BorderDashStyle="Solid" BackSecondaryColor="White"
 BackColor="64, 165, 191, 228"
 ShadowColor="Transparent" BackGradientStyle="TopBottom">
            <area3dstyle Rotation="10" perspective="10" Inclination="15"
 IsRightAngleAxes="False" wallwidth="0" IsClustered="False"></area3dstyle>
            <axisy linecolor="64, 64, 64, 64">
                <labelstyle font="Trebuchet MS, 8.25pt, style=Bold" />
                <majorgrid linecolor="64, 64, 64, 64" />
            </axisy>
            <axisx linecolor="64, 64, 64, 64">
                <labelstyle font="Trebuchet MS, 8.25pt, style=Bold" />
                <majorgrid linecolor="64, 64, 64, 64" />
            </axisx>
        </asp:ChartArea>
    </chartareas>
</asp:chart>
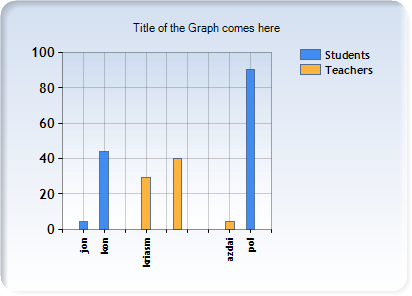
The above graph is created when all the above code is executed.
Points of Interest
We can create graphs simply by adding the datapoints. The graphs can also be created dynamically by providing the datasource to the asp:chart control which I will provide to you later.
References
- New ASP.NET Charting Control: <asp:chart runat="server"/>
- Charting Controls
History
- 18th December, 2008: Initial post
