Introduction
This article will show you haw you can modify the j2mepolish styles of a j2ME application at runtime using code. In particular, this example will show you how to modify the style for an application's title bar. I think this example should be enough to get you started.
I decided to write this article because I didn't find what I was looking for when I was having this problem.
Before I get started, I want to tell you that the application was written using the eclipse IDE version 3.4, and the polish version was 2.0.4.
The last thing I want to mention is that the polish.css file that this application uses is taken from a more complex application that I am building and that you shouldn't pay much attention to it. You should only pay attention to the styles I will show in the next section of the article.
Background
In order to understand this article, I suppose you need some experience in building j2me applications that use polish in order to enhance their visual appearance.
Using the code
To get started, I will say that this application implements the MVC pattern and that it uses three classes (the controller and two views). The controller class is shown below.
public class Controller {
    Midlet midlet;
    Display display;
    MainForm mainScreen;
    StyledList styledList;
    public Controller(Midlet midlet){
        this.midlet=midlet;
        display=Display.getDisplay(midlet);
        mainScreen=new MainForm("Main Screen",this);
        styledList=new StyledList("Styled List",List.IMPLICIT,new Style(),this);
    }
    public void showMainScreen(){
        display.setCurrent(mainScreen);
    }
    public void showStyledList(){
        display.setCurrent(styledList);
    }
    public void quitApp(){
        midlet.quitApp();
    }
}
As you can see, this controller class has a few simple functions. We have the quitApp() function to exit the application, the showMainScreen() to show the mainScreen form, and the showStyledList() function to show the styledList list. This list will contain the code to change the title bar style. The constructor initializes the two views. As you can see from the initialization code, you can change the styles of a UI element only if this element derives from a polish UI element (like the StyledList does).
The next class I will present is the MainForm class. The definition for this class is presented below.
public class MainForm extends Form implements CommandListener {

    private Controller controller;
    Command cmdExit;
    Command cmdShowList;
    public MainForm(String title,Controller controller)
    {
        super(title);
        this.controller=controller;
        setCommandListener(this);
        cmdExit=new Command("Exit",Command.EXIT,0);
        this.addCommand(cmdExit);
        cmdShowList=new Command("Styled List",Command.SCREEN,0);
        this.addCommand(cmdShowList);
    }
    public void commandAction(Command cmd, Displayable arg1) {
        if(cmd==cmdExit){
            controller.quitApp();
        }else if(cmd==cmdShowList){
            controller.showStyledList();
        }
    }
}
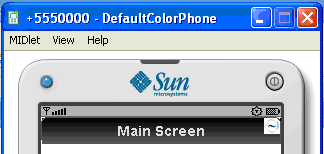
As you can see, the only purpose of this class is to send the user to the styled list. As you will see, when you run the application, this screen also shows that the style for the title bar will be changed only for the styledList screen. The MainForm screen will retain its original title bar style.
The last class I am going to present is the most important one. This class contains the code that will change the title bar style. The definition for this class is presented below:
public class StyledList
extends de.enough.polish.ui.List
implements CommandListener {
Controller controller;
Command cmdBack;
Command cmdChangeTitle;
Command cmdOldStyle;
Background oldBackground;
public StyledList(String title, int listType, Style style,Controller controller) {
super(title, listType, style);
this.controller=controller;
this.setCommandListener(this);
cmdBack=new Command("Back",Command.BACK,0);
this.addCommand(cmdBack);
cmdChangeTitle=new Command("Change",Command.SCREEN,0);
this.addCommand(cmdChangeTitle);
cmdOldStyle=new Command("Old Title",Command.SCREEN,1);
this.addCommand(cmdOldStyle);
}
public void commandAction(Command cmd, Displayable arg1) {
if(cmd==cmdBack){
controller.showMainScreen();
}else if(cmd==cmdChangeTitle){
Style style=new Style();
BorderedRoundRectBackground bg=
new BorderedRoundRectBackground(16711680,10,10,16776960,3);
style.background=bg;
style.marginBottom=3;style.marginTop=3;
style.marginLeft=3;style.marginRight=3;
style.paddingBottom=3;style.paddingTop=3;
style.paddingLeft=3;style.paddingRight=3;
style.fontColorObj=new Color(16776960);
style.layout=Item.LAYOUT_EXPAND|Item.LAYOUT_CENTER;
Font f=Font.getFont(Font.FACE_MONOSPACE,
Font.STYLE_BOLD,Font.SIZE_LARGE);
style.font=f;
this.setTitle(this.getTitle(),style);
}else if(cmd==cmdOldStyle){
Style style=new Style();
Font f=Font.getFont(Font.FACE_PROPORTIONAL,
Font.STYLE_BOLD,Font.SIZE_LARGE);
style.fontColorObj=new Color(14474460);
style.font=f;
style.marginBottom=1;
style.paddingTop=style.paddingBottom=3;
style.layout=Item.LAYOUT_EXPAND|Item.LAYOUT_CENTER;
style.border=new RoundRectBorder(5658216,1,12,12);
ImageBackground foregroundBG=
new ImageBackground(Color.TRANSPARENT,"/omni16.PNG",10,-3,0);
PartialGradientBackground backgroundBG=
new PartialGradientBackground(0,5658216,0,0,100);
CombinedBackground combinedBG=
new CombinedBackground(foregroundBG,backgroundBG);
ImageBackground foregroundBG2=
new ImageBackground(Color.TRANSPARENT,"/omni16.PNG",6,3,0);
CombinedBackground combinedBG2=
new CombinedBackground(foregroundBG2,combinedBG);
style.background=combinedBG2;
this.setTitle(this.getTitle(),style);
}
}
}
Before I start to explain the code in this class, I want to show you the original title bar style. I will show here the CSS from the polish.css file and an image to show how it looks like. The CSS style for the title bar can be seen below:
titleBottom
{
    type:partial-gradient;
    start:0%;
    end:100%;
    top-color:#000000;
    bottom-color:#565668;
}
titleTop
{
    image:url(omni16.PNG);
    color:transparent;
    anchor:top|right;
}
title
{
    font:titleFont;
    padding-top:3;
    padding-bottom:3;
    margin-bottom:1;
    border
    {
        color:#565668;
        type:round-rect;
        arc:12;
        width:1;
    }
    background
    {
        type: combined;
        foreground:titleTop;
        background:titleBottom;
    }
    layout: hcenter | hexpand;
}
We have here a combined background. The first part of the background is the titleTop style. This is an image background that will represent the foreground of the combined background. The second style is the titleBottom style. This is a partial gradient background that will represent the background part of the combined background. The title style also sets the font padding and border. This title style can also be seen in the image below.

As you can see, the image part is laid over the partial gradient part.
Next, I will explain the StyledList class code. You can see that this class derives from the polish List class. This is mandatory if you want to change the styles at runtime in code. This class has only three commands.
The first command is used to get back to the main form screen.
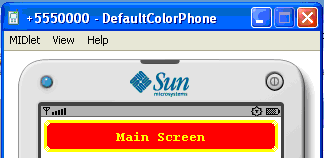
The second command is used to change the current style to a simple red background style. The new background is set using code unlike the original style that is set using CSS styles. This new title bar style can be seen in the following image:

In order to build this background using code, I first instantiated a Style object. After this, I instantiate a BorderedRoundRectBackground object and assign this background to the background field of the Style object I instantiated earlier.
Style style=new Style();
BorderedRoundRectBackground bg =
   new BorderedRoundRectBackground(16711680,10,10,16776960,3);
style.background=bg;
The first parameter for the constructor above is the color of the background (red), the second and third arguments represent the arc width and height, the fourth argument represents the border color (yellow), and the last argument represents the thickness of the border.
Next, I set the properties for the margin, padding, layout, and font. These are set using the following lines:
style.marginBottom=3;style.marginTop=3;
style.marginLeft=3;style.marginRight=3;
style.paddingBottom=3;style.paddingTop=3;
style.paddingLeft=3;style.paddingRight=3;
style.fontColorObj=new Color(16776960);
style.layout=Item.LAYOUT_EXPAND|Item.LAYOUT_CENTER|Item.LAYOUT_VEXPAND;
Font f=Font.getFont(Font.FACE_MONOSPACE,Font.STYLE_BOLD,Font.SIZE_LARGE);
style.font=f;
The last thing I do is use the setTitle() function in order to apply the new style.
This style can also be set using the CSS styles like below, but since I wanted to change them dynamically, I didn't use this aproach. Here is the equivalent CSS:
title {
    font
    {
        face:monospace;
        size:large;
        color:#ffff00;
        style:bold;
    }
    background
    {
    type:round-rect;
    arc:10;
    width:3;
    color:#ff0000;
    }
    border
    {
        width:3;
        color:#ffff00;
        type:round-rect;
        arc:10;
    }
    margin:3;
    padding:3;
    layout:center|hexpand|vexpand;
}
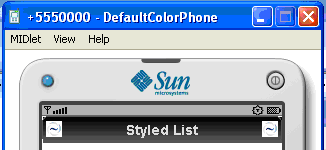
In order to select the more advanced style, we need to use the last command. By using this last command, we can obtain the following style:

The style was built using the following code.
I first instantiate a Style object that will be applied at the end. Then I set the padding, margin, font, layout, and border using the following code:
Style style=new Style();
Font f=Font.getFont(Font.FACE_PROPORTIONAL,Font.STYLE_BOLD,Font.SIZE_LARGE);
style.fontColorObj=new Color(14474460);
style.font=f;
style.marginBottom=1;
style.paddingTop=style.paddingBottom=3;
style.layout=Item.LAYOUT_EXPAND|Item.LAYOUT_CENTER;
style.border=new RoundRectBorder(5658216,1,12,12);
The only thing left to do now is to set the background. This background is a combined background that contains another combined background. The first combined background is identical with the original background presented at the beginning of this article. This background is then used as the background in another combined background in order to position the second image. The code for this background is presented below:
ImageBackground foregroundBG=new ImageBackground(Color.TRANSPARENT,"/omni16.PNG",10,-3,0);
PartialGradientBackground backgroundBG=new PartialGradientBackground(0,5658216,0,0,100);
CombinedBackground combinedBG=new CombinedBackground(foregroundBG,backgroundBG);
ImageBackground foregroundBG2=new ImageBackground(Color.TRANSPARENT,"/omni16.PNG",6,3,0);
CombinedBackground combinedBG2=new CombinedBackground(foregroundBG2,combinedBG);
style.background=combinedBG2;
After building this style, I apply it using the setTitle() method.
This is it. I hope you will find this article useful and that it will help you to modify the rest of the styles in your application.
Points of interest
It is interesting to note that only the title style for the current screen will change. The rest of the screens will retain the old title style.
In order to change the title style for all the screens, a good option will be to have a global style in the controller and have all the screens use that style for the title bar style. Only this style will be modified for the duration of the application, and because every screen will hold a reference to this single instance, every time we modify it, the changes should be seen in all the screens.
History
