Introduction
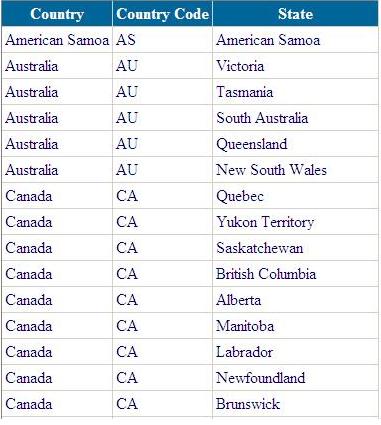
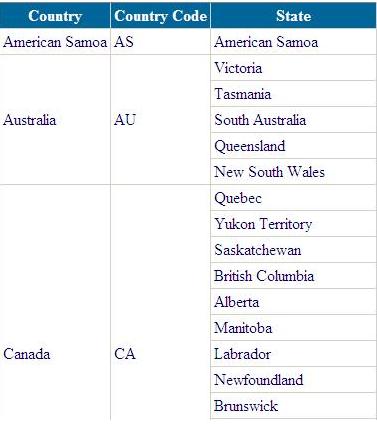
This article is all about creating a custom GridView control which is useful in scenarios where the data is in a hierarchical format, e.g., for columns like Country, State, etc., or Manager, Employee, etc.

Sample Data

Grouped Data
In the above scenarios, rather than using the GridView, GroupedGridview can be used in which the repetition of data is avoided.
Background
Users having a knowledge of creating an inherited (custom) control can easily use/understand this article.
Quickly learn how to create an inherited (custom) control
It's just like adding any other control like a Button or a DataGrid. First, create a new Class Library project. Create a class and derive it from an existing class. E.g.: TextBox, Button etc. In this article, we have derived from a GridView class.
Then, write the functionality which you want to add. This includes overriding methods, etc. Once you are done with it, create its DLL. Add a reference to the DLL in the web application.
Now, you are ready to customize the Toolbox: Right-click the Toolbox, .NET Framework Components, Browse, select the newly created DLL, and click OK. Then, you will notice the new control added in the Toolbox. It's now ready to use.
Using the code
The main part of this article is the class GroupedGridView which inherits from the GridView class.
namespace CommonClassLibrary
{
public class GroupedGridView : GridView
{
}
}
The class has a property GroupedDepth which specifies the number of columns needed to be grouped.
public int GroupedDepth
{
    get
    {
        object val = this.ViewState["GroupedDepth"];
        if (null == val)
        {
            return 0;
        }

        return (int)val;
    }
    set
    {
        if (value < 0)
            throw new ArgumentOutOfRangeException....
        this.ViewState["GroupedDepth"] = value;
    }
}
The GroupedGridView class overrides GridView's OnDataBound event, in which a recursive function SpanCellsRecursive is called.
protected override void OnDataBound(EventArgs e)
{
    base.OnDataBound(e);
    this.SpanCellsRecursive(0, 0, this.Rows.Count);
}
The function below loops through the row data and compares the column values. The compared value will be stored in a boolean variable isNewGroup. If the variable value is true, then its RowSpan is set to 1. And, if its value is false, the cell's Visible property is set to false and the RowSpan is incremented, thus duplicate display is avoided.
private void SpanCellsRecursive(int columnIndex, int startRowIndex, int endRowIndex)
{
    if (columnIndex >= this.GroupedDepth || columnIndex >= this.Columns.Count)
        return;

    TableCell groupStartCell = null;
    int groupStartRowIndex = startRowIndex;

    for (int i = startRowIndex; i < endRowIndex; i++)
    {
        TableCell currentCell = this.Rows[i].Cells[columnIndex];

        bool isNewGroup = (null == groupStartCell) ||
            (0 != String.CompareOrdinal(currentCell.Text, groupStartCell.Text));

        if (isNewGroup)
        {
            if (null != groupStartCell)
            {
                SpanCellsRecursive(columnIndex + 1, groupStartRowIndex, i);
            }

            groupStartCell = currentCell;
            groupStartCell.RowSpan = 1;
            groupStartRowIndex = i;
        }
        else
        {
            currentCell.Visible = false;
            groupStartCell.RowSpan += 1;
        }
    }
}
Once the class is added in the class library, add a reference to the DLL and the control will be available in the Toolbox ready to add in the web application, as mentioned in the Background part of the article above. The newly created control on your webpage looks like this:
<%@ Page Language="C#" AutoEventWireup="true"
   CodeFile="Default.aspx.cs" Inherits="_Default" %>

<%@ Register Assembly="CommonClassLibrary"
   Namespace="CommonClassLibrary" TagPrefix="cc1" %>

<html xmlns="http://www.w3.org/1999/xhtml">
<head  runat="server">
    <title>Untitled Page</title>
</head>
<body>
    <form id="form1"  runat="server">

<div>
        <cc1:GroupedGridView ID="GroupedGridView1"  runat="server"
          BackColor="White" BorderColor="#CCCCCC"
          BorderStyle="None" BorderWidth="1px"
          CellPadding="3" GroupedDepth="2" AutoGenerateColumns="false">
             <columns />
                <asp:BoundField HeaderText="Country" DataField="Country" />
                <asp:BoundField HeaderText="Country Code" DataField="Code" />
                <asp:BoundField HeaderText="State" DataField="State" />
             </columns />
</div>

    </form>
</body>
</html>
Note: This control does not work for AutoGenerateColumns="true". Sorry about that. I am working on this issue.
GroupedGridView1.DataSource = dataSet;
GroupedGridView1.DataBind();
Conclusion
This is my first article here. I hope you find this article and control useful - it's saved me a lot of time when working with several different types of hierarchical data, to quickly get a full-featured GridView grouped control up and running. Enjoy!
Any suggestions and feedback for improvement are highly appreciated!
