Most websites on the internet today are designed and developed to support a single language and culture, but making a website or web application to support different languages and cultures is not difficult and is relatively easy to implement in ASP.NET.
When a web application supports globalization, it means that the application can render its contents based on the language preference set by a user in his or her browser. Localization involves translating a web application into different languages and cultures.
Making an already deployed website to support globalization is not an easy task, thus it is always advised to make an application support globalization right from the development stage, even if there is no current plan to make it support more than one language. If later there is a decision to translate the application to another language, it will be easy to do, since the structure has already been put in place.
ASP.NET makes it easy to localize an application through the use of resource files. Resource files are XML files with .resx extension. Resources can either be a global resource, in which it is accessible throughout the site and placed in App_GlobalResources folder in a website or a local resource which is specific to a page only and is placed in App_LocalResources folder.
Now, let's get started, we are going to have a page that displays Good Morning in four different Languages (French, Spanish, German and Yoruba). Create a new ASP.NET website in Visual Studio and name it localizationexample, right click the website in solution explorer and select Add ASP.NET Folder then select App_GlobalResources. After that, right click the App_GlobalResources and select Add New Item in the list of items displayed in the dialog box then select Resource File, give it any name you like, but in this case, I name it content.resx. This will serve as the default resource file that will be selected if the language selected in the user browser is not available. Note that of great importance is the languageid and cultureid because ASP.NET checks the languageid and cultureid combination on the browser to determine the resource file to be used in rendering contents to that browser, to see the detailed list of language and culture identification, click here.
The next thing is to create our language specific resource file, for the four languages that the localizationexample website will be supporting, the culture names are:
- fr for French
- de for German
- es for Spanish and
- yo-NG for Yoruba
Apart from the content.resx file in the App_GlobalResources, four other resource files with the format resourcename.languageId-cultureId.resx are to be created content.de.resx, content.es.resx, content.fr.resx and content.yo-NG.resx.
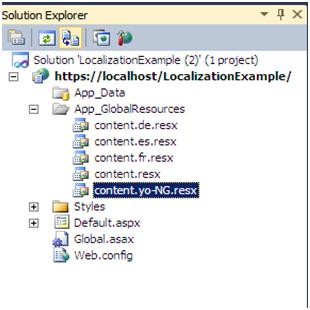
A resource file takes a key value pair, so all the resource files will contain the same key but the different values as the language translation may be, so I have a key Greeting in all the files with their values.
Resource file         Key         Value


content.resx        Greeting - Good Morning
content.de.resx     Greeting - Guten Morgen
content.es.resx     Greeting - buenos días
content.fr.resx     Greeting - bonjour
content.yo-NG.resx  Greeting - E kaa ro
The next thing to do is add a Label control that will be used to display the localized text to the Default.aspx page, then switch to the page source view in Visual Studio and set the Text property of the Label control to:
<asp:Literal ID="Literal5" runat="server" Mode="PassThrough"
Text="Text="< %$ Resources:content, Greeting % >"">
where Resource:content specifies that we are retrieving the content from a resource file named content and the value to be retrieved from the resource file has the name or key Greeting. Note that content was used and not content.de or any of the remaining three resource files, because this is our default resource file that ASP.NET will always use should in case we do not have translation for the user's browser language preference.
We need to override the page's InitializeCulture() method and set the page UICulture property, this property determines which global or local resource is to be loaded for the page. The browser's topmost language preference will be obtained by Request.UserLanguages[0] and then call the page’s base InitializeCulture method.
protected override void InitializeCulture()
{
   UICulture = Request.UserLanguages[0];
   base.InitializeCulture();
}
With the code written, we need to play a bit with the browser's language setting, by selecting on the tool menu, option and selecting language, depending on the type of browser, read your browser documentation to know how to set language preferences. Now setting German as our most preferred language and viewing the default.aspx page in the browser gives:
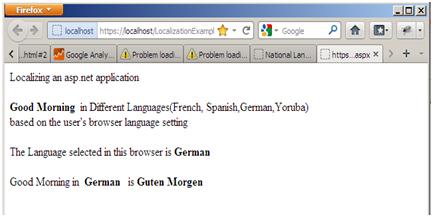
Let's change our language preference in the browser to Spanish and refresh the page:
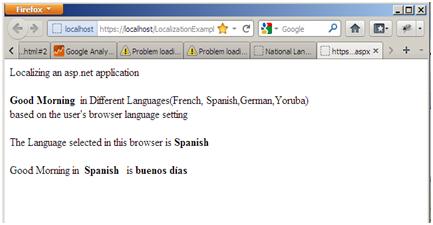
If we change the preference to French, refreshing the page on the browser gives:
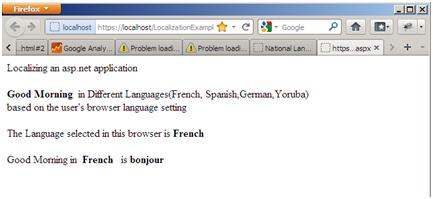
Changing the preference to Yoruba and refreshing the page gives:
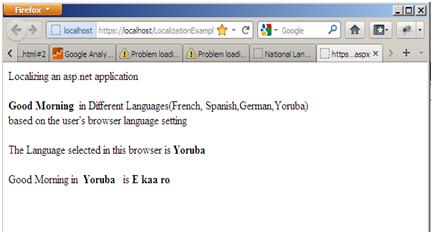
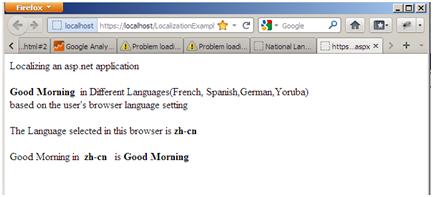
If we now change our browser language preference to Chinese which we do not provide a resource file for, ASP.NET then falls back to the content.resx resource file which serves as our default resource file.
Local resource works in a similar manner but with a different approach. Right click the localizationexample website in solution explorer and select Add New Item to add a new web form to the website, name it Default2.aspx. Just like we did for the Default.aspx page, add a Label control that will contain a localized content to the page. While still on the Default2.aspx page, click on Visual Studio Tools menu and select Generate Local Resource. This adds an App_LocalResources folder to the website with a resource file named Default2.aspx.resx. If we open the auto generated page local resource file, we see that ASP.NET has auto created some key strings for us based on localizable properties of all server controls of the page.
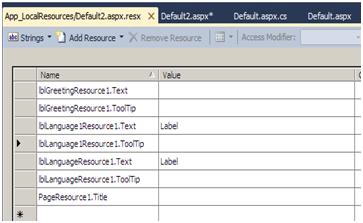
If we switch to source view in our Default2.aspx page, the control lblGreeting has been assigned a new property meta:resourcekey="lblGreetingResource1", this property tells ASP.NET to look up the values for all localizable properties for this control from the resource file by using the specified resource key.
So we set the value of lblGreetingResource1.Text to Good Morning in the Default2.aspx.resx which serves as our default resource file for the page. To have Default2.aspx localized to other languages, we have to make four copies of the Default2.aspx.resx resource file and rename them appropriately using the format pagename.aspx.languageId-cultureId.resx thus we have the files:
- Default2.aspx.de.resx
- Default2.aspx.es.resx
- Default2.aspx.fr.resx
- Default2.aspx.yo-NG.resx
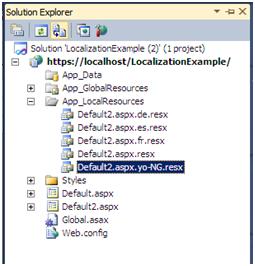
Then, the next thing to do is to set lblGreetingResource1.Text key values in the various resource files to the appropriate Good Morning translation of the languages. Now, just like we did for Default.aspx, there is a need for us to override the page's InitializeCulture() method and set the page UICulture property.
Thus, repeating the process of setting the preferred language of the browser and viewing the page Default2.aspx gives the same result as that of the Global resource files.
The source code of the website is available for download here.
