Introduction
While working, I came across a problem which required to invoke a Windows application (present in a local machine) from my web application. After some Google search, I came to know that by using custom URL protocol, we can invoke a Windows application. I found that there is a lot of information present related to custom URL protocol. I also found some sample applications on the internet. But all the sample applications seem to be made in C# or some other language. But as per the project requirement, I needed to write code in C++\Win32 for registering custom URL protocol handler. I have written a C++\Win32 class which registers the custom URL protocol handler.
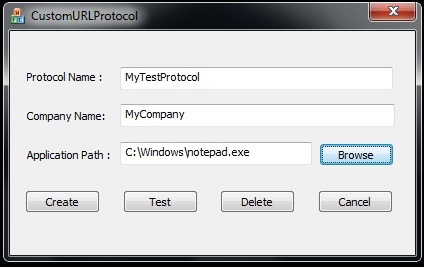
This article provides information for registering a client side Custom URL protocol handler for invoking windows application from web based applications. I have attached the "CustomURLProtocolFiles.zip" file which contains a cpp and header file. This files can be added in the application for creating a custom URL protocol. I have also attached a demo application along with its source which uses this Custom URL protocol files.
Custom URL protocol can also be used for passing content between applications.
Example: Application A wants to pass some data after its processing to application B. For achieving this, application A can register a protocol handler and can call application B with processed data as parameter. In this way, one application can pass data to another application.
Using the Code
Zip file "CustomURLProtocolFiles.zip" contains a cpp file and a header file which should be included in your project. This file contains a class named "class CustomURLProtocol".This class contains setter and getter function for protocol name, company name and application path which needs to be launched.
std::wstring getProtocolName() {return wszProtocolName;}
std::wstring getCompanyName() {return wszCompanyName;}
std::wstring getAppPath() {return wszAppPath;}

void setProtocolName(std::wstring pwProtocolName){wszProtocolName = pwProtocolName;}
void setCompanyName(std::wstring pwCompanyName){wszCompanyName = pwCompanyName;}
void setAppPath(std::wstring pwAppPath){wszAppPath = pwAppPath;}
Calling code has to create an object of the CustomURLProtocol class. With the help of setter function, calling application has to set required parameters like protocol name, company name and application path. Once this parameter is set, calling application can call CreateCustomProtocol function. This function will create a custom URL protocol for the application.
In my demo, the application calls initializeParameter function which calls the setter function of CustomURLProtocol class. It calls DeleteCustomProtocol function which will delete the custom protocol which is already present. Finally, it calls CreateCustomProtocol function which will create a custom protocol for launching the application.
void CCustomURLProtocolDlg::OnBnClickedOk()
{
DWORD errorCode = 0;
initializeParameter();
m_CustomURLProtocol.DeleteCustomProtocol();
if(m_CustomURLProtocol.CreateCustomProtocol() != ERROR_SUCCESS)
MessageBox(m_CustomURLProtocol.getErrorMsg().c_str());
else
MessageBox(L"Successfully Created Custom Protocol.");
}
CreateCustomProtocol function registers the custom protocol by entering the below keys in the registry.
CustomURLProtocol class also handles error conditions. The above code snippets show that if some error happens, then the application can get error description by calling m_CustomURLProtocol.getErrorMsg().c_str()
[HKEY_CLASSES_ROOT]
  [< ProtocolName >]
      (Default) = "URL:< ProtocolName > Protocol Handler"
      URL Protocol = ""
    [DefaultIcon]
       (Default) = "< Application Path >"
    [shell]
       [open]
         [command]
           (Default) = "< Application Path> "%1""
For deleting custom protocol, we just need to call DeleteCustomProtocol function as called in the demo function below. First, we need to initialize the parameter of CustomURLProtocol class and then call DeleteCustomProtocol function.
void CCustomURLProtocolDlg::OnBnClickedBtnDelete()
{
    DWORD errorCode = 0;
    initializeParameter();
	if(m_CustomURLProtocol.DeleteCustomProtocol() != ERROR_SUCCESS)
		MessageBox(m_CustomURLProtocol.getErrorMsg().c_str());
	else
		MessageBox(L"Successfully Deleted Custom Protocol.");
}
Registry key creation and deletion needs admin privileges in some Windows OS. This will need your app to run in admin privileges. My demo application contains a manifest file which is used to launch demo application with admin privileges. If there is any error, then demo application provides description of error along with error code.
In the demo app, I have also provided a way to test the registered custom URL protocol handler. When user clicks Test button, demo application generates an HTML file which launches the registered application. This test app can be used as a sample for invoking the application.
The provided class for creating a custom protocol can be updated according to the need of the project. I will update the code as I come to know about issues in it.
History
- 17th February, 2012: Initial version
- 27th February, 2012: Added Error Handling code in
CustomURLProtocol class - 06th March, 2012: Solved issue related to chrome browser in test application source code
