I’ve tried to find a jQuery editor plug in which works out of the box without configuration. The WMD editor used by stackoverflow.com looked nice but I couldn’t find a version that I got running. My main issue with most editors was that I didn’t figure out how to configure custom image and link dialogs. I’ve therefore done my own.
Highlights:
- Markdown (currently the only format supported)
- Preview pane (see generated HTML live)
- Syntax highlighting (live)
- Expanding textarea (which also goes back to original size on blur)
- jQueryUI dialogs for links/images
- Access keys (default browser modifier or CTRL if activated)
- Plug & Play (just include additional scripts to activate features)
The basic setup looks like this:
<!DOCTYPE HTML PUBLIC "-//W3C//DTD XHTML 1.0 Strict//EN"
"http://www.w3.org/TR/xhtml1/DTD/xhtml1-strict.dtd">
<head>
<title>Editor demo</title>
<script type="text/javascript"
src="scripts/jquery-1.6.2.min.js"></script>
<script type="text/javascript"
src="scripts/jquery.markdown-0.2.js"></script>
<script type="text/javascript"
src="../Source/textselector.js"></script>
<script type="text/javascript"
src="../Source/jquery.griffin.editor.js"></script>
<script type="text/javascript"
src="../Source/jquery.griffin.editor.markdown.js"></script>
<style type="text/css">
.editor .area { width: 600px; height: 200px; }
.editor .toolbar { padding: 0px; }
</style>
</head>
<body>
<div class="editor">
<div class="toolbar">
<span class="button-h1"
accesskey="1" title="Heading 1">
<img src="../Source/images/h1.png" /></span>
<span class="button-h2"
accesskey="2" title="Heading 2">
<img src="../Source/images/h2.png" /></span>
<span class="button-h3" accesskey="3"
title="Heading 3">
<img src="../Source/images/h3.png" /></span>
<span class="button-bold" accesskey="b"
title="Bold text">
<img src="../Source/images/bold.png" /></span>
<span class="button-italic" accesskey="i"
title="Italic text">
<img src="../Source/images/italic.png" /></span>
<span class="divider"> </span>
<span class="button-bullets" accesskey="l"
title="Bullet List">
<img src="../Source/images/bullets.png" /></span>
<span class="button-numbers" accesskey="n"
title="Ordered list">
<img src="../Source/images/numbers.png" /></span>
<span class="divider"> </span>
<span class="button-sourcecode" accesskey="k"
title="Source code">
<img src="../Source/images/source_code.png" /></span>
<span class="button-quote" accesskey="q"
title="Qoutation">
<img src="../Source/images/document_quote.png" /></span>
<span class="divider"> </span>
<span class="button-link" accesskey="l"
title="Insert link">
<img src="../Source/images/link.png" /></span>
<span class="button-image" accesskey="p"
title="Insert picture/image">
<img src="../Source/images/picture.png" /></span>
</div>
<textarea class="area">Hello world</textarea>
</div>
<script type="text/javascript">
$(function(){
$('.editor').griffinEditor();
});
</script>
</body>
</html>
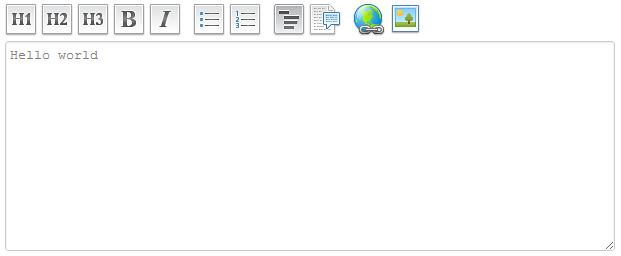
All of that is required. (Just a simple copy/paste). The idea is that you should easily be able to customize its layout. The script generates the following layout:

Dialogs
The basic setup uses browser dialog boxes:

Not so sexy. Include jQueryUI and the integration script:
<link rel="stylesheet"
href="Styles/jquery-ui-1.8.16.custom.css">
<script type="text/javascript"
src="scripts/jquery-ui-1.8.16.custom.min.js"></script>
<script type="text/javascript"
src="../Source/jquery.griffin.editor.dialogs.jqueryui.js"></script>
... to automatically reconfigure the plug in to use jQueryUI:

You can use your own dialogs by implementing the following function:
$.griffinEditorExtension.imageDialog = function(options)
{
options.success({ title: 'Some title', url: 'Some url';}) when you are done
}
Same goes for the link dialog.
Preview Pane
The preview pane is automatically configured when you add a div with a special id:
<div class="editor" id="myeditor">
//all the editor code
</div>
<div id="myeditor-preview">
</div>
This allows you to place the preview pane wherever you like. The included demo scripts place the preview to the right:

You can also add support for syntax highlighting by including additional script & stylesheet:
<script src="http://yandex.st/highlightjs/6.1/highlight.min.js"></script>
<link rel="stylesheet"
href="http://yandex.st/highlightjs/6.1/styles/idea.min.css">
The script inclusion will activate those features, no additional configuration is required.
Access Keys
The default access key implementation uses the browser specific implementation. For instance, Win+Chrome uses ALT+Key to activate it. Hence no additional information in the tooltip:

That can be changed by adding a hotkeys script:
<script type="text/javascript"
src="scripts/jquery.hotkeys.js"></script>
Which reconfigures the tooltips and allows you to use CTRL+key to access the toolbar features. The key is still controlled by the accesskey attribute on the toolbar icons.

Summary
The code and all examples are available at github.
