These last days, I had the chance to mess up with the Localization infrastructure inside Visual Studio 2008. I must realize it's the first time I seriously get into this issue, and I'm impressed with the work done on it.
When one needs to give an application multi-language support, the first temptation (as old-time programmers) is to build up some sort of tables with strings, each one for each language. That's more or less what the Localization system will do, but with the following extra features:
A Comfortable Visual Editor
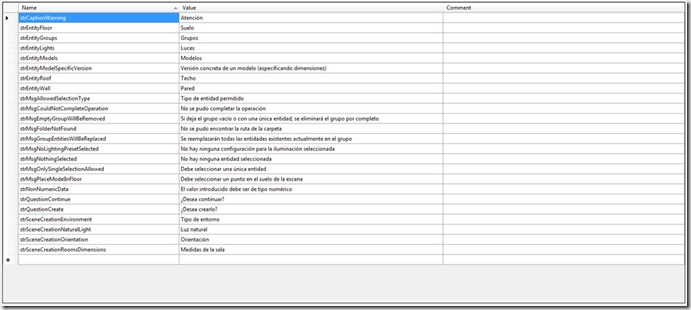
We have a comfortable visual editor to manage the string tables, like this one, giving you the chance to set comments to each entry.

Culture infrastructure-ready
The system offers automatic integration with the Culture infrastructure of each application. To get more information about this, check:
System.Threading.Thread.CurrentThread.CurrentCulture System.Threading.Thread.CurrentThread.CurrentUICulture
This gives you automatic support for different numbering and date formats, etc.
Integrated with the Visual Studio Designer
To start localizing, you just have to open the design view of a form or control and set the Localizable property of any form or control to True to generate the default resource (.resx) file. From then, each time you select a new language in the combo (and change any property), a newer resX file is generated to reflect the change. Of course, all these files are perfectly managed by the Solution Explorer as part of the form or the control.

Once a form is localizable, each time we change the current language, the designer automatically updates the design view to show the appearance of the form or control in that language. ResX files are also maintained automatically.
Localization of the Entire Looking (not only texts)
You can make specific versions of each control or user interface for each language, including control positions, dimensions, colors, anything...
This is specially relevant because many times is not enough with just replacing texts. The translation of a text may have a remarkable different length in other languages. In this case, we would have to resize the label containing the string, and maybe relocate other controls in the form, as in the following picture, where you can see two versions of the same form, for two different languages.

Note: Text strings are saved directly in the resx files accompanying the Form1.cs class, but other properties like dimensions, locations, etc. are saved in another place. When you compile your solution, in the output directory you will find additional folders with culture-specific names, like “en-US”, etc. This folder will contain additional DLLs created automatically by Visual Studio, one for each localizable assembly. Inside these DLLs, you will find resources defining the appearance of the form's controls.
Additional String Tables
We have talked about resource files handled by the Designer to reflect the appearance changes of forms for different languages but, what happens with the message shown in a MessageBox? This is not something we can manage in a design view.
A solution is to insert additional .resx files to the project. We can make them “embedded resources” and easily access them with the ResourceManager class directly, although I must tell you this is not the best solution (see next chapter). Of course, there's no designer to handle this tables, so they will have to be maintained manually (using the visual editor).
To include a complete collection of additional string tables, you can start with the default resx file (for the default language). Give it any name you like, for example: “LocalizedStrings.resx” (just click your project with the right button, and select “Add New item”, and then “Resource File” as the item type). Afterwards, you can add any other language version for that file, using the same name with the culture-specific string representation before the extension. Some examples:
- LocalizedStrings.en-US.resx
- LocalizedStrings.es-ES.resx
- LocalizedStrings.fr-FR.resx
- …
Strongly-typed Access to String Tables
This is also a very important feature, because once you have your string table up and running, you need to get access to it from your code. You can do so directly through the ResourceManager.GetString() method, but this is definitely not a good idea. Mostly because you will have to give it the name of the entry you are looking for, in the form of a simple "string”.
This means that you will have no Intellisense support (you will have to look for the name of the properties in the table by yourself), and if any property name is changed later, there will be no compiling warning or error. This means that if you are not extremely careful for the rest of your application's life, you won't notice the mistake until runtime, and this is extremely bug-prone.
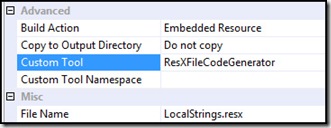
The solution is to make a strongly-typed class, which includes code properties to access each entry in the table. Of course, it would be non sense if we had to make them manually (it would be the same as accessing though the ResourceManager class). Thankfully Visual Studio includes a tool to take care of such task: the ResXFileCodeGenerator. To make VisualStudio invoke this tool, you will have to put its name (“ResXFileCodeGenerator”, without quotes) in the Custom Tool property of the default resx file. This is important: IN THE DEFAULT resx file. This means that, if you have LocalizedStrings.resx (with the default language, Spanish for example), and LocalizedStrings.en-US.resx, you have to set the custom tool to the first one.

When you do so, a new “.cs” file will be generated for you (below the resx file) containing the strongly-typed class. Though the maintenance of this class is automatic, you can force a refresh anytime you want by clicking the resx file with the right button and selecting “Run custom tool”.
From now, you can access your strint table texts with Intellisensed, strongly-typed, in-code properties like:
"text = LocalizedStrings.strWarningCaption"
APPENDIX A: Making an automatically-generated, strongly-typed class to be PUBLIC
By default, strongly-typed classes generated with the ResXFileCodeGenerator tool are INTERNAL. This means that they will only be accessible inside your assembly.
To make one of these classes public, you cannot just change its code as it will be re-generated by the tool on the next rebuild. You have to change the custom tool, selecting the PublicResXFileCodeGenerator instead of the previous one. It will make them public for you.
You can also do this by “double-clicking” your string table (to enter the visual editor view), and selecting the PUBLIC modifier in the upper part of the screen (this actually changes the custom tool as explained above).
Well, it's been long, but hope it helps someone. However, this is my first approach to Localization and therefore, for sure there will be people with deeper knowledge on this issue. Please feel free to complete (or correct) this tutorial with comments and suggestions.
Thanks!
