Introduction
When I started navigating SharePoint, I found it quite difficult to understand in terms of the underlying concept. A lot of resources are there throughout the Internet to start with any of the topics. But as always, I believe in making things simple to learn and understand. Here I am going to explain the process of implementing a Custom user control developed in Visual Studio 2005/2008 in SharePoint/MOSS 2007.
Prerequisite
- Basic familiarity with WSS/MOSS
- Experience of using WebUserControls and class libraries in .NET
- MOSS Server Installation
- A Web Application in MOSS to test our Project
- Visual Studio 2008 or Visual Studio 2005 having Microsoft.SharePoint DLL :-)
Hope all my readers satisfy these prerequisites, if not then also I would try to make it work for you.
Problem Scope
I want to use a Simple WebUserControl in MOSS site. We can call it a Custom Web Part.
This web user control is made in Visual Studio 2008 Web Site using C#. You can make this control as complex as you need because it really doesn't affect my process of implementing it on MOSS web application. :-)
Description
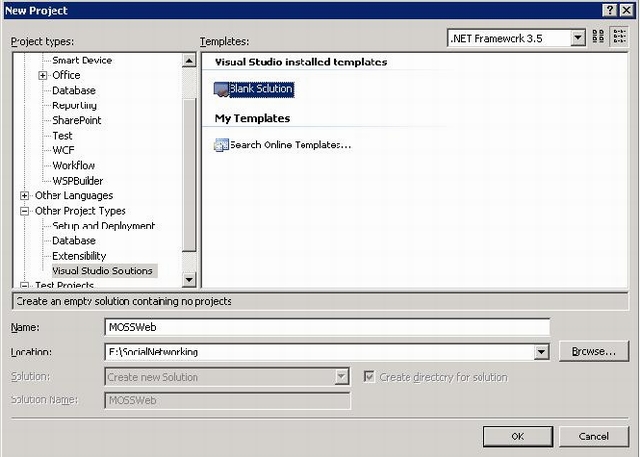
Open Visual Studio, go to C# Project and Add a Blank Solution named “MOSSWeb”.

Now add a new WebApplication named “MossWebDemo” to the Solution. Create a WebUserControl named “uclDemo.ascx”.
Now again from the Solution Explorer add a new Project of type “ClassLibrary”, name it “MossImplementation”. Rename the class named Class1.cs to “HostDemo.cs”.
Your Solution Explorer should look like the following:

Let us focus on uclDemo.ascx as of now. Code here with complete freedom and forget this control is to be used in MOSS. What I mean is you can code anything, like a Database operation etc. I will consider a database table and will fetch records on a GridView. The database is not the default MOSS database. Create your own database. And make a table “Employee” with your desired fields, put some records in it.
Let's store Database connection string in Web.config of the application as follows:
<appSettings>
<add key="ConStr" value="Database=YourDatabaseName;
	Server=ServerName;User=UserName;Password=Password;"/>
</appSettings>
I will not go into the details of writing the code to populate a GridView from a database table, I hope it's basic for the targeted audience. For details of that, you can download the code. Let's assume that our uclDemo.ascx is ready. Drop it on a Web Page and test it. After testing, go to your Moss Server on which you want to implement this control.
Open C:\Program Files\Common Files\Microsoft Shared\web server extensions\12\TEMPLATE\CONTROLTEMPLATES.
This is 12 Hive where in ControlTemplates folder, controls are physically placed.
Here you can directly drop uclDemo.ascx and uclDemo.ascx.cs, or you can create a folder and then drop these in that folder. Best practices advice to create a separate folder. So let's create a folder named “MyControls” and drop the controls here.
C:\Program Files\Common Files\Microsoft Shared\web server extensions\12\
	TEMPLATE\CONTROLTEMPLATES\MyControls
Let's go to class library project, open the class named HostDemo.cs and copy the following code.
using System;
using System.Collections.Generic;
using System.ComponentModel;
using System.Text;
using System.Web;
using System.Web.UI;
using System.Web.UI.WebControls;
namespace MossImplementation
{
  [DefaultProperty("Text")]
  [ToolboxData("<{0}:MossImplementation runat="server"></{0}:MossImplementation>")]
  public class HostDemo : System.Web.UI.WebControls.WebParts.WebPart
  {
    private Control _MyUserControl;
    protected override void CreateChildControls()
    {
    _MyUserControl =
	this.Page.LoadControl(@"~/_controltemplates/MyControls/uclDemo.ascx");
         this.Controls.Add(_MyUserControl);
    }
  }
}
Before moving further, let's have a quick look over the code.
This class is being inherited from System.Web.UI.WebControls.WebParts.WebPart.
_MyUserControl is a control object which will hold our custom control from 12 Hive.
We will override the CreateChildControls() event and will add our custom control to the current page. That's it, isn't it simple !! :-).
Our DLL is ready, just build it. Add a strong name to the DLL, after rebuild copy it to the Server GAC. Oh.... I think I may be going very fast for starters. Ok, let's do it.
Don't forget to add a reference to System.Web as we are using Control object in our Class Library. Build the application now.
Register your DLL from the bin folder of MossImplementation project to Server GAC, physical location of which is C:\WINDOWS\assembly. You can either drag the DLL here or use the VS command prompt as follows:
Gacutil /i (PathofYourDLL)
Like : gacuitl /i
	E:\CodeProject\MOSSWeb\MossImplementation\bin\Debug\MossImplementation.dll
Look for message “Assembly Successfully Added to GAC”.
Now look for the MOSS web application on which you want to use this WebControl. Let's suppose it is http://myserver:1000.
Go to C:\Inetpub\wwwroot\wss\VirtualDirectories and look for your port folder i.e., 1000. Open web.config of that folder. It's the web.config of your MOSS application so be very careful. Don't make any mistake in the update.
Here we need to make two updates.
- I want to make the MossImplementation DLL as a safe control, so that the web application can use it. Go to GAC location, locate your MossImplementation DLL. Right click properties, and get the following properties of that and add entry to the
<SafeContols> of the Web.Config. For example:
<SafeControl Assembly="MossImplementation, Version=1.0.0.0, Culture=neutral,
	PublicKeyToken=593570f0e9c6db21" Namespace="MossImplementation"
	TypeName="*" Safe="True" />
- If you are using Connection String from Web.Config in uclDemo.ascx then add that
string to the <appSettings> of this Web.Config. Save your web.config.
Now you are ready, open your MossWeb Application on the Web Browser.
Go to Site Settings, Web Part Gallery.
Click New ? look for your uclDemo.ascx and upload it.
Now go to any page of your site. Site settings, edit page ? Add WebPart and add your uclDemo WebPart. Hope it will work as per your expectation. In case of any query, please get back to me.
Happy coding......
History
- 23rd April, 2009: Initial post
