Introduction
Hi readers. This is an article for adding prerequisites of .NET Framework in Visual Studio setup project. I will only explain the steps of adding prerequisites of .NET Framework in a setup project with some pictures.
Description
When we develop an application using any platform, we should prepare our application to be deployed properly. Especially for .NET, the prerequisites of .NET Framework are a must. Here, I explain how to add framework to be installed before our application installation process.
After developing our .NET application, we need to create a setup project. Just follow the steps mentioned below:
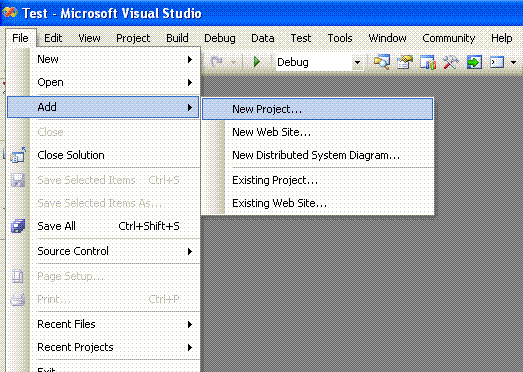
- Go to File menu, select Add New Project and then select Setup And Deployment under “Other Project Types”.

- Give a name to your project as per your wish.

- Then select your setup project solution and add Primary output of your developed project. You just need to right click your setup project in Solution Explorer, click add --> Project Output --> select your project.


- Then add custom action by right clicking setup project --> view --> Custom Actions --> right click Custom Actions --> Add Custom Actions.


- Now we are going to add the prerequisites for your setup project.
- Select your setup project, right click and go to properties, then click the Prerequisites button.


- Now select .NET Framework 2.0 tick box after selecting the Create setup program to install prerequisite components.
- Then specify the install location for prerequisites by selecting the option box.

- Here I select the second one Download prerequisites from the same location as my application.
- Click ok and apply, then ok.
- Now build your setup project, the .NET Framework will be added in your debug folder.

- Go to your debug folder and see the .NET Framework folder would be added as shown below:

- That's it.
Conclusion
As shown in the article, we can add the .NET Framework in our setup.
History
- 28th April, 2009: Initial post
