Introduction
In this article, I am going to show how to develop and deploy a custom web part which is used to connect to a database (SQL) and delete data from a database.
Microsoft Office SharePoint Server MOSS (2007) provides a lot of basic web parts that will have some limited functionality. If you need a web part which has different functionality, you have to go for Custom Web part which has to be built on your own or can be bought from third parties. You build web parts whenever your needs exceed what is available out of the box or from third parties.
A. What is a Web Part?
Components that display content on a page and are the primary means for users to customize/personalize pages.
Or
A name given to components or units that can be installed and customised easily by end users of a SharePoint page, in order to provide extended functionality.
B. Developing
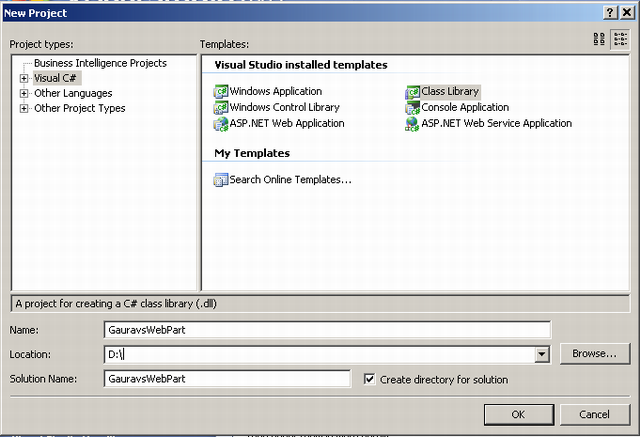
- To get started with creating a Custom Web Part for MOSS 2007 in Microsoft Visual Studio 2005, Open the IDE and create a new C# project, Select Class Library as Project Type. Name it as NewWebPart.

- In the Project explorer view, rename the Class1.cs with GauravWebPart.cs to be consistent with this example; this will result in renaming the class name as well. With the help of “
using” keyword, include the namespaces as shown in the code example below. - The
CreateChildren control is the same as in .NET 1.1, that it would create and add controls to this Web Part Class. In this case, I have only added a button and label object, which is in the method CreateDeleteButton.


- The
RenderControl method is an override for the WebPart Base, this causes the Children Controls to be rendered on the particular HtmlTextWriter passed as a parameter to the method.

- I have used two other classes
- SQLServerDataAccess.cs where you can have business rules, etc. and
- SqlServerHelper.cs for database access, it takes the connection string from the web.config which is accessed from the
GetConnectionString method in the SQerverHelper class.
- Next, use the following code snippet to add the
AllowPartiallyTrustedCallers attribute (located under the System.Security namespace) to the code's AssemblyInfo.cs file:
[assembly: AllowPartiallyTrustedCallers()]
- Give your assembly a strong name. Just go into the Project Properties and then go to the "Signing" tab (see Figure 1) to do this. Alternatively, you can use the sn.exe command line tool to generate strong names for you.

- Build the project and on successful build, you are ready to Deploy the Web Part to the Portal Site.
C. Deploying
- Deploy the assembly to the Assembly Folder (GAC) (requires the assembly to be strong named). Drag and Drop the assembly (DLL) file, named GauravsWebPart.dll from the source folder to the Gac Folder (C:\WINDOWS\ASSEMBLY).

- The Assembly (DLL), GauravsWebPart.dll will be copied into the GAC folder.

- Now take the public key token for the GauravsWebPart.dll assembly (DLL), select the file first and then click mouse right button, and select the properties.
- The properties will open and then select the public key token, copy it, and paste the key into any text file.
- Open the web.config file of the SharePoint application from the following path:
\C:\Inetpub\wwwroot\wss\VirtualDirectories\80
- Add the following attribute, in the last of
<sharepoint><safecontrols> element.
<SafeControl Assembly="GauravsWebPart, Version=1.0.0.0, Culture=neutral,
PublicKeyToken=4fd5e9f6385747e4" Namespace="GauravsWebPart"
TypeName="*" Safe="True" />
- Now replace the public key token, copied from GAC, with the existing key highlighted in yellow colour.
<SafeControl Assembly="GauravsWebPart, Version=1.0.0.0, Culture=neutral,
PublicKeyToken=4fd5e9f6385747e4" Namespace="GauravsWebPart"
TypeName="*" Safe="True" />
- Now copy and paste the same GauravsWebPart.dll assembly (DLL) to bin folder of the SharePoint application, the path is as follows:
C:\Inetpub\wwwroot\wss\VirtualDirectories\80\bin.
However there is another workaround for putting the assembly into the portal’s bin folder again ad again each time the Web Part Project is built with changes. Right click on the project name (NewWebPart) in the VS.NET 2005 IDE and click properties. Under the Build page, paste the same path copied from inetmgr console into the Output Path as shown in the figure below. This will result in the latest assembly automatically being deployed to the bin folder every time the project is built.

- Run the SharePoint application and open the Home Page and go to SiteAction->SiteSetings, then click the on the Modify all site Settings link.

- Click on the Web Parts link under the Galleries section.

- After opening the web part gallery, click on new button highlighted in the following figure:

- Select the checkbox of GauravsWebpart.GauravWebpart web part, and click the button Populate Gallary.

- Now the web part gallery will open again with the name of our new web part, highlighted in the following figure:

- Now open the site where this web part needs to be deployed:

- Click on SiteNavigation->EditPage.

- Now click on “Add Web Part” link, as shown in the following figure:

- A New window will be open “Add Web Part to Main”, and then go to ‘Miscellaneous’ section and select the checkbox of the Delete web part, then click ‘add’ button.

- The Web part will be come on the site.

- At last, click “Exit Edit Mode” comes under the “SiteSection”.

- The Web part now appears on the screen.

