Introduction
We saw in a first article, EF Code First: Let's try it,
how to generate a table using EF Code First. In a second one, I explain how to declare foreign keys for
Code First: EF Code First: Add a foreign key relationship.
In this article, we are going to see how to use Data Annotations and Code Fluent to tweak our database.
Using the code
Now that we have learnt how to create a database with Code First and how
to declare
a foreign key relationship, let's see what else can be configured.
In Code First, there are two ways for configuring database creation. The first one is using Data Annotations as we have seen on my second post about foreign key relationships,
the second one is using the Fluent API. Let's see how it works.
Define MaxLength of a column using DataAnnotation
First, we will define our columns. If we take a look at the table Project, we can see that all our columns created from
the string type in our class are nvarchar(max).

It’s not really useful and we don’t want the Name of the project to be so long. So we will define a max
length for our project name and we will
also indicate that a project should have a name. Here is how to do it using DataAnnotations:
public class Project
{
    public int ProjectId { get; set; }
    [MaxLength(255)]
    [Required]
    public string Name { get; set; }
    public int ManagerId { get; set; }
    [ForeignKey("ManagerId")]
    public Person Manager { get; set; }
}
Run the application and check your database columns:

This time, the Name column has a max length defined and the column Name is set as Not null.
Define column’s name using DataAnnotation
This time, we are going to see how to define a name for a column. Take a look at your
Person class:
public class Person
{
    public int PersonId { get; set; }
    public string LastName { get; set; }
    public string FirstName { get; set; }
    public DateTime BirthDate { get; set; }
}
Let’s say we don’t want the property BirthDate to be stored in a column named BirthDate but in a column named Birth.

Here is how we can modify our class:
using System.ComponentModel.DataAnnotations;
public class Person
{
    public int PersonId { get; set; }
    public string LastName { get; set; }
    public string FirstName { get; set; }
    [Column("Birth")]
    public DateTime BirthDate { get; set; }
}
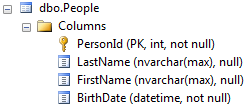
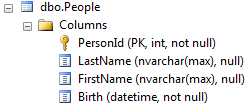
Run the application and check your database:

You can see the column name has changed.
Declare a property as foreign key with DataAnnotation
First we are going to add a new class Task with a foreign key to
the Project and Person classes, add a list of tasks in the
Project class, and remove the Manager property.
public class Task
{
    public int TaskId { get; set; }
    public string Title { get; set; }
    public string Description { get; set; }
    public int PersonId { get; set; }
    [ForeignKey("PersonId")]
    public Person AssignedTo { get; set; }
    public int ProjectId { get; set; }
    [ForeignKey("ProjectId")]
    public Project Project { get; set; }
}

public class Project
{
    public int ProjectId { get; set; }
    MaxLength(255)]
    [Required]
    public string Name { get; set; }
    public List<Task> Tasks { get; set; }
}
We use DataAnnotation to specify foreign keys to the Project and Person tables. Then we modify our Context class:
public class MyContext : DbContext
{
    public DbSet<Person> Persons { get; set; }
    public DbSet<Project> Projects { get; set; }
    public DbSet<Task> Tasks { get; set; }

    public MyContext()
    {}

    protected override void OnModelCreating(DbModelBuilder modelBuilder)
    {
        base.OnModelCreating(modelBuilder);
    }
}
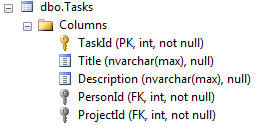
And we run the console application. Here is the result:


OK, all works fine until now. Let’s re-add the Manager property in the
Project class:
public class Project
{
    public int ProjectId { get; set; }
    [MaxLength(255)]
    [Required]
    public string Name { get; set; }

    public int ManagerId { get; set; }
    [ForeignKey("ManagerId")]
    public Person Manager { get; set; }

    public List<Task> Tasks { get; set; }
}
Here we get a SqlException:
Introducing FOREIGN KEY constraint 'FK_Tasks_Projects_ProjectId'
on table 'Tasks' may cause cycles or multiple cascade paths.
Specify ON DELETE NO ACTION or ON UPDATE NO ACTION, or modify
other FOREIGN KEY constraints.

Could not create constraint. See previous errors.
This error doesn’t come from Entity Framework or Code First, it comes from SQL Server. It doesn’t want to create tables and constraints because
it estimates there will be some issues if we let it as is. It asks us to specify
an action in case of delete (to avoid multiple cascade delete) or to modify our constraints.
As we don’t want to modify our constraints, we will specify an action in case of delete. Here is the first operation we can’t do using DataAnnotations. We will have to do it using Code Fluent.
Declare a property as foreign key with Code Fluent
Now that we have seen how to configure the generation of a database with DataAnnotation, we’ll see how to do the same, and more, with
the Fluent API.
This configuration should be done in the Context class. Here is how I modify it to declare the foreign key between Task and Project:
public class MyContext : DbContext
{
    public DbSet<Person> Persons { get; set; }
    public DbSet<Project> Projects { get; set; }
    public DbSet<Task> Tasks { get; set; }

    public MyContext()
    {}

    protected override void OnModelCreating(DbModelBuilder modelBuilder)
    {
        base.OnModelCreating(modelBuilder);
        modelBuilder.Entity<Task>().HasRequired(t => t.Project).WithMany(
          p => p.Tasks).HasForeignKey(t => t.ProjectId).WillCascadeOnDelete(false);
        modelBuilder.Entity<Task>().HasRequired(p => p.AssignedTo);
    }
}
It’s easy to understand. A task should be linked to a project which could have multiple tasks, this relation would be done using the property
ProjectId and there will be no action in case of Delete. We’ve done the same for the relationship between Task and Person.
Now we need to modify our Task class like this, to remove DataAnnotations:
public class Task
{
    public int TaskId { get; set; }
    public string Title { get; set; }
    public string Description { get; set; }

    public int PersonId { get; set; }
    public Person AssignedTo { get; set; }

    public int ProjectId { get; set; }
    public Project Project { get; set; }
}
And we can remove the directive:
using System.ComponentModel.DataAnnotations;
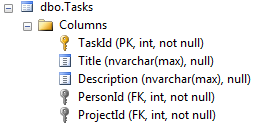
This time, when we run the application, there is no error and our tables are correctly created:


Define column name using Code Fluent
Now we will modify our Person class to use Code Fluent. First, we delete the Attribute
column.
public class Person
{
    public int PersonId { get; set; }
    public string LastName { get; set; }
    public string FirstName { get; set; }
    public DateTime BirthDate { get; set; }
}
Then we go to the Context class and add the line below:
modelBuilder.Entity<Person>().Property(d => d.BirthDate).HasColumnName("Birth");
Define a column as non-nullable
We will also indicate that a project should have a manager:
modelBuilder.Entity<Project>().HasRequired(p => p.Manager);
Define the MaxLength of a property and that it is a required information
modelBuilder.Entity<Project>().Property(p => p.Name).HasMaxLength(255).IsRequired();
modelBuilder.Entity<Project>().HasRequired(p => p.Manager);
This article is now finished. I hope it’ll help you understand how DataAnnotations and Code Fluent work. In a future article, we’ll see how to organize our configuration.
In the next article, we will talk about Data Annotations and Code Fluent.
History
