Introduction
I have been working on a Windows application where .NET 3.5 has been used. In this application, we were supposed to subscribe to WebServices which are interacting through business objects. Some of the business objects had already been defined as we were enhancing one existing application. Now I was supposed to find out an approach using which we could use databinding in the UI layer. After browsing the internet, I decided to stick with BindingList and give a little more flexibility to wrap this in a BindingSource.
Reasons Behind
Ideas which came to my mind:
- Business Objects are going to be used for data communication between layers.
- Need a fast and easy implementation approach.
- Approach should help developers by reducing lines of codes through Databinding.
Details of BindingList and BindingSource
I will explain in this post how easily anyone can use BindingList and BindingSource. I have taken a Master-Detail relational example – Employee and Employee Details.
Create two separate business entities of EmployeeBE and EmpDetails. Now to create the BindingList classes for respective business entities, use the following code – BindingList<T>.
public class EmployeeBEList : BindingList<EmployeeBE>
{
}
public class EmpDetailsList : BindingList<EmpDetails>
{
}
Now in the EmployeeBE have the reference of BindingList<EmpDetails> to maintain the Master-Detail relationship. So this is a very fast and easy implementation. This can be used for the existing business objects as well.
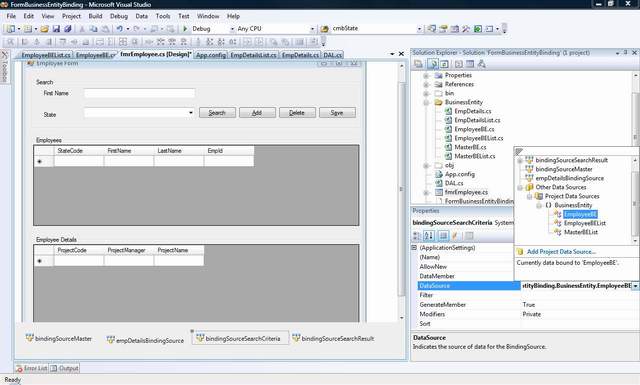
Once Business-Objects are created, let’s focus into the UI part. Create a simple search panel consisting of different search criteria. Also have a couple of grids for Employees and Employee Details for the selected Employee. Now comes the BindingSource using which we will do the design time data-binding.

As shown in the image, add the EmployeeBE as the data source to the BindingSource of the search criteria. In the same manner, we can have bindinglist for the datagrids where search result would be displayed. This bindingsource would have the EmployeeBEList as datasource. Now bind each of the UI elements with respective BindingSource.
I would like to explain the databinding the of the State dropdown. To populate this State dropdown, you can have MasterBE (with Code and Description properties). Similarly, another BindingList for this <code><code>MasterBEList : BindingList<MasterBE>. Now associate the dropdown to BindingSource which has the MasterBEList as the datasource. Set two properties of the dropdown as mentioned below -DisplayMember – “Description” and ValueMember – “Code”. These are the properties of the MasterBE. So far we are done with population and displayof States. Now we have to do the changes so that we can pass the searched State code to the next layer from UI. Using the following code (or using designer), the SelectedValue property of the dropdown is bound to “StateCode” of bindingSourceSearchCriteria BindingSource.
this.cmbState.DataBindings.Add(new System.Windows.Forms.Binding
	("SelectedValue", this.bindingSourceSearchCriteria, "StateCode",
	true, System.Windows.Forms.DataSourceUpdateMode.OnPropertyChanged));
The important thing to note is the DataSourceUpdateMode which is set to OnPropertyChanged. This means if the value of SelectedValue is changed through code also, that would be reflected in the BindingSource, whereas OnValidation needs user interaction.
Now I would quickly go through the CRUD operations. While retrieving, get the list of objects returned from the DAL layer and associate to datasource.
private void btnSearch_Click(object sender, EventArgs e)
{
    DAL objDal = new DAL();
    EmployeeBE searcchCriteria = (EmployeeBE)bindingSourceSearchCriteria.Current;
    bindingSourceSearchResult.DataSource =
	objDal.SearchEmployee(searcchCriteria.FirstName, searcchCriteria.StateCode);
}
Now the rest of the things would be taken care of by BindingSource once the data is populated. To add a new record, i.e. BusinessObject, use the following code snippet:
private void btnAdd_Click(object sender, EventArgs e)
{
    EmployeeBE newEmp = this.bindingSourceSearchResult.AddNew() as EmployeeBE;
}
For deletion, you need to simply delete the BusinessObject from the BindingSource.
private void btnDelete_Click(object sender, EventArgs e)
{
    EmployeeBE selectEmp = this.bindingSourceSearchResult.Current as EmployeeBE;
    this.bindingSourceSearchResult.Remove(selectEmp);
}
The BindingSource can be saved after doing create/delete/update on the list. This is mainly used for bulk update.
Compared to DataSet, you have to maintain a list to keep track of the changed items list. I have done that by keeping an array of integers and trapping the ListChanged event of BindingSource.
private void bindingSourceSearchResult_ListChanged
(object sender, ListChangedEventArgs e)
{
switch (e.ListChangedType)
{
case ListChangedType.ItemAdded:
if (!_addedRowIndexes.Contains(e.NewIndex))
_addedRowIndexes.Add(e.NewIndex);
break;
case ListChangedType.ItemChanged:
if (!_changedRowIndexes.Contains(e.NewIndex) &&
!_addedRowIndexes.Contains(e.NewIndex))
_changedRowIndexes.Add(e.NewIndex);
break;
default:
break;
}
}
Conclusion
So far this has been a very easy and fast implementation approach with design time databinding. There might be other ways of implementing the same scenario but I felt that this one was pretty easy. Definitely, BindingList does not support by default Sorting which I will cover in one of my next posts.
History
- 20th June, 2009: Initial post
This is the my article on Databinding. In the next one, I would discuss about few more advanced areas of BindlingList and BindingSource.
