This blog post is dedicated to share my experience while configuring and using Entity Framework 4.1 for my open source project which I am planning to release. This blog-post will contain all those experience which I faced while configuring and using Entity framework 4.1.
To begin with, lets have a look at how to configure Model First approach of configuring and using Entity Framework 4.1.
Visual studio supports many features so that we can easily add Entity Framework to our project. To Add Entity Framework to a project you will need a package manager.
Lets see how to add a package manager extension to visual studio.
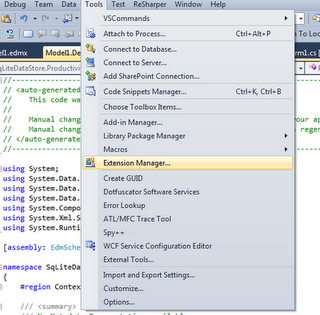
Step 1. Go to tools -> Extension Manager.

How to add a package manager extension to visual studio
Step 2. Go to on-line gallery and search for "nu-get package manager" and install it.

How to add nu-get package manager
Done! your package manager is installed. Now you can start install entity framework.
After you have installed Nu-get package manager, you have two options to install entity framework.
- Via package manager console.
- Purely through the UI.
For installing via package manager console, you have to go to View-> Other Window-> Package Manager Console.
Now at the console type "Install-Package EntityFramework" and press enter. It will start Installing.
If you are behind any firewall and you need credentials to access internet then it may ask for that credential. Give your credentials
to connect to internet and it will start downloading and will install.

How to install Entity Framework
Installing Entity Framework Purely Via UI
Right click on the projects Reference and there you can find an extra option "Manage NuGet Packages" click on that.

How to install Entity Framework to a project
Now this will take you to another window where you can find Entity framework. Install that.

How to install Entity Framework to a project
Now the installation of Entity Framework is over. After the Entity Framework is installed, you can see some entry in your App.config file which are associated with the Entity model.
Now lets see how to consume Entity Framework.
Consuming Entity Framework
Step 1. Adding ADO.Net Entity Data Model
Entity data model will automattically generate code to manage your data models. For this first right click on the project and say "Add new item"

Adding ADO.Net Entity Data Model
And at the add new item wizard, Select "ADO.Net Entity Data Model".

Adding ADO.Net Entity Data Model to a project
This will ask you to Select your database based on your setting in you app.config file. So before configuring Entity Framework,
please configure your database for model first approach. Here you have the option for configuring without any database, but as we are configuring
for model first approach it is recommended to configure your database before you configure Entity Framework.
After adding ADO.Net Entity Data Model, you can find a new file in your project with an extension of ".edmx" when you click on that file you can see the Entity designer.

Entity Framework Entity Designer
At this stage your project has the entity model, also this will add some entry in your
App.config file under connection string tag.

Entity Framework App.config Settings
At this stage, Installing and configuring Entity Framework is over. Now lets see how to use it in our code.
var ob = new ApplicationSetting {bootOnStartUp = true};

using (var obj = new ProductivityEntities())
{
    obj.ApplicationSettings.AddObject(ob);
    obj.SaveChanges();
}
Here ApplicationSetting is the name of my table which has a corresponding Entity class while we have configured ADO.NET Data Model. ProductivityEntities
is the class corresponding to the entry in your app.config file for connection string where the name of the tag is "name=ProductivityEntities".
After executing this line, your table will have an entry with the fields filled with data that you have supplied. Here in my case my table have only one filed
and the name of the field is "bootOnStartUp" which is of type boolean. For every field in table, you can find corresponding property in corresponding class for Entity.
Hurdles
If you are using .NET version 4.0 there can be a chance of getting an error as below.
Additional information: Mixed mode assembly is built against version 'v2.0.50727' of the runtime and cannot be loaded in the 4.0 runtime without additional
configuration information. Additional information: Mixed mode assembly is built against version 'v2.0.50727' of the runtime and cannot be loaded in the 4.0
runtime without additional configuration information.
This error happens because of the support for side-by-side runtimes, .NET 4.0 has changed the way that it binds to older mixed-mode assemblies.
These assemblies are, for example, those that are compiled from C++\CLI. Currently available DirectX assemblies are mixed mode.
To fix this, You have to add the below settings to your App.config file under configuration tag.
<startup useLegacyV2RuntimeActivationPolicy="true">
    <supportedRuntime version="v4.0"/>
    <requiredRuntime version="v4.0.20506"/>
</startup>
For this and more, visit my site MyWebsite <a href="https://sites.google.com/site/gonetdotnet/system/app/pages/sitemap/hierarchy" target="_blank" title="Configuring Entity Framework">https://sites.google.com/site/gonetdotnet/system/app/pages/sitemap/hierarchy</a>
