Introduction
This article will demonstrate Executable Integration which is a concept of integrating several distinct executables (often written in different programming languages) to create a single application.
It's a simple concept that appeals to both beginners and professionals, as it's easy to implement even on small projects, and dramatically speeds up and simplifies development of large ones.
Executable Integration has several advantages:
- Increases reuse, as binary software parts can be used by projects of different programming languages, and binary backwards compatibility often outlasts compiler compatibility (Win7 can run DOS and Win9x binaries, but no recent compiler can make them).
- Increases stability, due to the increased independence and isolation of each part (no shared memory or system resources, shorter process run time for components).
- Simplifies testing, due to standardized glue mechanism, unit tests can be written in other languages.
- High code cohesion, as coupling will often be 0.
- Speeds up development time for the above reasons.
- Cuts down costs due to reduced development effort, and larger selection and lower average cost of off-the-shelf parts.
For this example, we will use several native free-for-commercial-use utilities:
- The ping utility provided with Microsoft Windows
ConfigEditor as settings dialogPADUpdater for checking for a new version and auto updateInfoBrowser as a help system
And we will integrate them into a single application that we'll write in Java.

Creating Our Main Application
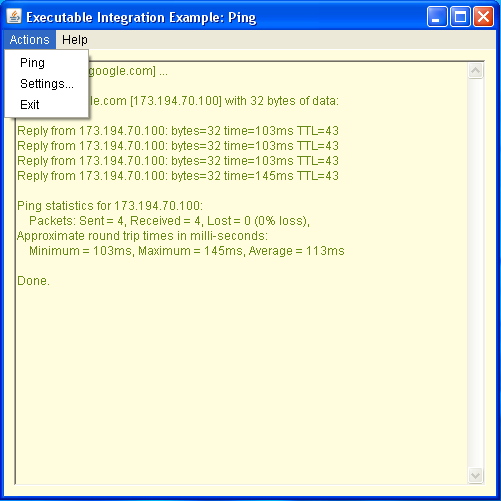
The main application in this example is a GUI based network ping. It should contain code for the following functionality:
- Create the main window GUI that has a menu for user actions, and a text box to display ping results
- Handle program functionality as taking user actions from GUI and calling the appropriate tasks, and return results to the GUI
- Execute external tools (i.e., launch
ConfigEditor when the user selects "Settings.." menu item) and grab their output (i.e., the output of the ping.exe tool) - Read the program settings from a *.properties file
For this, we made 4 classes accordingly: mainFrame, MainFunctionality, ProcessKit, and PropertiesReader:

The GUI (The mainFrame Class)
The user interface code is auto-generated by our development environment (NetBeans in this case), according to a visually edited design. User action functions invoke the MainFunctionality class to perform the actual program functionality.
The Program Functionality (The MainFunctionality Class)
This class has a function for each GUI action, and invokes ProcessKit, and PropertiesReader as needed.
Most functions just invoke an external process, for example the "Settings..." action:
public boolean SettingsScreen(){
try {
ProcessKit.ExecApp(AppPath + "\\ConfigEditor\\ConfigEditorFREE.exe", null);
settingsfile.Reload();
UpdateColor();
return true;
} catch (Exception ex) {
Logger.getLogger(mainFrame.class.getName()).log(Level.SEVERE, null, ex);
}
return false;
}
Launching External Tools (The ProcessKit Class)
For this purpose, we created a class called ProcessKit, that has several process launching and controlling functions. Its most important function is ExecApp() which is based around the Java built-in execution function Runtime.exec().
It is used for running the Configuration Editor tool when the user clicks the Settings menu:

Reading Settings File (The PropertiesReader Class)
This class reads the settings.properties file in the ConfigEditor directory, and is used for retrieving values from it (such as the destination web site and so on).
Conclusion
We can see that there is very little developer code in our example, and the code itself is simpler than usual due to very little variance between code lines, and uniform method of calling external software sub parts.
It took me only 2 hours to make (excluding previously invested effort in making the ProcessKit, and PropertiesReader classes).
I asked a junior Java developer to make this example application anew, she did it in 6 hours (the WMFP metric for this code is 11 hours, so she was %45 faster than the average developer).
This example code can be used as a fully featured application skeleton, and we can see this task can be done in a very short time, using familiar and freely available parts.
History
- This is the first version of this article.
