Say what?
That was my initial reaction a few years ago when seeing the UI for an iOS app developed entirely in code. I thought to myself what a crazy idea and clearly the person doing this just didn’t understand storyboards or the power of them and Auto Layout. I had envisioned this developer as some old developer clinging with all their might to the old ways.

As time passed, I heard more mention of it from other developers and then I came across these great YouTube tutorials here where the developer did everything in code. The speed and ease that he operated with was amazing (almost hypnotizing). Maybe this whole programmatic UI had something to it?
So I started to play around with the idea and developed some gists that I could use to copy from and speed up my coding. As time progressed, I noticed my skills and knowledge were improving and my UI development was actually happening faster.
To get you started in the process, I am going to cover that simple app that everyone loves, a table view that displays some basic rows of information.
Create Project
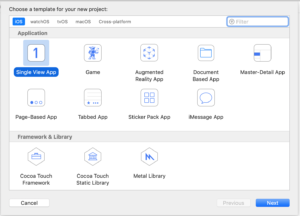
Start off with creating a Single View Application:
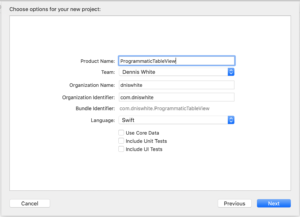
With the project setup, let’s do a quick review of it and all the items that were created in the process of setting it up.
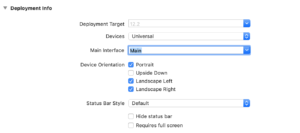
If you notice in Main Interface, the dropdown has selected an item called Main. This is from the Main.storyboard that was created when the project was being setup. Let’s go ahead and select that item and just delete it so that the dropdown is blank.
Now look at the different files that were created.
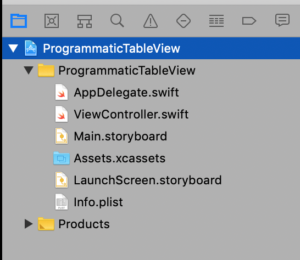
Just to make sure there is nothing sneaky going on select the Main.storyboard file and delete it and now if you run the app, you will get a big black screen.
Not very exciting, right?
Right now, you are getting a black screen because we have not setup a window for the application to run with. To fix that, click on the AppDelegate.swift file and let’s edit the application method so that the window which is already a property of the class gets created.
window = UIWindow()
window?.makeKeyAndVisible()

let viewController = ViewController()
window?.rootViewController = viewController
So what’s happening?
The first two lines we added are to create a window that will contain the view(s) for our application. Then the next two lines are going to instantiate the View Controller that was created with our project and then set the windows root view controller as our view just created. Go ahead and run the application again.
Another blank black screen what gives?
What is happening now is that we have created our applications window and associated a view with it. However, the default color for the background of a UIViewController is black which explains our current situation. Let’s solve that so that we have something somewhat interesting and normal to what we would get using a storyboard.
Click on the ViewController.swift file and add the following line of code to the viewDidLoad method.
view.backgroundColor = .white
When you are done, your viewDidLoad should look similar to the following:
override func viewDidLoad() {
    super.viewDidLoad()

    // Do any additional setup after loading the view.
    view.backgroundColor = .white
}
If you run the application now, it should show you a blank view controller and look like a new application would if you were using storyboard.
Setup Table View
So blank views are great and all but let's add some content; for this demo, I want to display a few rows of information in a table view. Our rows of information will be some static information and in future tutorials, I will cover things like connecting to a RESTful service or using Core Data to make the information more dynamic.
The first change to be made is changing the current View Controller so that it displays a table view. With the ViewController still open in the editor, let's change its inheritance.
class ViewController: UITableViewController {
If you run the application again, you will notice that your blank view has changed slightly and it is displaying a collection of blank rows. Exciting right?
So let’s add some meat to our new Table View controller so that it displays some rows with information.
Register Cell for Rows
In order to display rows of information, we will have to register at least one type of cell that we will want displayed. Since table views have the ability to display different sections as well as header and footer rows, they also give us the power to display different types of rows for each.
For this demo, I am just going to register a classic UITableViewCell. In the viewDidLoad, let’s make an update to it so it looks like the following:
override func viewDidLoad() {
    super.viewDidLoad()

    // Do any additional setup after loading the view.
    view.backgroundColor = .white

    // register a cell type that will be displayed
    tableView.register(UITableViewCell.self, forCellReuseIdentifier: "cellId")
}
This change will make more sense as we make the changes to display each row with its own information being displayed.
Display Rows
With the inheritance of UITableViewController comes the requirement that we implement two required methods that come from the UITableViewDataSource protocol. The following method shows a basic implementation that sets the number of rows to be created and populated with data as five rows:
override func tableView(_ tableView: UITableView,
                        numberOfRowsInSection section: Int) -> Int {
    return 5;
}
For populating each row, you have to implement the method that requests for you to create a cell for a row at a specified index. The following method shows a quick example of creating a row and populating it with some text:
override func tableView(_ tableView: UITableView,
                        cellForRowAt indexPath: IndexPath) -> UITableViewCell {
    let cell = tableView.dequeueReusableCell(withIdentifier: "cellId",
               for: indexPath) as! UITableViewCell

    cell.textLabel?.text = "some text"

    return cell
}
I remember many years ago when I started working with UITableViews, I wondered what is that dequeReusableCell? So what’s happening here is that while you can specify your table has several hundred rows in it what’s actually going to happen is that only the rows being displayed will be created and as you scroll through your table view, it will continually call this method allowing you to update each row based on the index (using indexPath) into your data source.
Where did that text label come from?
A UITableViewCell comes built in with an UIImageView named imageView and two UILabels named textLabel and detailTextLabel. The part that is cool about these controls is that the cell will orient itself based on the use of each control. For more details, review the Apple Documentation here that discusses configuring a cells content.
Data Source
We could leave the example as it is but instead let's tie to a very basic data source. In this situation, we will create a member variable in the ViewController that is an array of strings and that can be used to populate the number of rows as well as information in each cell.
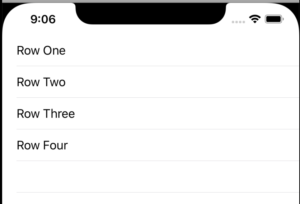
var dataSource = ["Row One", "Row Two", "Row Three", "Row Four"]
Finally, update the methods for returning the row count as well as a UITableViewCell for each row.
override func tableView(_ tableView: UITableView,
                        cellForRowAt indexPath: IndexPath) -> UITableViewCell {
    let cell = tableView.dequeueReusableCell
               (withIdentifier: "cellId", for: indexPath) as! UITableViewCell

    cell.textLabel?.text = dataSource[indexPath.row]

    return cell
}

override func tableView(_ tableView: UITableView,
                        numberOfRowsInSection section: Int) -> Int {
    return dataSource.count;
}
With all that in place, you can build and run the application and assuming you are using a simulator, you should see something similar to the following:
Conclusion
I will admit that in the beginning, I had some initial reservations about the idea of building my UI programmatically but I gave it a fair shake. As time progressed, I found that while doing things programmatically, I was actually gaining a better view of how Auto Layout and how components were laid out and handled on the screen.
Am I going to totally abandon using storyboard? Probably not, but honestly my first and most preferred approach has become developing my UIs programmatically.
In future articles, I will start detailing more about control layout. For now though, I hope this was enough to get you started and thinking you want to see and learn more.
For now, you can view the complete source here and as always, happy coding!!!
