Woa, me and my classmates are planning to go to the cinema to enjoy "Madagascar 3" next week. It's fantastic because the girl I like loves this movie so much. I invited her to join us but she couldn't, that's so sad. It's not the worst thing when I realized that all my guys would go with their girlfriends and I would go alone. In my band of 6 or 7, I am the only one who is single. Ridiculous. Really I am a bad mood, and I can't work for my final exam until I make something crazy. I decide to call some C# code in a VBScript @@, thanks stackoverflow stuff for helping.
Target
Wrap a .NET user control in an ActiveX class.
Solution
1. Create the Class Library in VS 2010
Open your Visual Studio in Administrator mode please (some system access will be made). Create a new, empty Class Library project and add into it a Windows Form.
Drag to the form 1 button named btnDo and 1 label named lblResult. Then bind the button clicking event with this code:
private void radButton1_Click(object sender, EventArgs e)
        {
            this.lblResult.Text =
               "I am a .NET user control happily living \ninside an ActiveX container. Cheers.";
        }
I'm sure you all know the meaning of that code. If you don't, go to the book store and pick any book about C# programming. I suggest the thin one because it should be cheaper.
Ok, let's move to the next part.
2. Setting for Project
Open the library's Property Settings window and select the Application tab. You should see an “Assembly Information…” button - click on it and it will open a dialog form with various assembly settings. You will see a checkbox named “Make assembly COM-visible”. The checkbox must be checked. You would also see a GUID field. Let's do something with it. Click menu Tools -> Create GUID. In the showing dialog, click Copy. Now close this dialog and paste to GUID field in Property Settings. It is used to set the ID of the typelib if this project is exposed to COM.
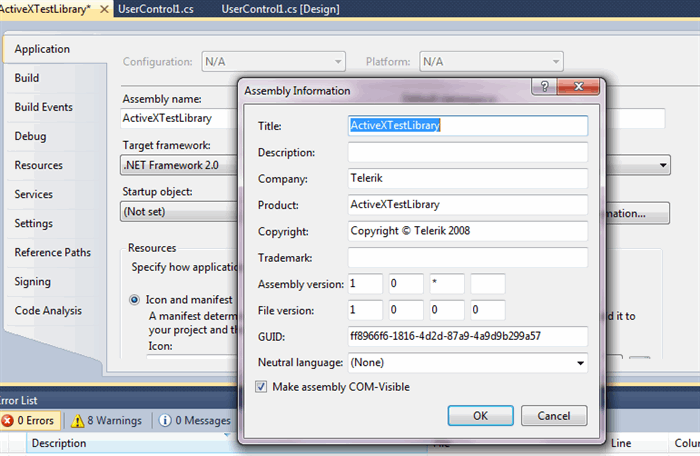
Figure 1 - Settings
Now, choose tab Build. If you want automatic registration of the freshly created ActiveX wrapper, you should check the “Register for COM interop” checkbox. It runs Regasm.exe after every build to register the types with COM (which you probably shouldn't do until you're stable because your COM GUIDs will change whenever you change the methods unless you specify GUIDs explicitly, so your registry could end up with a lot of registration junk for versions that will never be used). Last thing to do here is to provide your ActiveX a strong name key. Let do it with Microsoft style. The steps below have been copied from http://msdn.microsoft.com/en-us/library/aa559684%28v=bts.20%29.aspx with a small modification.
To create a strong name key file:
- Click Start, point to Programs, point to Microsoft Visual Studio 2010, point to Visual Studio Tools, and then click Visual Studio 2010 Command Prompt.
- At the command prompt, change directory to your project folder.
- At the command prompt, type sn -k ActivX.snk, and then press ENTER.
Now, in the Property Settings, choose Signing tab and Browse ActivX.snk as Strong name key file. Done, now back to the code for a few additions.
3. Thank God We have Interop Services
At the beginning of your Window Form class, insert the below code:
[ProgId("ActiveXTestLibrary.UserControl")]
[ClassInterface(ClassInterfaceType.AutoDispatch)]
[ComVisible(true)]
The ProgIdattribute which provides a unique name for the created ActiveX interface. You can change ActiveXTestLibrary.UserControl by other string that describes your ActiveX function.
The second ClassInterface attribute states whether and how a COM interface will be generated for the managed assembly. The last ComVisible attibute controls accessibility of member true to COM.
Also you can provide static methods that are invoked when the ActiveX is registered or unregistered through the Regasm.exe:
[ComRegisterFunction()]
public static void RegisterClass(string key)
{
    StringBuilder sb = new StringBuilder(key);
    sb.Replace(@"HKEY_CLASSES_ROOT\", "");

    RegistryKey k = Registry.ClassesRoot.OpenSubKey(sb.ToString(), true);

    RegistryKey ctrl = k.CreateSubKey("Control");
    ctrl.Close();

    RegistryKey inprocServer32 = k.OpenSubKey("InprocServer32", true);
    inprocServer32.SetValue("CodeBase", Assembly.GetExecutingAssembly().CodeBase);
    inprocServer32.Close();

    k.Close();
}

[ComUnregisterFunction()]
public static void UnregisterClass(string key)
{
    StringBuilder sb = new StringBuilder(key);
    sb.Replace(@"HKEY_CLASSES_ROOT\", "");

    RegistryKey k = Registry.ClassesRoot.OpenSubKey(sb.ToString(), true);

    if (k == null)
    {
        return;
    }
    k.DeleteSubKey("Control", false);

    RegistryKey inprocServer32 = k.OpenSubKey("InprocServer32", true);

    inprocServer32.DeleteSubKey("CodeBase", false);

    inprocServer32.Close();
}
The methods have predefined names (RegisterClass and UnregisterClass) and should be marked respectively with the ComRegisterFunction/ComUnregisterFunction attributes. Here, we register the category of the ActiveX as a UI control.
4. Write Something to Show the Form
To show a form, you need to start a message loop by calling Application.Run:
[ComVisible(true)]
public void Hello()
{
    Application.Run(this);
    MessageBox.Show("Hello text", "Test");
}
The Show() function will show the form and immediately exit. Application.Run() will not exit until the form is closed.
Now build the project. You will have DLL and your DLL has already been registered to System.
5. Test
Open a text editor for writing about 4, 5 lines of VBS code. I like notepad++ for Window and gedit for Ubuntu, but what you use is up to you. Paste that code, save it as Test.vbs, run the file and see what happens.
Sub main
    set objTest = CreateObject("ActiveXTestLibrary.UserControl")
    objTest.Hello
    Do While (10 > 9)
    Loop
end Sub

call main

Figure 2 - C# form is called by vbs
Then click the button. :)
Figure 3 - C# event is listened
Thanks for reading a very boring post. Here is your gift: my source code.


 General
  News
News  Suggestion
  Question
  Bug
Bug  Answer
  Joke
Joke  Praise
  Rant
Rant  Admin
Admin 


