Introduction
Activity of android application is main entity which likes windows on win32 platform. It has lifecycle, contains gui widgets, and manages them together. Activity can create child activities, with initial parameters, and gets results from them. Here gives an example to operate activities, which code is written with python based on wrapandroid project. The purpose of this article is to tell programmer how to operate activities using python, rather than explain activity’s lifecycle and how to create child activities, which is talked in detail in android sdk documents.
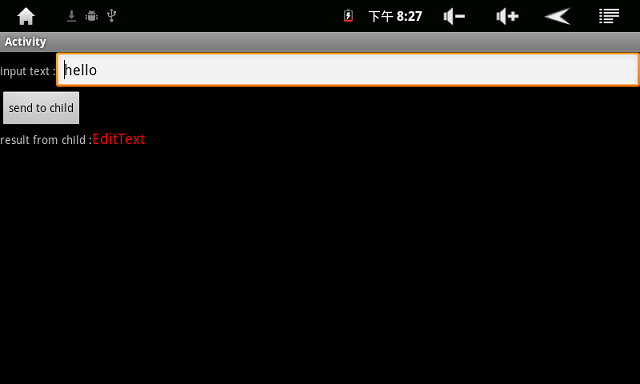
Examples given in this article is simple. We create two activities, one is root, and another is child. The root activity contains an edit widget, which is used to get input from user, and a button widget. When users press button, child activity is created with input as parameter. Child activity displays the parameter in text widgets, shows an edit widget for user to input result for parent. At last, the text returned from child is shown in parent activity.
Root Activity
Layout XML file
We use xml file layout. The xml file contains text view, button and edit view, which is listed below.
="1.0"="utf-8"
<LinearLayout
android:id="@+id/widget30"
android:layout_width="fill_parent"
android:layout_height="fill_parent"
android:orientation="vertical"
xmlns:android="http://schemas.android.com/apk/res/android"
>
<LinearLayout
android:id="@+id/widget34"
android:layout_width="fill_parent"
android:layout_height="wrap_content"
android:gravity="bottom"
android:layout_gravity="center_vertical"
>
<TextView
android:id="@+id/widget35"
android:layout_width="wrap_content"
android:layout_height="wrap_content"
android:text="input text :"
>
</TextView>
<EditText
android:id="@+id/widget38"
android:layout_width="fill_parent"
android:layout_height="wrap_content"
android:text="hello"
android:textSize="18sp"
>
</EditText>
</LinearLayout>
<Button
android:id="@+id/widget39"
android:layout_width="wrap_content"
android:layout_height="wrap_content"
android:text="send to child"
>
</Button>
<LinearLayout
android:id="@+id/widget40"
android:layout_width="fill_parent"
android:layout_height="wrap_content"
android:gravity="bottom"
android:layout_gravity="center_vertical"
>
<TextView
android:id="@+id/widget41"
android:layout_width="wrap_content"
android:layout_height="wrap_content"
android:text="result from child :"
>
</TextView>
<TextView
android:id="@+id/widget42"
android:layout_width="fill_parent"
android:layout_height="wrap_content"
android:text=""
android:textSize="18sp"
>
</TextView>
</LinearLayout>
</LinearLayout>
Code of activity
The boot code of activity is written in java, which is simple. The function of it is to load python code, which is code.py located in asset directory.
public class ActivityActivity extends WrapAndroidActivity {
@Override
public void onCreate(Bundle savedInstanceState) {
super.onCreate(savedInstanceState);
setContentView(R.layout.main);
StarActivity._Call("DoAssetsFile", "python", "code.py");
}
}code.py
“Code.py” is the main code of root activity. It is a python file. Step 1: The first step of python code is to get service group object and service object created by the Java code.
SrvGroup = libstarpy._GetSrvGroup()
Service = SrvGroup._GetService("","")
#--get activity
StarActivity = Service.ActivityClass.getCurrent();
Step 2: The step 2 is to obtain widgets defined in the layout file. And set onClick event listener of button. When the event is triggered, we build an intent and create child activity. The child activity is named ChildActivity. It must be declared in AndroidManifest.xml. Otherwise, the call will be failed. AndroidManifest.xml:
    <application
        android:icon="@drawable/ic_launcher"
        android:label="@string/app_name" >
        <activity
            android:label="@string/app_name"
            android:name=".ActivityActivity" >
            <intent-filter >
                <action android:name="android.intent.action.MAIN" />
                <category android:name="android.intent.category.LAUNCHER" />
            </intent-filter>
        </activity>
        <activity android:name=".ChildActivity" android:label="@string/app_name"/>
</application>
Python code:
#--button
myEdit = StarActivity.findViewById("EditTextClass",StarActivity.getResource("id/widget38"));
myButton = StarActivity.findViewById("ButtonClass",StarActivity.getResource("id/widget39"));
def myButton_onClick(self, Ev) :
    MyIntent = Service.IntentClass._New();
    MyIntent.setClassName("ChildActivity");
    MyIntent.putStringExtra("value",myEdit.getText());
    StarActivity.startActivityForResult(MyIntent,1);
    MyIntent._Free();
    return;
myButton.onClick = myButton_onClick;
myButton.setOnClickListener();
Step 3: When the child activity returns, we can get result from child and show it in text view. To receive result, we should override activity’s function onActivityResult.
#--receive result
myText = StarActivity.findViewById("EditTextClass",StarActivity.getResource("id/widget42"));
myText.setTextColor(0xFFFF0000)
def StarActivity_onActivityResult(self,requestCode, resultCode, data) :
    if( requestCode == 1 and data != None ) :
        myText.setText(data.getStringExtra("value"))
StarActivity.onActivityResult = StarActivity_onActivityResult;
Child Activity
Layout XML file
The XML file also contains text view, button and edit view, which is listed below.
="1.0"="utf-8"
<LinearLayout
android:id="@+id/widget30"
android:layout_width="fill_parent"
android:layout_height="fill_parent"
android:orientation="vertical"
xmlns:android="http://schemas.android.com/apk/res/android"
>
<LinearLayout
android:id="@+id/widget31"
android:layout_width="wrap_content"
android:layout_height="wrap_content"
>
<TextView
android:id="@+id/widget32"
android:layout_width="wrap_content"
android:layout_height="wrap_content"
android:text="from parent :"
>
</TextView>
<TextView
android:id="@+id/widget33"
android:layout_width="wrap_content"
android:layout_height="wrap_content"
android:text=""
>
</TextView>
</LinearLayout>
<LinearLayout
android:id="@+id/widget34"
android:layout_width="fill_parent"
android:layout_height="wrap_content"
>
<TextView
android:id="@+id/widget35"
android:layout_width="wrap_content"
android:layout_height="wrap_content"
android:text="input text : "
>
</TextView>
<EditText
android:id="@+id/widget36"
android:layout_width="fill_parent"
android:layout_height="wrap_content"
android:text="EditText"
android:textSize="18sp"
>
</EditText>
</LinearLayout>
<Button
android:id="@+id/widget37"
android:layout_width="wrap_content"
android:layout_height="wrap_content"
android:text="return to parent"
>
</Button>
</LinearLayout>
Code of child activity
The boot code of child activity is same as parent activity.
code.py
Step 1:
The first step of python code is to get service group object and service object created by java code, which is the same as parent activity. Python uses global namespace, which should be pay special attention. If we use same variable name as parent activity, it will replace the variable in parent, which may cause error.
SrvGroup = libstarpy._GetSrvGroup()
Service = SrvGroup._GetService("","")
ChildStarActivity = Service.ActivityClass.getCurrent(); Step 2:
First, we get start intent, which is set by parent. Then, obtains text view defined in the layout file, and show string of the intent in the text view. Gets button widget, set it’s onClick event listener. When the event is triggered, we build result intent for parent and call finish function to end the child activity.
child_intent = ChildStarActivity.getIntent();
ChildText = ChildStarActivity.findViewById("TextViewClass",ChildStarActivity.getResource("id/widget33"));
ChildText.setText(child_intent.getStringExtra("value"))
ChildText.setTextColor(0xFFFF0000)
childEdit = ChildStarActivity.findViewById("EditTextClass",ChildStarActivity.getResource("id/widget36"));
childButton = ChildStarActivity.findViewById("ButtonClass",ChildStarActivity.getResource("id/widget37"));
def childButton_onClick(self, Ev) :
MyIntent = Service.IntentClass._New();
MyIntent.putStringExtra("value",childEdit.getText());
ChildStarActivity.setResult1(0,MyIntent);
MyIntent._Free();
ChildStarActivity.finish();
return;
childButton.onClick = childButton_onClick;
childButton.setOnClickListener();
We also should capture “BACK” key event. When the key is pressed, we also end the activity.
def ChildStarActivity_onKeyDown(self,keyCode,event) :
if( keyCode == Service.AndroidConstantClass.getInt("KeyEvent","KEYCODE_BACK") ) :
MyIntent = Service.IntentClass._New();
MyIntent.putStringExtra("value","press key back");
ChildStarActivity.setResult1(0,MyIntent);
MyIntent._Free();
ChildStarActivity.finish();
return True,True;
ChildStarActivity.onKeyDown = ChildStarActivity_onKeyDown Screenshot
Parent Activity

Child Activity

