Introduction
Sometimes we use the <IFrame> tag to design the frame page. However, the data exchange between each page will become very difficult to handle. Or, once the structure of frame changes to a normal page, a lot of work needs to be carried out.
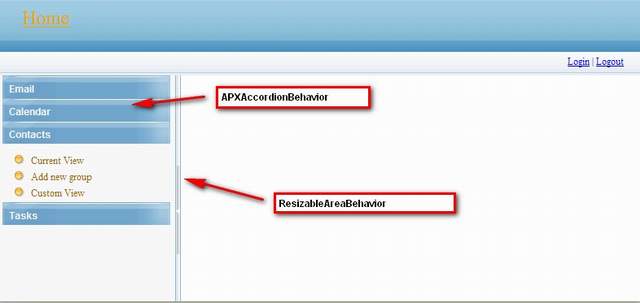
Sure I developed an Ajax control to simulate <IFrame>. It works like the Microsoft MSDN Library site.
Introducing the PartialHyperLink Control
APXExt library includes two Ajax controls:
ResizableArea - simulates IFrame Accordion - allows you to provide multiple panes and display them one at a time
APXExt depends on Microsoft System.Web.Externsions.dll and APEnnead.net free version Symber.Web.dll.
If needed, you can download for free:
Using the Code
To use the control, simply reference the "Symber.Web.APX.dll" file into your web project.
Next, register the control on each .ASPX page you want to use it on, by writing the following line at the top of the page:
<%@ Register TagPrefix="apX" Namespace="Symber.Web.APX" Assembly="Symber.Web.APX" %>
Using APXResizableAreaBehavior, you can create the following code:
<asp:Panel ID="ra" runat="server" CssClass="resizableArea">
  <asp:Panel ID="raLeft" runat="server" CssClass="leftSection">
  </asp:Panel>
  <asp:Panel ID="raSplitter" runat="server" CssClass="splitter">
	<div class="grippy"></div></asp:Panel>
  <asp:Panel ID="raRight" runat="server" CssClass="rightSection">
  </asp:Panel>
  <apx:APXResizableAreaBehavior id="raBehavior" runat="server"
    TargetControlID="ra"
    LeftID="raLeft"
    RightID="raRight"
    SplitterID="raSplitter"
    CookiePath="/" />
</asp:Panel>
Using APXAccordionBehavior, you can create the following code:
<apX:APXAccordion ID="accordion" runat="server"
     SelectedIndex="1"
     CookieEnabled="true"
     HeaderCssClass="accordionHeader"
     HeaderSelectedCssClass="accordionHeaderSelected"
     ContentCssClass="accordionContent"
     FadeTransitions="false"
     FramesPerSecond="40"
     TransitionDuration="250"
     AutoSize="None"
     RequireOpenedPane="false"
     SuppressHeaderPostbacks="true"
     CookiePath="/"
     CookieEnabed="true">
  <Panes>
    <apX:APXAccordionPane ID="accordionPane1" runat="server">
      <Header><div class="inner">
	<a href="" class="accordionLink">Title1</a></div></Header>
      <Content>Content1</Content>
    </apX:APXAccordionPane>
    <apX:APXAccordionPane ID="accordionPane2" runat="server">
      <Header><div class="inner">
	<a href="" class="accordionLink">Title2</a></div></Header>
      <Content>Content2</Content>
    </apX:APXAccordionPane>
  </Panes>
</apX:APXAccordion>
That's all!
I've included a small example project to demonstrate how to use the control.
More
Next, we can use the APEnnead.net virtual_page and page_layout techniques to achieve each page. The following content is all based on APEnnead.net Free Version. About How to create APEnnead.net project, you can read "/Toturials/Create apennead application.htm" in the sample code.
Step 1 - Create Four .ascx Controls
Modules/Feature.ascx
Modules/Msdn.ascx
Modules/Email/Fly.ascx
Modules/Email/Overview.ascx
Step 2 - Add Modules Information into web.config
<APSchema>
  <Modules>
    <add uri="url:~/Modules/Msdn.ascx" name="Msdn Library"/>
    <add uri="url:~/Modules/Feature.ascx" name="Feature Spotlight"/>
    <Page name="email*">
      <add uri="url:~/Modules/Email/Fly.ascx" name="System Requirements"/>
      <add uri="url:~/Modules/Email/Overview.ascx" name="Overview"/>
    </Page>
  </Modules>
</APSchema>
Step 3 - Settings UrlRemapping in web.config.strong
<APSchema>
  <add url="^~/(\w+)/(\w+)/(\w+).aspx?$"
	mappedUrl="~/Default.aspx?c=$1&f=$2&a=$3" isRegularExpress="true"/>
</APSchema>
Step 4 - Layout Every Page
Run application. Click "login" LinkButton to login application with "designer" user.
And right click on the browser pages, show context menu to layout pages.

We show you the layout of the "home page" as follows:

And show you the layout of "~/Email/Inbox/Default.aspx" as follows:

Notes
I have included my SqlServer .mdf file of this demo in source code. You can use an additional database.
Or you read "/Totutials/Create apennead.net application.htm" to learn How to create and deploy APEnnead.net project.
History
- 8th November, 2009: Initial post
