Introduction
This article deals with Windows Azure Cloud Storage. I was looking for a simple way to demonstrate the storage fundamentals of Windows Azure. That's when the idea of a simple command line tool to exchange data with Azure Storage struck me. Another benefit we can have with a command line tool is we can write a simple batch file, or a Windows 7 PowerShell script, which would invoke this tool to periodically take the backup of important files to Windows Azure Cloud Storage.

Background
This is my second article in the series of articles related to Windows Azure - A cloud computing initiative of Microsoft. You may want to read the first article Hello Windows Azure before proceeding here.
Windows Azure Storage
Windows Azure Storage provides mainly three types of storage:
- Blob - For storage of files/information chunks/large data buffers (Blob = Binary Large Object).
- Tables - Massive, scalable, structured storage.
- Queues - For FIFO storage/dispatch mechanism/asynchronous communications.
We are going to have a more detailed look at Blob Storage which provides a way to store files and can be used as backup storage for important files. To access it, you need a storage service account with Windows Azure, which you can sign up at www.azure.com. APIs to access storage service are RESTful, and work over HTTP/S. Blob storage is organised into containers which act as folders to hold files and can have either public or private accessibility. Information in public containers can be accessed via URIs like http://[account].blob.core.windows.net/[container]/[file]. For example: http://bhavik.blob.core.windows.net/mycontainer/test.txt. Apart from blob, other metadata related to blob can be stored as key:value pairs. The image below shows the organisation of blob.

* Image courtesy http://blogs.msdn.com.
Blobber Code
The code is compact, simple, and self-explanatory. All we need to understand is some simple concepts of command line argument parsing and Application Config settings in C#. To access Azure storage, it uses StorageClient.dll provided in the samples of the Azure SDK. Typically, you may find it at "C:\Program Files\Windows Azure SDK\v1.0\samples.zip\StorageClient". The StorageClient.dll wraps the Azure Storage API as described in MSDN.
The following code blocks simply demonstrate upload and download of data from Blob:
try
{
StorageAccountInfo StorageAcc = new StorageAccountInfo(
AccessUri,
null,
(String)ConfigurationSettings.AppSettings["AccountName"],
(String)ConfigurationSettings.AppSettings["AccountSharedKey"]);
BlobStorage blobStorage = BlobStorage.Create(StorageAcc);
BlobContainer blobContainer = null;
blobContainer = blobStorage.GetBlobContainer(
ConfigurationSettings.AppSettings["ContainerName"]);
if (false == blobContainer.DoesContainerExist())
{
blobContainer.CreateContainer(new NameValueCollection(),
ContainerAccessControl.Private);
}
NameValueCollection metadata = new NameValueCollection();
metadata["FileName"] = File;
metadata["Submitter"] = "Blobber";
BlobProperties properties = new BlobProperties(File);
properties.Metadata = metadata;
properties.ContentType = MimeType(File);
byte [] FileContents = System.IO.File.ReadAllBytes(FileName);
BlobContents fileBlob = new BlobContents(FileContents);
blobContainer.CreateBlob(properties, fileBlob, true);
}
catch (Exception e)
{
Console.WriteLine(e.Message.ToString());
bRetval = false;
}
try
{
StorageAccountInfo StorageAcc = new StorageAccountInfo(
AccessUri,
null,
(String)ConfigurationSettings.AppSettings["AccountName"],
(String)ConfigurationSettings.AppSettings["AccountSharedKey"]);
BlobStorage blobStorage = BlobStorage.Create(StorageAcc);
BlobContainer blobContainer = null;
blobContainer = blobStorage.GetBlobContainer(
ConfigurationSettings.AppSettings["ContainerName"]);
FileStream fs = File.Create(FileName);
BlobContents fileBlob = new BlobContents(fs);
BlobProperties propBlob;
propBlob = blobContainer.GetBlob(sFile, fileBlob, true);
}
catch(Exception e)
{
Console.WriteLine(e.Message);
bRetval = false;
}
Blobber Usage
The usage of Blobber is pretty simple. We need to set the default account name, access key, and container name in blobber.config, which is the application config file. The sample configuration XML can be downloaded here - Blobber.exe.config.
="1.0"="utf-8"
<configuration>
<appSettings>
<add key="AccountName" value="devstoreaccount1"/>
<add key="AccountSharedKey" value="Eby8vdM02xNOcqFlqUwJPLlmEtlCDXJ1OUzFT50uSRZ6IFsuFq2UVErCz4I6tq/K1SZFPTOtr/KBHBeksoGMGw=="/>
<add key="BlobStorageEndpoint" value="http://127.0.0.1:10000/"/>
<add key="ContainerName" value="mycontainer"/>
</appSettings>
</configuration>
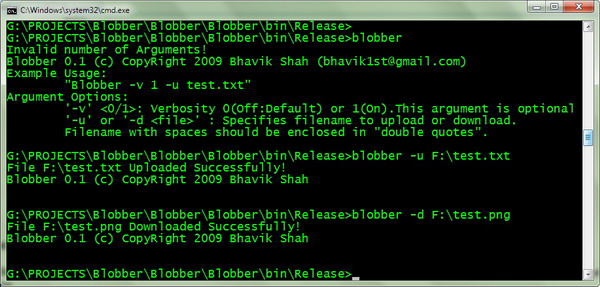
Once set, we may simply use Blobber from the command line. Example usage:
Blobber -u test.txt
Argument options:
- '-u' or '-d <file>': Specifies the filename to upload or download. Filename with spaces should be enclosed in "double quotes".
- '-v' <0/1>: Verbosity 0 (Off: Default) or 1 (On). This argument is optional, and should be first if used.
Sample output:

History
- 21-Nov-2009: Did not get much time since last article. Finally found a Saturday to upload v0.1.
