Introduction
This article will demonstrate how to build an application for Softbank mobile phones (S!Application) using J2ME. It assumes no prior development experience and should be relatively easy to follow even for beginners.
Development Environment Setup
- Download and install a Java SE Development Kit (version 1.4.2 or above)
- Download and install Eclipse (Classic)
- Download and install the MEXA SDK*
- Download and install the MEXA SDK Eclipse Plugin*
* Can be downloaded from the S!Application Development Tools page of the Softbank Mobile Creation site (free registration required, site in Japanese only.)
Creating the Project
- Create an empty MEXA project in Eclipse:
Select “File” -> “New” -> “Other” -> “MEXA” -> “MEXA Project”
Enter your project name and press “Next.” On the second panel, set the executable path to the MEXA Emulator directory and the build class path to the MEXA library:
Executable path: \Program Files\SOFTBANK_MEXA_EMULATOR23
Build class path: \Program Files\SOFTBANK_MEXA_EMULATOR23\lib\stubclasses.zip
Click “Finish” once completed.
- Create a new
MIDlet class:
Right-click on the project’s “src” folder and select “New” -> “Class”
Enter a class name in the “Name” field, enter “javax.microedition.midlet.MIDlet” for the “Superclass,” and click “Finish.”
- Configure the jad file:
Double-click on the project’s “.jad” file and fill out the MIDlet name and vendor fields. Check the “use” check box next to your new class and add an application name.
Adding Source Code
- Add the two following lines to the top of your source file:
import javax.microedition.lcdui.Display;
import javax.microedition.lcdui.Form;
- Add the following code to the
startApp function:
Form form = new Form("");
form.append("Hello World");
Display.getDisplay(this).setCurrent(form);
Running the Application in the Emulator
- Configure MEXA emulation settings for your project:
Right-click on your top project folder and select “Properties”.
In the “MEXA Emulation Settings” window, set the MEXA Emulator project path to the “.jar” file created by your current project. You can find this path by right-clicking on the jar file in the Eclipse project window and checking the location label.
- Create a new run configuration:
Select “Run” -> “Run Configurations”.
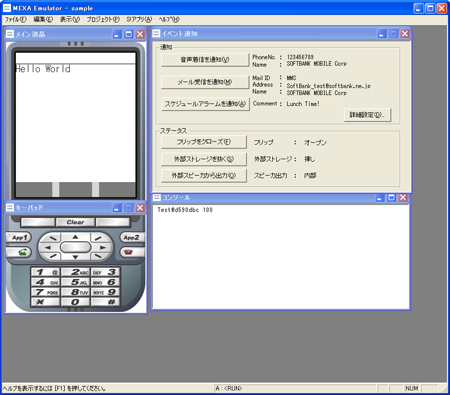
Double-click on “MEXA Emulator - MEXA” and select your current project in the settings window. Click “Apply” and then “Run” to launch your application in the emulator.
History
- 22 November 2009 - Initial version
