Introduction
Google Earth is possibly the best visualisation tool available for GIS data. The only problem is that you have to get the GIS data into Google Earth's Keyhole Markup Language (KML) in order for Google Earth to be able to display it for you.
ESRI Shape files are commonly used to represent GIS data and there are many tools available for visualising them, one of the most popular Open Source tools being Mapwindow. However, Mapwindow currently doesn't have a built-in Google Earth Keyhole Markup Language (KML) export option, although there are Paid for Plugins available.
Luckily, Google has made creating KML very straightforward and so it is relatively easy to write a simple set of functions (using the MapWinGIS class) to convert Polygon Shapefiles to KML.
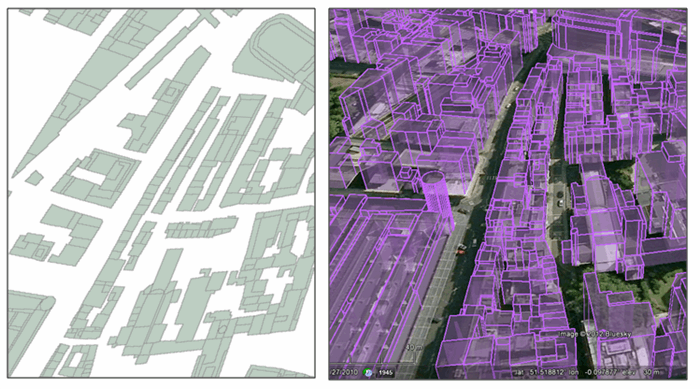
Just to illustrate the difference between looking at Shapefile data in MapWindow and GoogleEarth, compare the two screen extracts below. The left hand one shows the Shapefile viewed in MapWindow, whilst the right hand one shows the same data overlaid in Google Earth. In this example the data shows buildings in central London.

Using the Code
There are 13 Shape types in the ESRI standard (excluding the NullShape) but the code in this example only handles Polygons. However, as these are the most common Shape type used, this is not such a big limitation. The code can be easily extended, to support other Shape types, by adding the relevant functions to the Case Statement below. Currently any non Polygon shapes will be skipped cleanly and a note will appear in the Visual Studio debug console to tell the user.
Dim ShapeIndex As Integer, ConvertedShapeCount As Integer
For ShapeIndex = 0 To SF.NumShapes - 1
Select Case SF.Shape(ShapeIndex).ShapeType
Case ShpfileType.SHP_POLYGON
Call AddPolygonKML(SF.Shape(ShapeIndex), KMLFile, CStr(ShapeIndex))
ConvertedShapeCount = ConvertedShapeCount + 1
Case Else
Debug.Print("Shape # " & ShapeIndex & " of type " & SF.Shape(ShapeIndex).ShapeType & " not supported yet.")
End Select
Next ShapeIndex
Creating a Polygon in KML
KML has a Polygon function, so to convert a Shape into KML, you just need to read out the points from the Shape and apply the appropriate KML syntax to them.
A Polygon defined in KML looks like this:
<Polygon>
    <extrude>1</extrude>
    <altitudeMode>relativeToGround</altitudeMode>
    <outerBoundaryIs>
       <LinearRing>
          <coordinates>
             -0.10615258,51.51241061,26.0
             -0.10617222,51.51241083,26.0
             -0.10617112,51.51248367,26.0
             -0.10599687,51.51248266,26.0
             -0.10599709,51.51247534,26.0
             -0.10599741,51.51246417,26.0
             -0.10606998,51.51246500,26.0
             -0.10615098,51.51246545,26.0
             -0.10615258,51.51241061,26.0
          </coordinates>
       </LinearRing>
    </outerBoundaryIs>
 </Polygon>
The coordinates are defined as tuples with Longitude (degrees), Latitude (degrees) and Height (metres). The height can be relative to Ground, Sea, Seabed etc. This is defined by the Altitude Mode, so make sure you use the appropriate altitude mode for your height data!
<altitudeMode>relativeToGround</altitudeMode>
Putting this all together, a simple function to convert from a Shape Polygon to a KML Polygon is shown below. This function ignores the fact that Polygons may have more than one part and so multi-part polygons may not display correctly. NB I'll probably add this functionality at a later date.
Private Sub AddPolygonKML(ByRef Shape As MapWinGIS.Shape, _
ByRef oWrite As System.IO.StreamWriter, _
ByVal ShapeID As String)
Dim LatDeg As Double
Dim LonDeg As Double
Dim Height As Double
oWrite.WriteLine(" <Placemark>")
oWrite.WriteLine(" <name>Shape " & ShapeID & "</name>")
oWrite.WriteLine(" <styleUrl>Shape Style</styleUrl>")
oWrite.WriteLine(" <Polygon>")
oWrite.WriteLine(" <extrude>1</extrude>")
oWrite.WriteLine(" <altitudeMode>relativeToGround</altitudeMode>")
oWrite.WriteLine(" <outerBoundaryIs>")
oWrite.WriteLine(" <LinearRing>")
oWrite.WriteLine(" <coordinates>")
Dim PointIndex As Integer
For PointIndex = 0 To Shape.numPoints - 1
LonDeg = Shape.Point(PointIndex).x
LatDeg = Shape.Point(PointIndex).y
Height = Shape.Point(PointIndex).Z
oWrite.Write(" ")
oWrite.Write(FormatNumber(LonDeg, 8) & ",")
oWrite.Write(FormatNumber(LatDeg, 8) & ",")
oWrite.Write(FormatNumber(Height, 1) & " ")
oWrite.WriteLine()
Next PointIndex
oWrite.WriteLine(" </coordinates>")
oWrite.WriteLine(" </LinearRing>")
oWrite.WriteLine(" </outerBoundaryIs>")
oWrite.WriteLine(" </Polygon>")
oWrite.WriteLine(" </Placemark>")
End Sub
Using the Source Code
The Source Code contains a standalone set of functions which will take a Shapefile and convert it to a KML file. The main function header is shown below:
Public Sub ConvertShapeFileToKML(ByVal ShapeFileName As String, _
                                 ByVal KMLFileName As String)
Points of Interest
The best tip I can give for writing KML is to remember that when listing coordinates, do not have any spaces around the commas between Longitude, Latitude and Height, otherwise GE assumes they are separate coordinates and you will spend ages trying to figure out why the KML isn't working so:
<coordinates>-1.1,-2.2,100</coordinates>      'works fine
<coordinates>-1.1, -2.2, 100</coordinates>    'will not work as expected!
History
Version 1.0, 4th September 2012
