Introduction
Sockets are getting more and more used nowadays. They provide a simple way to exchange data over the network. It's used, as an example, to exchange messages between users. You can go further more to transfer files and play "distributed" games and communicate multiple programs. Thanks to its powerful features, sockets are becoming a must to learn technology for developers.
As sockets are based on client/server architecture, this application is composed of a server and a client. The server will reserve a port number. Then it will listen to any upcoming client. The client then will attempt to connect to the server. When the connection succeeds, it will be possible to exchange text messages. When finished, the connection will be closed.
Using the code
To use sockets in .NET applications, we have to add the following using statements:
using System.Net;
using System.Net.Sockets;
Now we can create a socket object:
Socket sListener;
Programming the server
Let's create a click event that will enable the created socket to set its IpEndPoint and the protocol type.
But before that, a socket needs permission to work, because it will use a closed port number. A window will appear demanding permission to allow sending data.
permission = new SocketPermission(NetworkAccess.Accept,
                   TransportType.Tcp, "", SocketPermission.AllPorts);
As sockets use a network to transmit data, it uses protocols. The most known in this context are UDP which is fast but not reliable, and TCP which is reliable but not fast. Reliability is recommended when sending messages. That's why I use TCP.
sListener = new Socket(ipAddr.AddressFamily, SocketType.Stream, ProtocolType.Tcp);
The socket needs to have an address. It's of type IpEndPoint. Each socket is identified through the IP address, which is useful to locate the host's machine, and the port number to identify which program is using the socket inside the machine.
IPHostEntry ipHost = Dns.GetHostEntry("");
IPAddress ipAddr = ipHost.AddressList[0];
ipEndPoint = new IPEndPoint(ipAddr, 4510);
Now we will associate our socket with the IpEndPoint:
sListener.Bind(ipEndPoint);
So that our socket is ready to use, let's start listening on the chosen port number (4510). You can choose another port number. But the client has to be aware about that. Listening will be handled through this button's event:
Place a socket in a listening state and specify how many client sockets could connect to it:
sListener.Listen(10);
The server will begin an asynchronous operation to accept an attempt. One of the powerful features of sockets is the use of the asynchronous programming model. Thanks to it, our program can continue running while the socket is performing actions.
AsyncCallback aCallback = new AsyncCallback(AcceptCallback);
sListener.BeginAccept(aCallback, sListener);
If there is any attempt from the client to connect, the following code will be executed:
Socket listener = (Socket)ar.AsyncState;
Socket handler  = listener.EndAccept(ar);
To begin to asynchronously receive data, we need an array of type Byte for the received data, the zero-based position in the buffer, and the number of bytes to receive.
handler.BeginReceive(buffer, 0, buffer.Length,
          SocketFlags.None, new AsyncCallback(ReceiveCallback), obj);
If the client sends any message, the server will try to get it. As sockets send data in binary type, converting them to string type is necessary. It's good to know also that the server, and even the client, don't know anything about the length of the message or the time needed for listening to all of it. That's why we use a special string "<Client Quit>" to put in the end of the message to tell that the text message ends there. To receive data, BeginReceive is called:
byte[] buffernew = new byte[1024];
obj[0] = buffernew;
obj[1] = handler;
handler.BeginReceive(buffernew, 0, buffernew.Length,
        SocketFlags.None, new AsyncCallback(ReceiveCallback), obj);
After receiving the client's messages, the server may want to reply. But it has to convert the string message in str to bytes data, because sockets manipulate bytes only.
byte[] byteData = Encoding.Unicode.GetBytes(str);
The server now will send data asynchronously to the connected socket:
handler.BeginSend(byteData, 0, byteData.Length, 0, new AsyncCallback(SendCallback), handler);
When using the asynchronous programming model to build this sample, there's no risk of application or interface blocking. It will seem like we are using multiple threads.
After writing code, you want to handle the different methods through a user interface. So you may have a UI like this:

Programming the client
The client will try to connect to the server. But it has to know its address.
After creating a SocketPermission for socket access restrictions and creating a socket with a matching IpEndPoint, we have to establish a connection to the remote server host:
senderSock.Connect(ipEndPoint);
We have to note here that the created IpEndPoint will not be used to identify the client. But it'll be used to identify the server socket.
To send messages, the client adds "<Client Quit>" to mark the end of message and must transform the text message to binary format, as the server did. After that, the socket will send the message by invoking the method Send which will take the binary message as a parameter.
byte[] msg = Encoding.Unicode.GetBytes(theMessageToSend + "<Client Quit>");
int bytesSend = senderSock.Send(msg);
For receiving data from the server, it converts the byte array to string and continues to read the data till data isn't available:
String theMessageToReceive = Encoding.Unicode.GetString(bytes, 0, bytesRec);
while (senderSock.Available > 0)
{
  bytesRec = senderSock.Receive(bytes);
  theMessageToReceive += Encoding.Unicode.GetString(bytes, 0, bytesRec);
}
To close the connection, we should use Socket.Shutdown(SocketShutdown.Both) and Socket.Close().
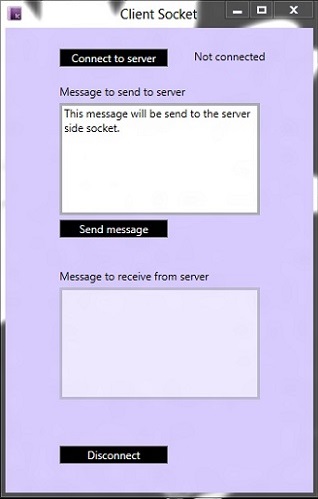
After matching events with button's click, the client side user interface will look like this:

Conclusion
I provided here an application that is a sample to use and easy to integrate in your projects. So give yourself a chance to try taking benefit of socket's features to build a more rich and powerful software.
